Posts tagged “Happy Birthday” (Page 2)

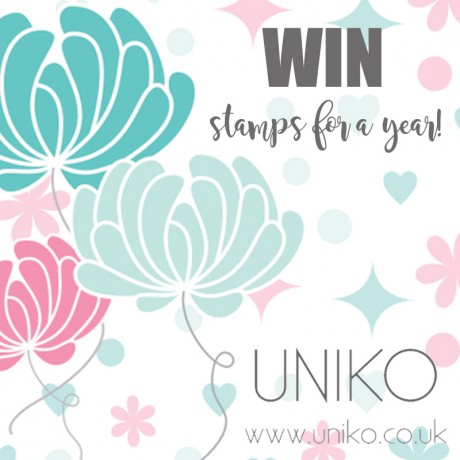
April / May 2019 Reveal, Design Team Blog Hop & GIVEAWAY!

Hey!

Finally the day has arrived and the April / May 2019 Reveal, Blog Hop & GIVEAWAY is here! The Release will be available to purchase HERE at a NEW time of 9pm GMT tonight.

Hopefully you have hopped on over from HERE, where I have formally introduced the 4 new Clear Stamp Set designs, 2 coordinating Designer Die collections AND 1 Stencil Design being released.

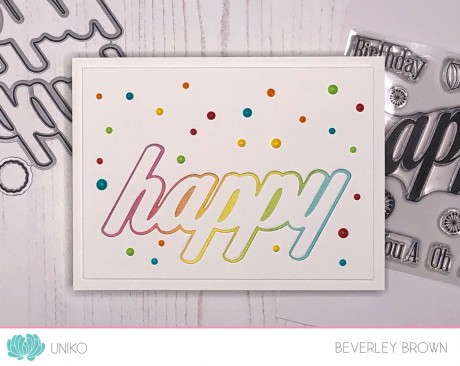
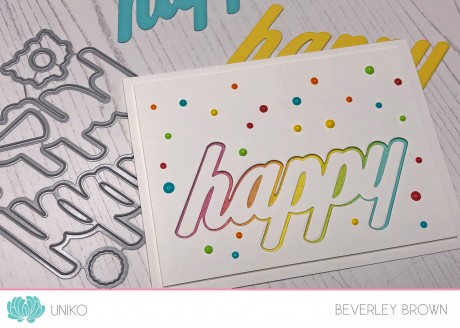
I’ve made a couple more cards using the new products, not as many as I had hoped to make, but I do feel I am getting back into the creative groove again…

MayRD1

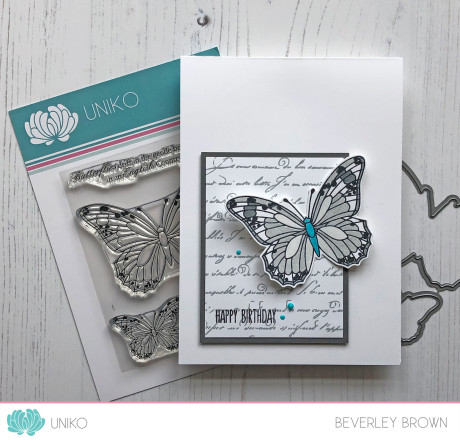
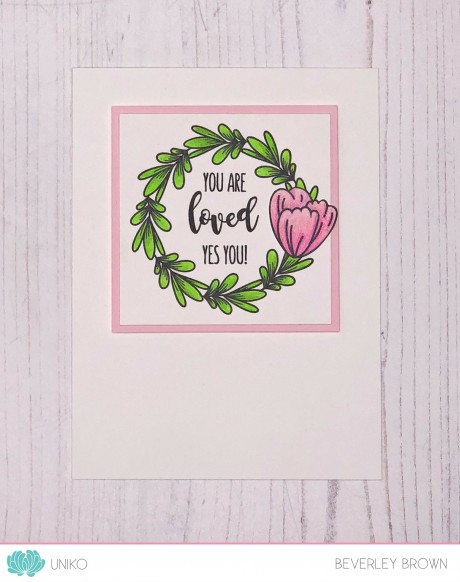
My first card uses the Designer Dies English Country Garden Butterflies. I’ve been wanting to pair the butterfly with the Large French Script Background for ages and it seemed the perfect time now I had the dies to match. They give such a love clean cut edge compared to fussy cutting!

MayRD1a

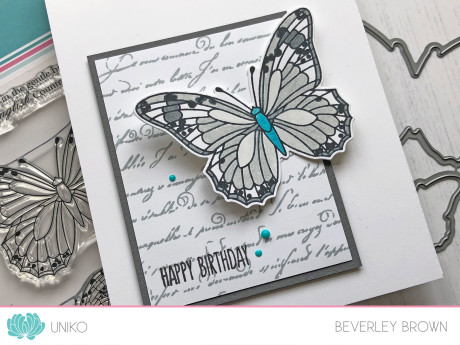
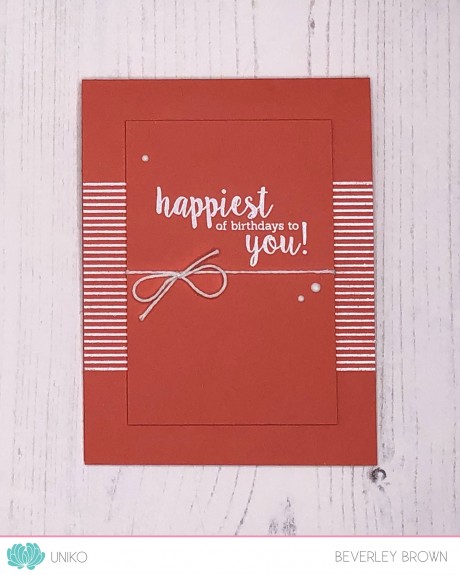
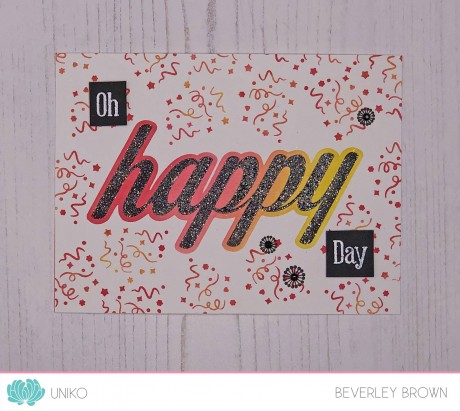
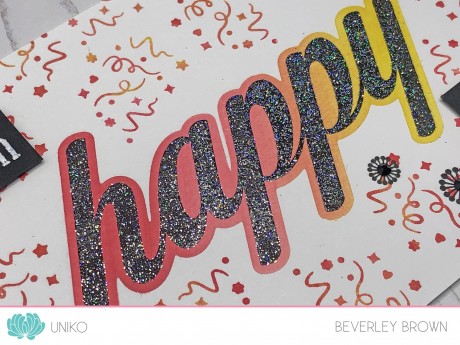
I still have a thing for shades of grey! Hence my colour scheme, though I did add in a little hint of aqua for the butterfly body and some Nuvo Drop detail. The Happy Birthday sentiment is from Birthday Sentiments, which is now back in stock.

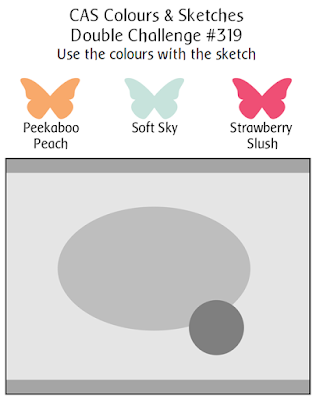
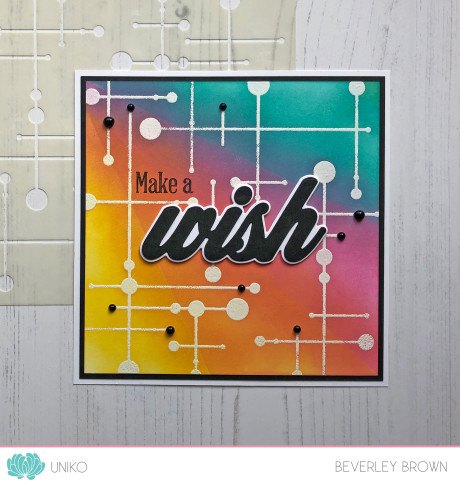
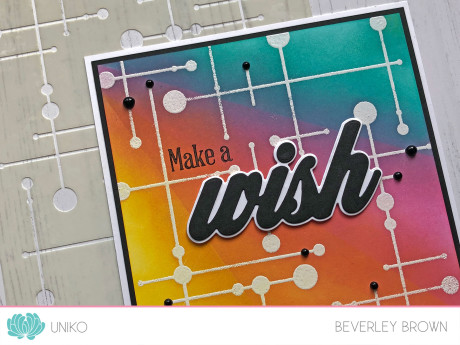
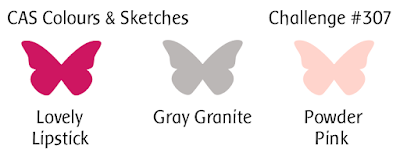
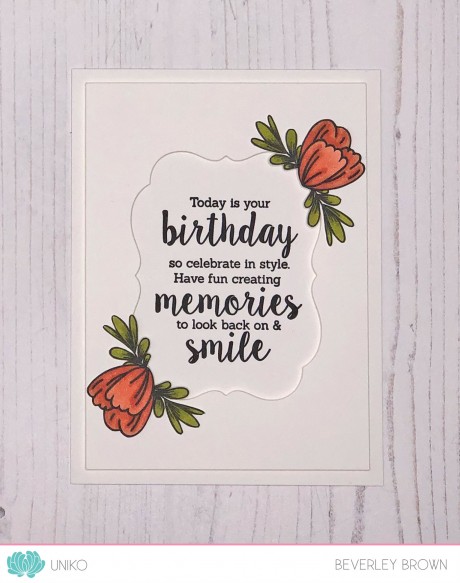
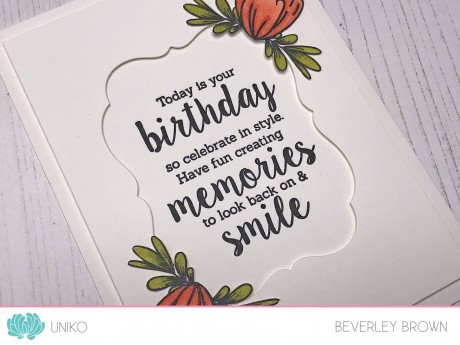
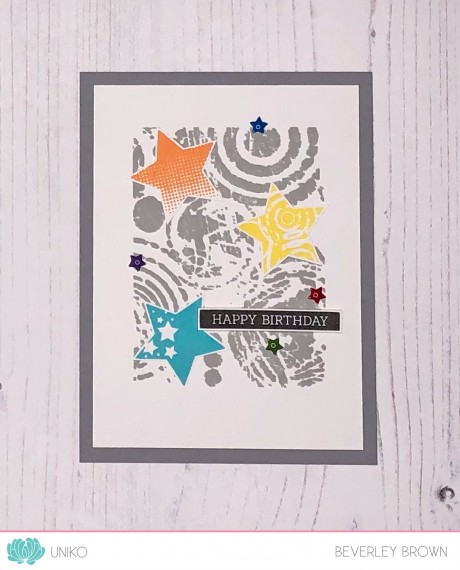
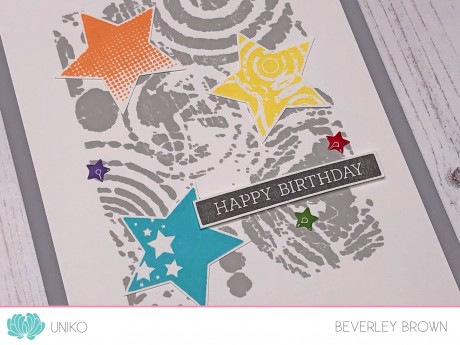
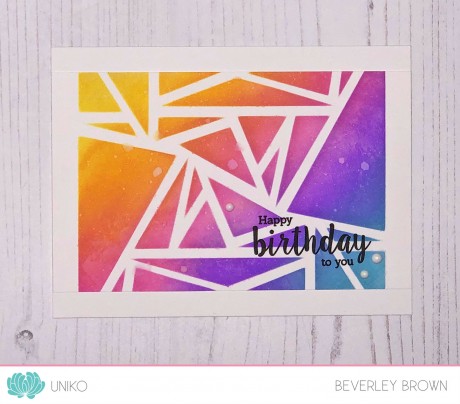
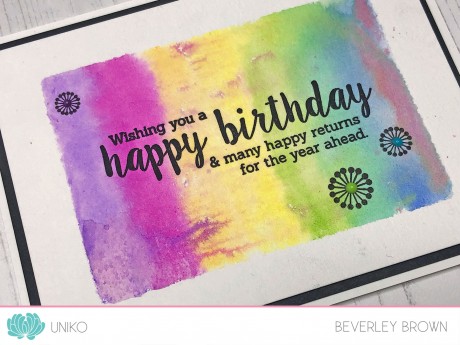
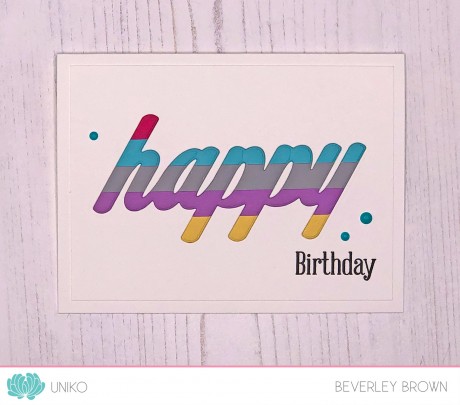
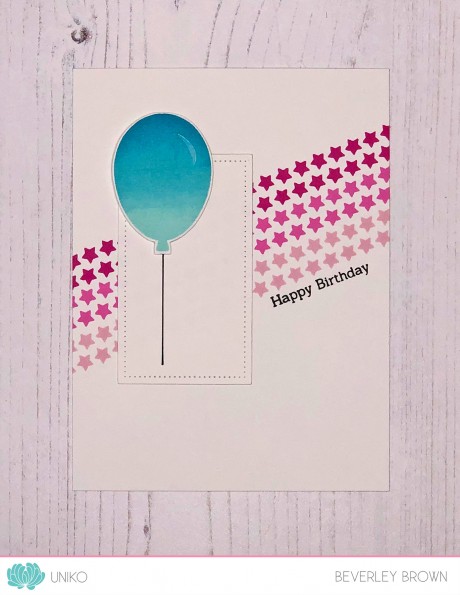
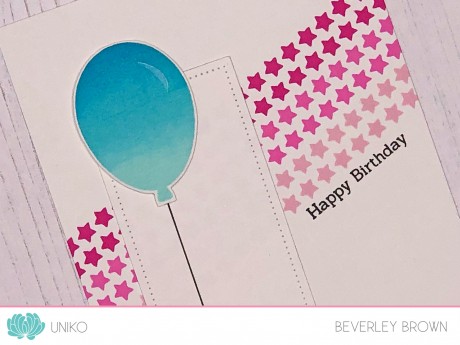
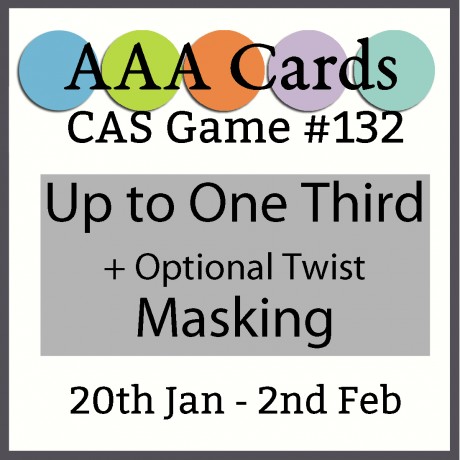
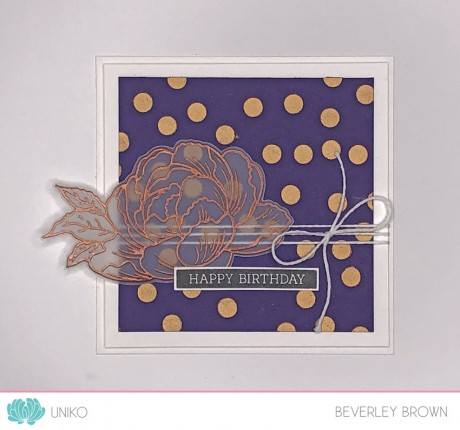
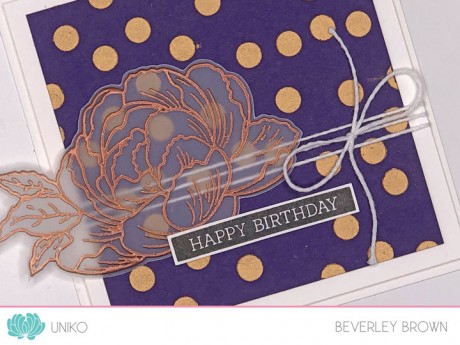
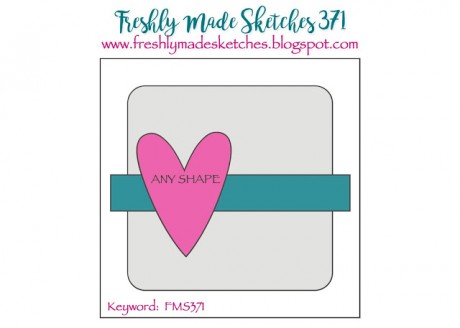
My last card today was inspired by a couple of things. Firstly the Double Challenge over at CAS Colours & Sketches seen HERE and below.

double 319

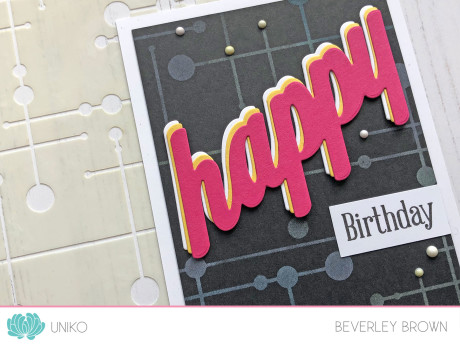
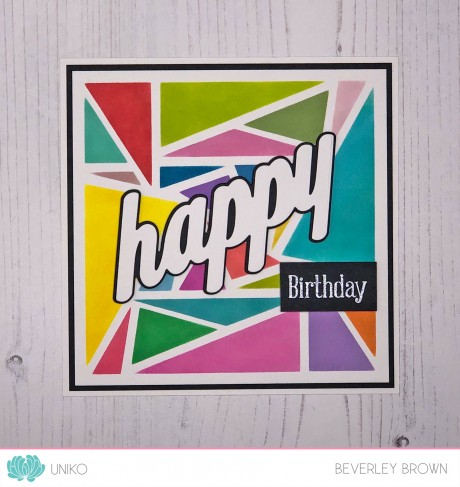
And secondly by Jenny’s card HERE our Guest Designer for this release. I just loved how Jenny thought to cut up the Background Block Mid Century Modern II. So I did the same, this time using it for the top and bottom border in the sketch.

MayRD2

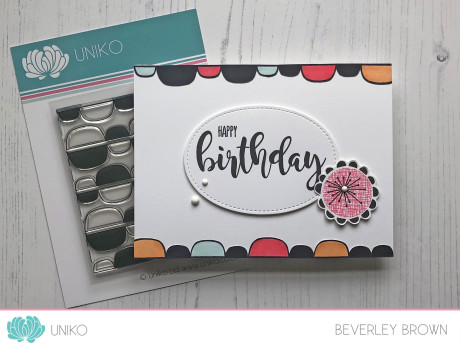
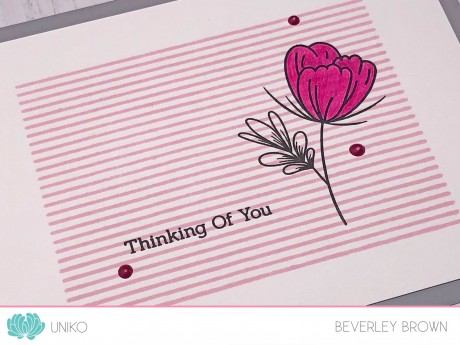
I simply stamped the Background Block Mid Century Modern II in black and coloured the outline sections with the closest colours to the challenge as I had. I then got to fussy cutting the sections out and adhered them to my card base using some new Gina K Connect Glue – LOVE! Thanks for the recommendation Lynda 😉

MayRD2a

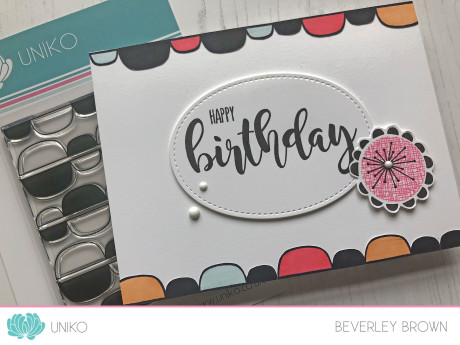
The sentiment is another from Birthday Sentiments and I’ve accented it with a flower from Mid Century Modern Florals and some of my favourite Gloss White Nuvo Drops!

That’s all from me today, but as usual we have our traditional Design Team Blog Hop & Giveaway. To be in the chance of winning The ENTIRE April / May 2019 Release! (4 clear stamp sets, 2 previously released clear stamp sets, 2 co-ordinating designer die collections & 1 stencil design).

Simply comment along the blog hop, it’s as easy as that! You have until Midnight Sunday 12th May 2019. Winner will be announced a few days after.

Happy Hopping!

Hugs

Introducing… Stencil Mid Century Modern

Hey!

Welcome to Day 3 of the April / May 2019 Release product introductions. If you missed Day 1 and 2, you can catch up HERE and HERE, they’re not to be missed 😉

Today we are heading back to the Mid Century Modern era to introduce a new Stencil, Mid Century Modern. This stencil is a  much larger scale compared to the Background Block Mid Century Modern  we introduced on day 1 and it is great for all occasions and projects.

I’ve two cards to share with you today using this new stencil and I have gone for some fun clean lined, graphic, almost futuristic and more masculine styled cards…

IntroMCMstnecil2

As the stencil is my usual 6 x 6 inches in size I opted to make a 14 cm square card for my first card. This size card is a perfect fit for the stencils.

IntroMCMstencil1

I started by inking through the stencil with VersaMark ink onto a white card panel and heat embossed with WOW Opaque White EP. I then used Distress Oxides in my favourite colours and blended over the top.

IntroMCMstencil1a

I’ve finished the card off with tomorrows product introduction, BIG & BOLD Wish Designer Dies 🙂 and also some Ebony Black Nuvo Drops.

For my next card I decided to use my Oxides through the stencil onto some black card stock…

IntroMCMstencil3

I used the same colours as my first card, but they haven’t shown up as bright as I was expecting. That might be because I was lazy and didn’t clean my stencil from the VersaMark on my first card 🙁 I still like the result though!

IntroMCMstencil3a

This time I have finished the card off with the BIG & BOLD Happy Designer Dies and a sentiment from the coordinating clear stamp set. Oh, and some Gloss White Nuvo Drops 😉

It wouldn’t be a release without a daily blog hop full of inspiration! As usual my AWESOME Design Team and our Guest Designer this month have worked their magic with todays products, so be sure to hop along & see them…

Sarah P

Wiebke 

WOW!

That was so much fun! I hope you enjoyed it and you will join us again tomorrow for the last of the product introduction and LOTS more inspiration 🙂

Hugs

7th Birthday February 2019 Reveal, Blog Hop & Giveaway Treasure Hunt!

Happy Birthday Uniko & Woohoo!

Finally the day has arrived and the 7th Birthday February 2019 Reveal, Blog Hop & GIVEAWAY is here! The Release will be available to purchase HERE at a NEW time of 9pm GMT tonight.

Hopefully you have hopped on over from HERE, where I have shared a look at all the products & their prices! Did you see this though…?

This little gem is a Release Day FREEBIE Clear Stamp Set, we introduced it in the blog hop yesterday HERE.

This clear stamp set will be automatically added to release day orders of £25 or more up until Sunday 17th Feb 9pm GMT or while stock lasts.

After 9pm GMT Sunday 17th February, if there is stock remaining it will be made available for purchase at £5.

As it is our 7th Birthday Blog Hop I wanted to add a little more FUN to the blog hop and I have incorporated a Treasure Hunt!

Hidden in photos along the blog hop are these letter balloon icons.

The ‘Rules’ of The Treasure Hunt are simple…

1. Comment along the Blog Hop & find the icons

2. Email bev@uniko.co.uk with the following information

– Design Team Members Name & Balloon Letter Found

– What the Balloons spell out

Entries need to be emailed no later than Thursday 28th February 2019, for the winner to be announced Friday 1st March 2019 (winner will be randomly chosen from all the correct entries).

Prize…

The ENTIRE 7th Birthday February Release! (6 clear stamp sets, 2 co-ordinating designer die collections & 1 stencil design).

PLUS… I will still randomly select another winner! Be sure to comment along the hop for your chance to win ALL SIX Clear Stamp Sets!! You have until Midnight (GMT) Thursday 28th February 2019 to comment and the winner will be announced with ALL the 7th Birthday February 2019 Winners.

Okay, so now I have mentioned all the ‘formal’ stuff! How about a couple more cards using the new release…

Feb19RD1

First up I decided to go for a more feminine card & opted to use Pantone’s colour of the year. I am partial to a bit of Coral and feel I haven’t embraced this years colour as much as I have wanted to !

I have used Background Blocks Pinstripe and heat embossed it in white across my card base. The sentiment in from Birthday Wishes and is also heat embossed. I added some white bakers twine and gloss white Nuvo Drops to finish.

Feb19RD1a

And lastly for today is another BIG & BOLD Happy card…

Feb18RD2

This is the ‘other’ two for the price of one technique cards, where I shared the first HERE on Day 1 of the introductions! On this card I have done inlay die cutting with the ‘happy’ word die. I created a striped panel of coloured card (great way of using up all those scraps) on a thin piece of white card.

Feb19RD2a

I then die cut the ‘happy’ word die into this panel. As I was going through a couple of layers of card I went through my cutting machine a couple of times. I set the striped happy aside and kept the inner parts of the a, p & p for this card. I then die cut another happy from a white card panel the same size of the striped panel (which was used to create the card I shared on Day 1) and inlayed it into this striped panel.

Finally the word Birthday is stamped and heat embossed white and again I added my favourite gloss white Nuvo Drops to finish!

That’s all I have to share today using these products, but I know Ruth our Guest Designer this month along with the Design Team have SO much more to share with you.

Hop on by to see what Ruth has created HERE and this is the order of the hop following Ruth…

Also, don’t forget the enter the HUGE giveaway over HERE to WIN Stamps For A Year! If you need help entering the giveaway as you don’t have a blog or social media to link, send me an email and I will assist you 🙂

WINstampsforayear

Thanks so much for stopping by & joining in on the 7th Birthday February Release fun 🙂

Hugs


Introducing… Background Blocks Pinstripe & You Are, Yes You

Hey!

Welcome to the LAST day of our 7th Birthday & February 2019 Release product introductions. The last four days have been so fun and colourful. If you have missed any of them you can catch up HEREHEREHERE and HERE.

I’m back again today with my guest designer and the design team to show you LOTS of inspiration! This time we are introducing a new Background Blocks Pinstripe & Yes, You  clear stamps. Hopefully you have hopped on over from the start HERE where I have introduced these 2 new products a little.

How about a closer look at the cards I have made using them…

IntroPinstripe


This first card shows the pinstripe background perfectly! I’ve stamped it in Altenew Pink Diamond ink a couple of times using my stamping tool. The flower from You Are, Yes You is then stamped directly over the top in VersaFine Onyx Black ink and coloured with one colour of Prismacolor pencil. I added one of the leaves from the same set and a sentiment from Simply Said. Again finishing the design with Nuvo Drops 😉

IntroDay5a


The colours for the card were again inspired by this weeks CAS Colours & Sketches challenge seen HERE and below. I rather like this colour combo, as I am quite a sucker for Grey!

CC&S color307-001

For my next card I decided to use the flowers & leaves from You Are, Yes You to embellish the corners of a die cut sentiment window frame.

BirthdayWishes&YesYou


The sentiment is from Birthday Wishes, which was introduced on Day 2 and it fits perfectly inside the Papertrey Ink Mat Stack 4. The flowers and leaves are coloured with Stampin’ Up! stamping blends, fussy cut out and adhered to the card with double sided tape.

IntroDay5d

Lastly, I wanted to try my hand at stamping a wreath using a self made wreath builder template and one of the leaves from You Are, Yes You…
WreathYesYou
Oh my! This was so much fun to do! I stamped and masked the leaf as I went round to create a lovely leaf wreath. The sentiment is from You Are, Yes You and I stamped, fussy cut and coloured the flower from the set to add to where the wreath began and ended to make it look neat.
IntroDay5c

That’s all I have to share today using these products, but I know Ruth our Guest Designer this month along with the Design Team have SO much more to share with you.

Hop on by to see what Ruth has created HERE and this is the order of the hop following Ruth…

Also, don’t forget the enter the HUGE giveaway over HERE to WIN Stamps For A Year! If you need help entering the giveaway as you don’t have a blog or social media to link, send me an email and I will assist you 🙂

WINstampsforayear

Thanks so much for stopping by & joining in on the 7th Birthday February Release fun 🙂

Hugs

Introducing… Background Blocks Graffiti Texture

Hey!

Welcome to Day 3 of our 7th Birthday & February 2019 Release product introductions. The last two days have been so fun and colourful. If you have missed any of them you can catch up HERE and HERE.

I’m back again today with my guest designer and the design team to show you LOTS of inspiration! This time we are introducing a new Background Blocks Graffiti Texture clear stamp Hopefully you have hopped on over from the start HERE where I have introduced these 2 new products a little.

How about a closer look at the cards I have made using it…

IntroDay3a


This stamp to me speaks masculine and the randomness of the design appears as if it would be difficult to achieve a seamless pattern. However, with a tiny bit of masking I was able to stamp the block down one edge of a Smokey Slate card stock base.

IntroDay3d

I added a sentiment from Simply Said Blocks I which is layered with a piece of red card and adhered using foam adhesive. I finished the design with a trio of Nuvo Drops.

For my next card I decided to continue with the masculine theme and the grey colour scheme…

IntroDay3b

For this card I stamped the block in Altenew Silver Slate ink. I then stamped a trio of the stars from Background Builders: Seeing Stars in Aqualicious, Fresh Lemon and Orange Cream added the same sentiment from Simply Said Blocks I and some enamel stars.

IntroDay3e

Lastly I wanted to show how this background block can be used for a feminine card…

IntroDay3c

I was inspired by a couple of my favourite card challenges to create this card. First up the colour combo is from CAS Colours & Sketches seen HERE and below. Then the layout of my card is from Freshly Made Sketches seen HERE and below.

CC&S color307-001

FMS Final 374-001

To make this card I stamped the graffiti block in Rubellite and Pink Diamond ink. I then die cut a two sizes of Sizzix Framelits hearts. The sentiment is from the ‘secret’ clear stamp set being introduced on the 10th 😉

IntroDay3f

Once I had arranged the die cuts how I wanted them, I went in and added some stamped hearts from Flower Power #3. I also added some White Blizzard Nuvo Glitter Drops to the smaller stamped hearts to add a little sparkle.

That’s all I have to share today using these products, but I know Ruth our Guest Designer this month along with the Design Team have SO much more to share with you.

Hop on by to see what Ruth has created HERE and this is the order of the hop following Ruth…

Also, don’t forget the enter the HUGE giveaway over HERE to WIN Stamps For A Year! If you need help entering the giveaway as you don’t have a blog or social media to link, send me an email and I will assist you 🙂

WINstampsforayear

Thanks so much for stopping by & joining in on the 7th Birthday February Release fun 🙂

Hugs

Introducing… Stencil Abstract Triangles & Birthday Wishes

Hey!

Welcome to Day 2 of our 7th Birthday & February 2019 Release product introductions. How fun & colourful was yesterday? It sure brightened up my Wednesday! If you missed it, you can catch up HERE.

I’m back again today with my guest designer and the design team to show you LOTS of inspiration! This time we are introducing a new Stencil Abstract Triangles & Birthday Wishes Clear Stamp Set. Hopefully you have hopped on over from the start HERE where I have introduced these 2 new products a little.

How about a closer look at the cards I have made using them…

IntroDay2a


I had this crazy idea to rainbow the Abstract Triangle stencil and I am glad I did as the results are FAB! I used my Altenew Inks for this as I have more colours to choose from and I didn’t want to repeat the colours too much. It was just a matter of masking off each triangle to apply the colour and move onto the next.

IntroDay2f

I trimmed my card to exactly 6 x 6 ” and place my stencil central, this left a nice border around the edge. I layered it onto a black card base and added the BIG & BOLD Happy die cuts & clear stamp sentiment to finish the design.

Next I used the same technique of placing my stencil to create a border down the vertical sides. This time I used Distress Oxide Inks and I trimmed my panel horizontal to create a slightly raised panel when adhered to my base card.

IntroDay2b


I added a slight sprite of water to the ink blending, added another of the sentiments from Birthday Wishes and a trio of Nuvo Gloss White Drops.

IntroDay2e

Lastly I have one more card using Birthday Wishes and to continue the rainbow theme I created a watercolour rainbow block panel for my sentiment to be stamped onto.

IntroDay2c

I used smooth watercolour card, an acrylic block & Zig Clean Color Brush Pens. I coloured my acrylic block with the Zigs in a rainbow format, spritzed them and also my panel of watercolored card and stamped it in place. I had a little ink movement as I lifted, but still the results were good.

IntroDay2d

I used my MISTI tool to stamp the sentiment as even though the watercolour card is smooth, it still took a couple of stamps to get a crisp image. The trio of circle stamps are from yesterdays BIG & BOLD Happy clear stamp set and I also added some colourful Nuvo Drops to their centres.

That’s all I have to share today using these products, but I know Ruth our Guest Designer this month along with the Design Team have SO much more to share with you.

Hop on by to see what Ruth has created HERE and this is the order of the hop following Ruth…

Also, don’t forget the enter the HUGE giveaway over HERE to WIN Stamps For A Year! If you need help entering the giveaway as you don’t have a blog or social media to link, send me an email and I will assist you 🙂

WINstampsforayear

Thanks so much for stopping by & joining in on the 7th Birthday February Release fun 🙂

Hugs


Introducing… BIG & BOLD Happy Clear Stamps & Designer Dies

Welcome to Day 1 of our 7th Birthday & February 2019 Release product introductions.

This is the fun part where myself, my guest designer and the design team get to show you LOTS of inspiration! You get to see all the sneak peeks I shared yesterday in action on cards & projects over the next few days leading up to 11th February, Release Day!

Hopefully you have hopped on over from HERE, where I have introduced todays products a little and all the links to the blog hop.

Okay, now to some inspiration…

IntroB&Bhappy1b

I thought I would start off with this rainbow happy card. Just seeing the rainbow of colours sparks joy and happiness to me!

IntroB&Bhappy1a

This card uses just the BIG & BOLD Happy Designer Dies, I wanted to show how they can be used on their own. Though I have used some favourite colours and products too to make the dies shine!

I started out by masking a rectangle off on my base card. I then used Distress Inks & blended them together to create a nice rainbow that would flow from ‘H’ to ‘Y’. I then trimmed a top layer of white card to fit inside the base card with a slight border around the edge and die cut the ‘happy shadow’ to create a window to see the rainbow of colours.

IntroB&Bhappy1c

This die cut window panel is adhered to the card base using foam adhesive. I then die cut the ‘happy’ word & adhered it direct to my card base inside the window. Hopefully you can see the dimensions of the window & word in the photo above.

The card is finished with lots of yummy Nuvo drops to match the rainbow. I decided to keep the front of the card sentiment free and will add a follow on sentiment inside the card for the occasion it is sent out for.

For my next card I used mainly the clear stamp set…

IntroB&Bhappy2

This is almost a one layer card, it is just the raised ‘Oh’ and ‘Day’ which makes it a two layer card. It is also a little less CAS for me & I nearly didn’t show it here today because of that!

Anyway, I did (sorry if you don’t like it) and here is how I made it. I started out by creating a window mask out of printer paper to lay over my base card & ink blend through. This time I used Distress Oxide inks in Festive Berries, Worn Lipstick, Spiced Marmalade & Fossilised Amber.

IntroB&Bhappy2a

Once my ink blending had dried, I used my MISTI stamping tool to stamp the large happy inside the ink blended shadow & heat embossed with Stardust EP. I stamped the confetti spray around the happy, which I inked up in a trio of the colours I used to ink blend with. I then added a trio of circle accents from the clear stamp set in black and the smaller sentiments. These are stamped & embossed with detail white EP onto black card and adhered using foam adhesive.

I have one last card to share with you today using these products, this time I went back to my usual CAS style…

IntroB&Bhappy3

This one again mainly uses the dies as I was having so much fun with them! I tried my hand at the inlaid die cutting technique and added in colourful stripes for a little more interest. I actually made 2 cards with this technique, but I will share the other one with you on release day!

I started by adhering 1 cm strips of left over coloured card to a thin white piece of card using double sided tape & glue adhesive. I then die cut the word happy. I’ve then created a base card and panel like my first card at the top of the post.

IntroB&Bhappy3a

Before adhering my white card panel to the card base using double sided tape I die cut the happy from this too, setting aside the die cut & the inner pieces aside. The striped die cut is adhered inside the die cut window and then I added the white inner die cuts to fill in the gaps. Added the birthday sentiment and a trio Nuvo Drops to finish.

That’s all I have to share today using these products, but I know Ruth our Guest Designer this month along with the Design Team have SO much more to share with you.

Hop on by to see what Ruth has created HERE.

Also, don’t forget the enter the HUGE giveaway over HERE to WIN Stamps For A Year! If you need help entering the giveaway as you don’t have a blog or social media to link, send me an email and I will assist you 🙂

WINstampsforayear

Thanks so much for stopping by & joining in on the 7th Birthday February Release fun 🙂

Hugs

7th Birthday & February Release Sneak Peeks

Woohoo!

It is finally time to share the ‘official’ sneak peeks for the 7th Birthday February Release! With so much FUN & excitement already, it has been hard to keep these till now & you might have already spotted LOTS of peeks at the new products being released around social media AND over on the website blog!
Anyway, this month I have 6 new clear stamp sets, 2 designer die collections AND 1 stencil design being released on February 11th at 9pm GMT.

Let’s have a look at the peeks…

Do you recognise this font? Did you see the Guest Designer card I made for “Less is More” which I shared HERE!

Yep, it is the next addition to the BIG & BOLD series AND to top it off rather nicely this clear stamp set has a collection of coordinating Designer Dies – WOOHOO!!

Next I have a peek at a new sentiment clear stamp set…

When I design for releases I often look at what is missing from the Uniko inventory and what I would use and need as a stamper & card maker! I was missing sentiments that could be used inside my cards as well as on the outside, so here it is!

You know I can’t resist a new floral set! So here is my modern take on the Passiflora (Passion Flower) AND this clear stamp set also has a collection of coordinating Designer Dies – YAY!

Lastly for the clear stamps in this release I have 2 new designs to add to the growing Background Blocks series…

BUT, wait…. that is only 5 sneak peek pics, where is the 6th I hear you ask?!

Well, I am keeping the 6th under wraps a little longer! You will have to keep an eye out during the introductions for its ‘formal’ introduction and the reason for keeping it ‘secret’ for a little longer 😉

And lastly, but by no means least I have a new stencil design…

That is all the sneak peeks for this release, which means tomorrow the FUN starts!! Myself, our Guest Designer Ruth & the Design Team will be back to start the product introductions with lots of inspiration.

I’d LOVE to know what you are most excited to see in this line up of products and what your favourite is!

Win Stamps For A Year! DON’T FORGET to enter the HUGE prize giveaway on THIS post too!

Thank you so much for stopping by today & I do hope you will come back & see what these sneak peeks can do?!

Hugs

Uniko’s 7th Birthday Linky Party!

Woohoo!

It’s time for some celebrating! This month at Uniko we are celebrating our 7th Birthday and I am kicking the celebrations off today with a party!

It wouldn’t be a birthday celebration without a PARTY, right?

Now, the party starts over HERE and you can find LOTS of inspiration from my awesome team, the link up to add your entry AND of course all the prize info. There are SEVEN ways to win 😉

All you have to do is create a birthday card and add it to the linky! You don’t have to have a blog to enter, you can link your card from your Instagram, Facebook, Pinterest or like with ALL Uniko Challenges you can email me your entry to add.

You don’t have to use Uniko products, but I’d LOVE to see you using your Uniko stash (including Uniko Digital Freebies) AND there is an extra opportunity to win a prize if you do 😉

Okay, enough chit chat, how about some inspiration…

UnikoBirthdayLinky1

I dusted off a couple of sets for this card, Background Builders: Seeing Stars and Balloon Bash. I used my MISTI tool to stamp both the diagonal ombre star stripes and the ombre balloon. I drew the ballon string with a fine liner as I wanted a nice crisp string! The sentiment is from Simply Said.

UnikoBirthdayLinky1a

The layout of my card was is from this weeks Freshly Made Sketches challenge seen HERE and below. This is one of my favourite challenges to join in on when I can 🙂

Next I wanted to try out a new glimmer paste that arrived in the post, Nuvo Glimmer Paste – Moonstone. My goodness, this stuff is lush! Just look at the shine…

UnikoBirthdayLinky2

This time as I wanted to use the paste through a Uniko Stencil I used the Balloon Bash stencil. I started out with the round pink balloon and used Altenew Cherry Blossom collection inks to achieve the ombre effect.

UnikoBirthdayLinky2b

I then masked off the pink balloon to layer the larger balloon behind inked up in Altenew Sweet Dreams collection. I then went back and placed the stencil over the smaller round balloon to

FMS Final 373-001apply the glimmer paste. Now, usually I struggle with applying pastes on a large surface, but this stuff… this stuff glides on beautifully!

UnikoBirthdayLinky2a

This time I was inspired to join in on another favourite challenge, AAA Cards HERE and seen below. For this challenge they want you to use a third of your card (so leaving a third of your card with white space) & an optional twist of masking.#132

That’s all I have to share with you today, thanks for stopping by and joining in on the fun!

Hugs

Uniko Challenge #51 – Anything Goes, optional twist Love

Hey! 

Welcome to the January/February 2019 Uniko Challenge. 

This is our first challenge of 2019 and we’ve chosen a really simple theme to ease you back in – Anything Goes. But for those of you that are already into the swing of 2019 challenges and would like more to get your teeth into we’ve added the optional twist of LOVE.

We have the amazingly talented and super creative Trina P joining us as out Guest Designer for this challenge. I’m sure you all know of her and are just as impressed by her cards as we are, but it’s always worth a visit to her blog to check out what’s she’s been up to.

Guest Designer – Trina P

Too cute!

I decided to go with the ‘Anything Goes’ part of the challenge, I’m not quite in the Valentine’s frame of mind! Plus, I treated myself to some new crafty goodies and wanted to give them a whirl with the idea I had formed in my head…

USC#51

One of the crafty products I bought was Nuvo Expanding Mousse. Wow, this stuff is fun! I tested out with the Pure Florals Chrysanthemum Stencil too & shared over on my Instagram stories.

For this card I have used it with the Scattered Polka Dot Stencil and this time I didn’t heat expand it. I love the flat shimmer finish it has just aired dried too. I bought the Mustard Seed colour and it is more like a vintage gold colour. I’ve used it on some Papertrey Ink Royal Velvet card stock.

USC#51a

I’ve paired it with Pure Florals Peony and a sentiment from Simply Said Blocks (back in stock next week). I wanted the stencil design to be seen, so I stamped and embossed the smaller Peony bloom onto vellum. I only have copper and gold embossing powders (ancient) and neither matched perfectly with the Nuvo Mousse, so I decided to go with more of a contrast and used the copper.

The layout of my card is based on this weeks Freshly Made Sketches layout seen HERE and below…

FMS Final 371-001

My talented team have some inspiration for you too, so be sure to head on over to their blogs and see what they’ve been up to.

Linda

Wiebke 

 
Are you ready to play?

Well, just in case you need some more incentive to play along with the challenge here are the details of the prizes.

THE PRIZES

  • Main Winner Chosen By the DT – £25 eGift Certificate
  • Random Twist Winner – £5 In Stock Clear Stamp Set of Winners Choosing
  • Random Uniko Stamps Winner – £5 In Stock Clear Stamp Set of Winners Choosing
  • Top 3 Chosen By DT – 150 Loyalty Reward Points

You’ve got plenty of time to play along with this challenge. The deadline for submission is midnight (GMT) on Friday 22nd February 2019 (7.00pm EDT).

Hugs