Posts tagged “Uniko Designer Dies”

25 Days of Christmas Tags Day 4 2019

Welcome to Day 4 of 2019’s 25 Days of Christmas Tags!

Uniko is super excited to be a part of this wonderful festive event organised by Tracey McNeely from In My Creative Opinion. If this is your first year joining in and finding out about the fun you can read all about it HERE.

How about some inspiration from myself and the Uniko Brand Ambassadors and be sure to checkout Tracey’s Blog HERE for more inspiration from the 25 Days of Christmas Tags team.

I seem to have a yearly theme when it comes to creating a tag for this event and unintentionally reach for the same but ever popular Uniko clear stamp set, Winter Foliage! 

I do have a good reason though this year, as I recently released coordinating Designer Dies for this stamp set and I have been really enjoying using them!
I'd planned on having more tags made to share with you, but the flu at the weekend put a stop to that and I have spent most of the week in-between looking after The Beans resting and recuperating in bed! 

Fear not though as I have my awesome Brand Ambassadors joining me today and they have FABulous tags to share with you too. Be sure to stop by each of their blogs (link below the photo of their tags) and leave a comment. I will select a lucky comment to win another prize separate from the Uniko Sponsor prize for the event!

Crafty Hugs 

Winter Foliage Inspiration

Happy Sunday!

Last night was daylight savings here in the UK, so I decided to put it to good use once The Beans were settled in bed last night and made a whole bunch of Christmas cards!

Did you see yesterday’s post HERE? The October 2019 Post Release Brand Ambassador Blog Hop & GIVEAWAY is in full swing. And just by commenting along the hop you have the chance of winning the ENTIRE release 😉

I was a little sad that I didn’t get time to make all the cards before my post went live, so last night I set to making a couple of those I intended to make. First up a card using the new Stencil – Winter Foliage

OctRelease19WF1

I had an idea to do a lot of masking and ink up the stencil with a couple of shades of brown, green and red to create this beautiful background. The layout of my card was inspired by the Freshly Made Sketches layout seen HERE and below.

FMS408

To finish the card I added one of the Festive Sentiments Outlined sentiments and added some Nuvo Drops in Autumn Red to the single berries in the design. The card was pretty time consuming, but I really like the results.

OctReleaseWF1a

Lastly for today I have a card using the Designer Die Winter Foliage Collection. This card was a little quicker to make, but again I’m loving the end result.

OctRelease19WF2

I decided to use the same sentiment and this time coloured it with a black fine liner instead of red. I then die cut the berries and holly leaves from my panel. To stamp the coordinating images from Winter Foliage clear stamp set, I temporarily adhered the panel to my base card and placed this inside my MISTI.

OctRelease19WF2a

I was then able to position the stamps to stamp perfectly inside the die cuts. Once stamped I then adhered the panel permanently with foam adhesive.

That’s all I have to share for today, but I will be back during the week with more! Until then, thank you for stopping by today.

Crafty Hugs


Rainbow Snowflakes

Hey!

Where did Monday go?! I had all good intentions to pop in yesterday with the card I am sharing today, but the day got away from me!

Anyway, how about some rainbow snowflakes…


RainbowSnowflakes


I never tire of colour and part of card making and paper crafts is being creative and adding your own spin on things. So rainbow snowflakes, why not?!

RainbowSnowflakes1


Also, never underestimate the power of a small stamp either 😉 This snowflake from BIG & BOLD Snow is just 2cm in diameter, but look at the fun I’ve had with it and the coordinating Designer Dies BIG & BOLD Snow Collection.

RainbowSnowflakes2


I used 1mm thick foam adhesive to adhere the snowflakes to my card. This thickness means you get some dimension, but it isn’t too bulky and still fits through the mail as a normal letter 😉 The sentiment I have used is from the popular Simply Said Blocks Christmas.

Okay, that’s all from me today, I hope you have enjoyed this little bit of Christmas inspiration. Until next time, thanks so much for stopping by today.

Crafty Hugs


Stamp & Designer Die Focus – BIG & BOLD Snow

Hey & Happy Hump Day!

I’m still here dreaming of a white Christmas and I don’t think this feeling is going to pass any time soon! And as it doesn’t look like snow is expected any time soon I thought I would get my snow fix by inking up BIG & BOLD Snow and giving the NEW Designer Dies another outing.

Often these mini clear stamp sets can be overlooked as to how much you can do with them. But add in some coordinating designer dies and it can breathe a whole new life into the stamps and opens so many more possibilities.

Today I have a trio of cards to share with you using both the stamps and the dies…

StampFocusB&BSnow1

As you know I am a huge fan of aqua shades and when paired with snow or snowflakes, it’s no surprise it has to make an appearance!

StampFocusB&BSnow1d

I started with this card as I wanted to try out the stamp / die spotlight technique with the largest of the snowflakes in BIG & BOLD Snow, paired with the large snow stamp & matching die.

StampfocusB&BSnow1b

I started by stamping & die cutting the word snow, to see where I would place it on my card & where to place the snowflakes around it. I then did cut the snowflakes and temporarily adhered the layer to my base card to stamp the snowflakes. I finished the design off with some small accent snowflakes and some White Blizzard Nuvo Drops.

Next I wanted to create a one layer ombre card…

StampFocusB&BSnow1e

Thank goodness for stamping tools and the ease of creating a staggered ombre look and also for adding sparkle to a stamped layer. This is what I have done with the last darkest stamped snow.

StampFocusB&BSnow1c

To finish the design I used the positive snowflake die cuts from the first card, adding the stamped image inside the die cuts in Aqualicious ink and once I had adhered them to the card I finished the design off with some of the smaller stamped snowflakes and again White Blizzard Nuvo Drops.

Lastly for today I was inspired by this weeks Freshly Made Sketches sketch seen HERE and below my card. I decided to keep with the same aqua colour scheme, using my blender brushes to create the perfect base colour card.

StampFocusB&BSnow1f

And here is the sketch I followed…

FMS Final 407-001

I love how you find the perfect sketch to fit with the products you are currently using and this one came together pretty quick too. This time I used the smaller of the snow sentiments and added just one stamped and die cut snowflake.

StampFocusB&BSnow1a

That’s all I have to share with you today using these products, but I will back with some more new release product inspiration tomorrow. Heads up, if you’re on Instagram, be sure to check out my feed HERE later today as I have a Win it Wednesday coming!

Okay, best get some more work done before the daylight has gone!

Crafty Hugs


April / May 2019 Reveal, Design Team Blog Hop & GIVEAWAY!

Hey!

Finally the day has arrived and the April / May 2019 Reveal, Blog Hop & GIVEAWAY is here! The Release will be available to purchase HERE at a NEW time of 9pm GMT tonight.

Hopefully you have hopped on over from HERE, where I have formally introduced the 4 new Clear Stamp Set designs, 2 coordinating Designer Die collections AND 1 Stencil Design being released.

I’ve made a couple more cards using the new products, not as many as I had hoped to make, but I do feel I am getting back into the creative groove again…

MayRD1

My first card uses the Designer Dies English Country Garden Butterflies. I’ve been wanting to pair the butterfly with the Large French Script Background for ages and it seemed the perfect time now I had the dies to match. They give such a love clean cut edge compared to fussy cutting!

MayRD1a

I still have a thing for shades of grey! Hence my colour scheme, though I did add in a little hint of aqua for the butterfly body and some Nuvo Drop detail. The Happy Birthday sentiment is from Birthday Sentiments, which is now back in stock.

My last card today was inspired by a couple of things. Firstly the Double Challenge over at CAS Colours & Sketches seen HERE and below.

double 319

And secondly by Jenny’s card HERE our Guest Designer for this release. I just loved how Jenny thought to cut up the Background Block Mid Century Modern II. So I did the same, this time using it for the top and bottom border in the sketch.

MayRD2

I simply stamped the Background Block Mid Century Modern II in black and coloured the outline sections with the closest colours to the challenge as I had. I then got to fussy cutting the sections out and adhered them to my card base using some new Gina K Connect Glue – LOVE! Thanks for the recommendation Lynda 😉

MayRD2a

The sentiment is another from Birthday Sentiments and I’ve accented it with a flower from Mid Century Modern Florals and some of my favourite Gloss White Nuvo Drops!

That’s all from me today, but as usual we have our traditional Design Team Blog Hop & Giveaway. To be in the chance of winning The ENTIRE April / May 2019 Release! (4 clear stamp sets, 2 previously released clear stamp sets, 2 co-ordinating designer die collections & 1 stencil design).

Simply comment along the blog hop, it’s as easy as that! You have until Midnight Sunday 12th May 2019. Winner will be announced a few days after.

Happy Hopping!

Hugs

Introducing… BIG & BOLD Wish Designer Dies

Hey!

Welcome to the last day of the April / May 2019 Release product introductions. If you missed Day 1, 2 and 3you can catch up HEREHERE and HERE, they’re not to be missed 😉

Today we have another set of matching Designer Dies to introduce to you. This time to coordinate with the previously released BIG & BOLD Wish clear stamp set. This set of dies have been requested by so many customers, that with the success of the BIG & BOLD Happy Designer Dies released in February, it was a must!

How about a look at these dies in action…

AprilSR2

How about a yellow and grey number with some smooth WOW Metallic Silver embossing?! This was such a quick CAS card to make and it could be easily changed to suit a recipients favourite colours.

AprilSR2a

Next I decided to go rainbow style…

IntroBBwishDD1

I’m hooked on this die! It’s so easy to use and create quick clean and simple cards with colourful impact. I’ve layered and offset the ‘wish’ word die, using a variety of SU! bright card stock colours. I’ve added the ‘big’ sentiment from the coordinating clear stamp set and embellished the design with sparkly clear Nuvo Drops and some clear Wink of Stella.

IntroBBwishDD1a

That’s all from me today using these new coordinating Designer Dies. However, it wouldn’t be a release without a daily blog hop full of inspiration!  As usual my AWESOME Design Team have worked their magic with todays products, so be sure to hop along & see them…

Sarah P

WOW!

That was so much fun! I hope you have enjoyed seeing all the new products in action? Tomorrow is release day – yay! I do hope you will join us for our traditional reveal and Design Team Blog Hop 🙂

Hugs

Introducing… Stencil Mid Century Modern

Hey!

Welcome to Day 3 of the April / May 2019 Release product introductions. If you missed Day 1 and 2, you can catch up HERE and HERE, they’re not to be missed 😉

Today we are heading back to the Mid Century Modern era to introduce a new Stencil, Mid Century Modern. This stencil is a  much larger scale compared to the Background Block Mid Century Modern  we introduced on day 1 and it is great for all occasions and projects.

I’ve two cards to share with you today using this new stencil and I have gone for some fun clean lined, graphic, almost futuristic and more masculine styled cards…

IntroMCMstnecil2

As the stencil is my usual 6 x 6 inches in size I opted to make a 14 cm square card for my first card. This size card is a perfect fit for the stencils.

IntroMCMstencil1

I started by inking through the stencil with VersaMark ink onto a white card panel and heat embossed with WOW Opaque White EP. I then used Distress Oxides in my favourite colours and blended over the top.

IntroMCMstencil1a

I’ve finished the card off with tomorrows product introduction, BIG & BOLD Wish Designer Dies 🙂 and also some Ebony Black Nuvo Drops.

For my next card I decided to use my Oxides through the stencil onto some black card stock…

IntroMCMstencil3

I used the same colours as my first card, but they haven’t shown up as bright as I was expecting. That might be because I was lazy and didn’t clean my stencil from the VersaMark on my first card 🙁 I still like the result though!

IntroMCMstencil3a

This time I have finished the card off with the BIG & BOLD Happy Designer Dies and a sentiment from the coordinating clear stamp set. Oh, and some Gloss White Nuvo Drops 😉

It wouldn’t be a release without a daily blog hop full of inspiration! As usual my AWESOME Design Team and our Guest Designer this month have worked their magic with todays products, so be sure to hop along & see them…

Sarah P

Wiebke 

WOW!

That was so much fun! I hope you enjoyed it and you will join us again tomorrow for the last of the product introduction and LOTS more inspiration 🙂

Hugs

Introducing… Passiflora & Designer Dies

Hey!

Welcome to Day 4 of our 7th Birthday & February 2019 Release product introductions. The last three days have been so fun and inspiring. If you have missed any of them you can catch up HEREHERE and HERE.

I’m back again today with my guest designer and the design team to show you LOTS of inspiration! This time we are introducing a new Passiflora Clear Stamp Set & Designer Dies. Hopefully you have hopped on over from the start HERE where I have introduced these 2 new products a little.

How about a closer look at the cards I have made using them…

IntroDay4a

My first card pairs the solid Passion Flower and leaf contained in the set with one of tomorrows introductions, another addition to the Background Block series. I’ve used my MISTI tool to stamp and layer the flower details, apart from the upper stamen of the flower, which is die cut and adhered with foam adhesive.

IntroDay4d

The darker shading on both the flower and the leaves was done by after stamping the image in a lighter shade. I used an ink dauber to apply the darker ink to selected areas of my stamp before stamping. I’ve found that using an ink dauber to apply the ink to the stamp results in a more even blended look. I’ve embossed the pinstripe background in gold, added a sentiment from Simply Said Blocks II and some Nuvo Drops too!

Continuing with the purple colour theme for the Passion Flower I opted for another clean and simple design…

IntroDay4c

Again I used the solid flower from the set (there is an outline flower too), but this time I white heat embossed the circular line detail of the flower and added the swirly foliage detail.

IntroDay4e

I’m loving the trend of embossed scoring lines, so tried my hand at it. It is quite subtle in the photo and more noticeable in real life. The sentiment is from Just Because clear stamp set and again I added my favourite Nuvo Drops!

Lastly it had to be a shaker card (apologies on my iffy photo, I’m still trying to get the hang of my new set up)…

IntroDay4b

There is something about new dies and my *need* to make a shaker card with them 😉 This time I went for some lovely bright pinks for the flowers and you can see that I have used the outline flower inside the shaker part of the card. I’ve also added a small circular detail stamp to the middle of that flower.

IntroDay4f


With the upper most solid flower I have used both of the stamen images, stamping, die cutting and layering them. If you look at some Passiflora flowers and the one I designed my stamp set from, they have a five stem stamen and then a 3 stem stamen. The sentiment is also from the set and again, more Nuvo Drops! I just love these too much! The shaker mix is from Little Things From Lucy’s Cards, Blush mix.

That’s all I have to share today using these products, but I know Ruth our Guest Designer this month along with the Design Team have SO much more to share with you.

Hop on by to see what Ruth has created HERE and this is the order of the hop following Ruth…

Also, don’t forget the enter the HUGE giveaway over HERE to WIN Stamps For A Year! If you need help entering the giveaway as you don’t have a blog or social media to link, send me an email and I will assist you 🙂

WINstampsforayear

Thanks so much for stopping by & joining in on the 7th Birthday February Release fun 🙂

Hugs

Introducing… BIG & BOLD Happy Clear Stamps & Designer Dies

Welcome to Day 1 of our 7th Birthday & February 2019 Release product introductions.

This is the fun part where myself, my guest designer and the design team get to show you LOTS of inspiration! You get to see all the sneak peeks I shared yesterday in action on cards & projects over the next few days leading up to 11th February, Release Day!

Hopefully you have hopped on over from HERE, where I have introduced todays products a little and all the links to the blog hop.

Okay, now to some inspiration…

IntroB&Bhappy1b

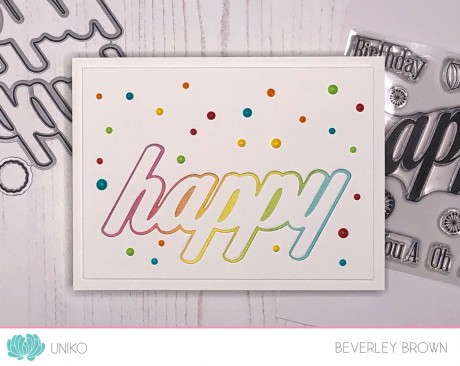
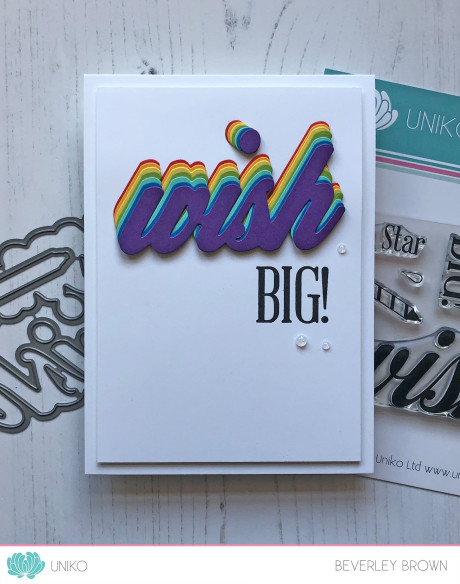
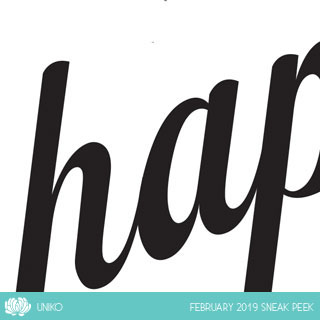
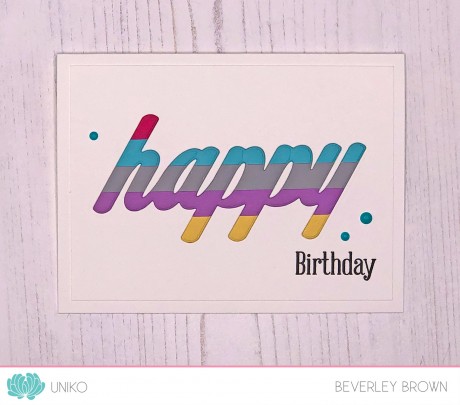
I thought I would start off with this rainbow happy card. Just seeing the rainbow of colours sparks joy and happiness to me!

IntroB&Bhappy1a

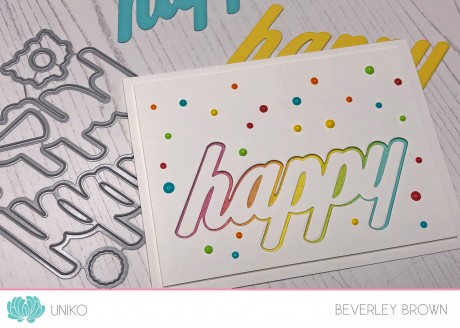
This card uses just the BIG & BOLD Happy Designer Dies, I wanted to show how they can be used on their own. Though I have used some favourite colours and products too to make the dies shine!

I started out by masking a rectangle off on my base card. I then used Distress Inks & blended them together to create a nice rainbow that would flow from ‘H’ to ‘Y’. I then trimmed a top layer of white card to fit inside the base card with a slight border around the edge and die cut the ‘happy shadow’ to create a window to see the rainbow of colours.

IntroB&Bhappy1c

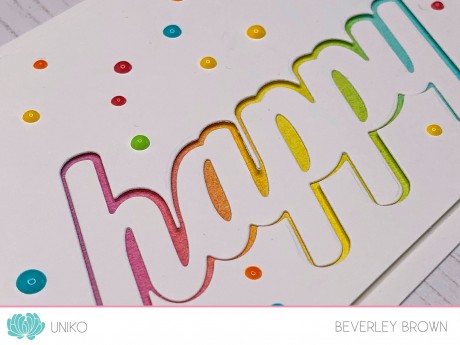
This die cut window panel is adhered to the card base using foam adhesive. I then die cut the ‘happy’ word & adhered it direct to my card base inside the window. Hopefully you can see the dimensions of the window & word in the photo above.

The card is finished with lots of yummy Nuvo drops to match the rainbow. I decided to keep the front of the card sentiment free and will add a follow on sentiment inside the card for the occasion it is sent out for.

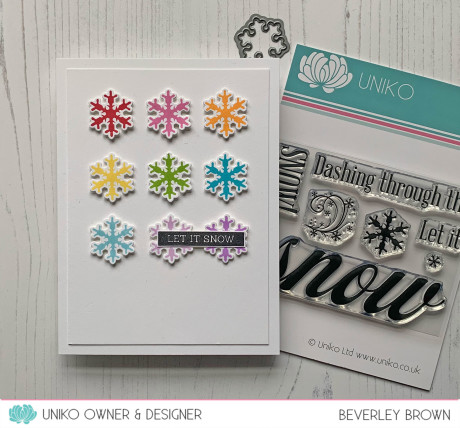
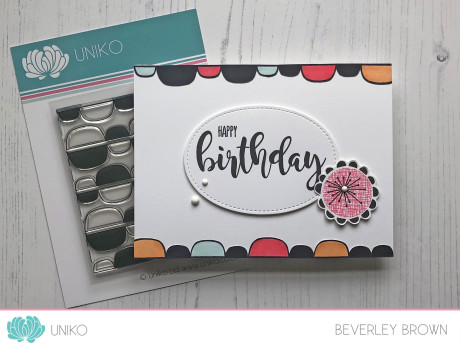
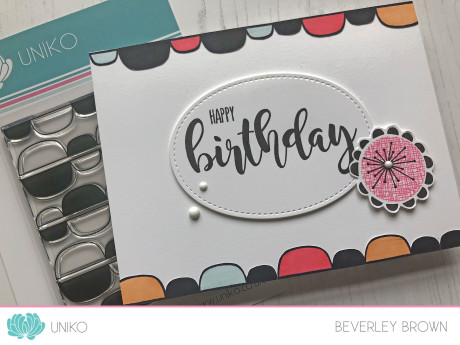
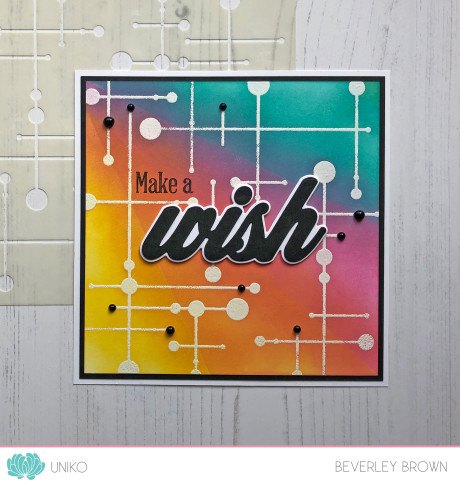
For my next card I used mainly the clear stamp set…

IntroB&Bhappy2

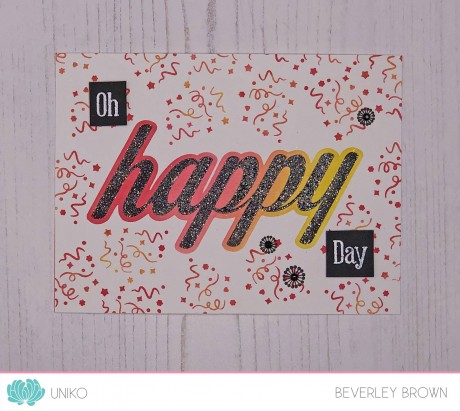
This is almost a one layer card, it is just the raised ‘Oh’ and ‘Day’ which makes it a two layer card. It is also a little less CAS for me & I nearly didn’t show it here today because of that!

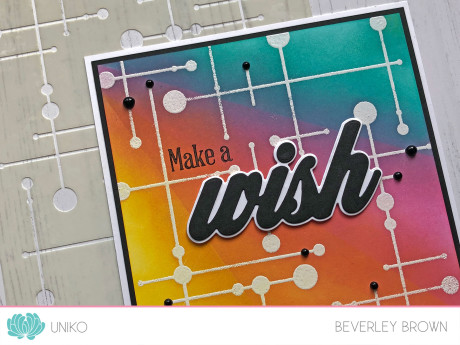
Anyway, I did (sorry if you don’t like it) and here is how I made it. I started out by creating a window mask out of printer paper to lay over my base card & ink blend through. This time I used Distress Oxide inks in Festive Berries, Worn Lipstick, Spiced Marmalade & Fossilised Amber.

IntroB&Bhappy2a

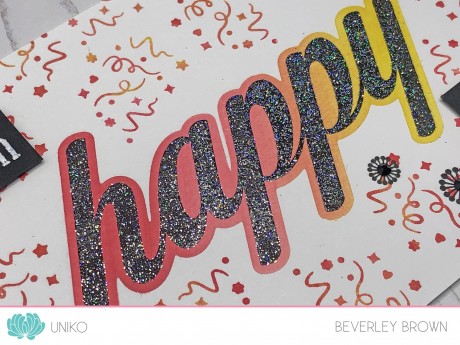
Once my ink blending had dried, I used my MISTI stamping tool to stamp the large happy inside the ink blended shadow & heat embossed with Stardust EP. I stamped the confetti spray around the happy, which I inked up in a trio of the colours I used to ink blend with. I then added a trio of circle accents from the clear stamp set in black and the smaller sentiments. These are stamped & embossed with detail white EP onto black card and adhered using foam adhesive.

I have one last card to share with you today using these products, this time I went back to my usual CAS style…

IntroB&Bhappy3

This one again mainly uses the dies as I was having so much fun with them! I tried my hand at the inlaid die cutting technique and added in colourful stripes for a little more interest. I actually made 2 cards with this technique, but I will share the other one with you on release day!

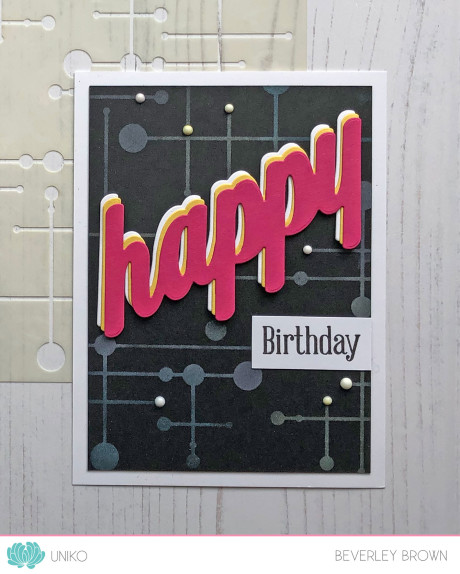
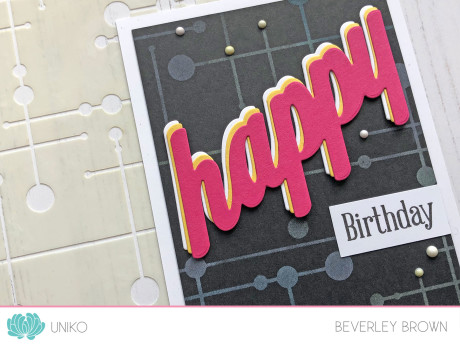
I started by adhering 1 cm strips of left over coloured card to a thin white piece of card using double sided tape & glue adhesive. I then die cut the word happy. I’ve then created a base card and panel like my first card at the top of the post.

IntroB&Bhappy3a

Before adhering my white card panel to the card base using double sided tape I die cut the happy from this too, setting aside the die cut & the inner pieces aside. The striped die cut is adhered inside the die cut window and then I added the white inner die cuts to fill in the gaps. Added the birthday sentiment and a trio Nuvo Drops to finish.

That’s all I have to share today using these products, but I know Ruth our Guest Designer this month along with the Design Team have SO much more to share with you.

Hop on by to see what Ruth has created HERE.

Also, don’t forget the enter the HUGE giveaway over HERE to WIN Stamps For A Year! If you need help entering the giveaway as you don’t have a blog or social media to link, send me an email and I will assist you 🙂

WINstampsforayear

Thanks so much for stopping by & joining in on the 7th Birthday February Release fun 🙂

Hugs

7th Birthday & February Release Sneak Peeks

Woohoo!

It is finally time to share the ‘official’ sneak peeks for the 7th Birthday February Release! With so much FUN & excitement already, it has been hard to keep these till now & you might have already spotted LOTS of peeks at the new products being released around social media AND over on the website blog!
Anyway, this month I have 6 new clear stamp sets, 2 designer die collections AND 1 stencil design being released on February 11th at 9pm GMT.

Let’s have a look at the peeks…

Do you recognise this font? Did you see the Guest Designer card I made for “Less is More” which I shared HERE!

Yep, it is the next addition to the BIG & BOLD series AND to top it off rather nicely this clear stamp set has a collection of coordinating Designer Dies – WOOHOO!!

Next I have a peek at a new sentiment clear stamp set…

When I design for releases I often look at what is missing from the Uniko inventory and what I would use and need as a stamper & card maker! I was missing sentiments that could be used inside my cards as well as on the outside, so here it is!

You know I can’t resist a new floral set! So here is my modern take on the Passiflora (Passion Flower) AND this clear stamp set also has a collection of coordinating Designer Dies – YAY!

Lastly for the clear stamps in this release I have 2 new designs to add to the growing Background Blocks series…

BUT, wait…. that is only 5 sneak peek pics, where is the 6th I hear you ask?!

Well, I am keeping the 6th under wraps a little longer! You will have to keep an eye out during the introductions for its ‘formal’ introduction and the reason for keeping it ‘secret’ for a little longer 😉

And lastly, but by no means least I have a new stencil design…

That is all the sneak peeks for this release, which means tomorrow the FUN starts!! Myself, our Guest Designer Ruth & the Design Team will be back to start the product introductions with lots of inspiration.

I’d LOVE to know what you are most excited to see in this line up of products and what your favourite is!

Win Stamps For A Year! DON’T FORGET to enter the HUGE prize giveaway on THIS post too!

Thank you so much for stopping by today & I do hope you will come back & see what these sneak peeks can do?!

Hugs