Posts tagged “Uniko Stencil”

You’re Going to Flip – Brand Ambassador Release Day Blog Hop & Giveaway!

Happy Weekend! 

I do hope you’ve enjoyed You’re Going to Flip Week here on the blog and you’re as excited about this new stencil, as I am 😃 It is now available HERE on the website to purchase and if you are coming to Stamping Together in Port Sunlight today, I will have stock with me. I will also be doing a LIVE demo on the How To Craft Network using this stencil. The live is recorded and I will share it once it is available in case you miss it. 

Anyway, back to this fun stencil…

This is designed like the previously released Ink & Flip Geometric Heart Layering Stencil. In that you can use each layer individually or use them together. 

So let’s have a look at this in action…

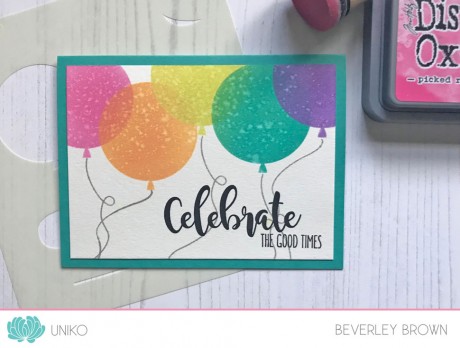
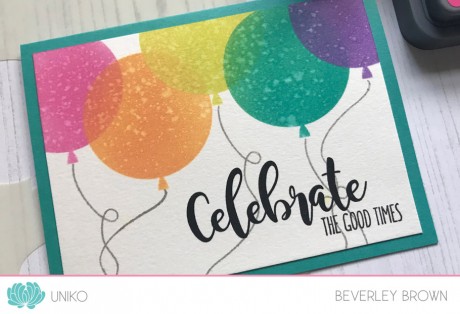
For my first card I went for a mix of bold colours with soft colours to create this striking card. For the background I used Parsley and Rainforest. And for the butterfly I used Watermelon and Creamsicle.

This time for the butterfly I inked and flipped it onto a separate piece of card, fussy cut it out and adhered it using foam adhesive. This helps it pop a little more against the base card. To finish I used a sentiment from Simply Said Blocks II.

I’m all about the dimension on my cards today, as for my next card I used just the butterfly layer.

I inked two butterfly’s, one bright and bold to use on the top and one soft and delicate to use underneath. You can see in this photo below how I have scored and layered them.

To finish the card I added a sentiment from Floral Vines and also the trio of dots, which I added Nuvo Drops to.

That’s all I have to share today, but I am sure you will be seeing more of this stencil in the coming days!

Be sure to comment along the hop for your chance to win a Flippin’ Good Prize! Commenting to win will close midnight BST Sunday 28th April 2024 and I will announce the winner on the blog 29th April. 

Thank you so much for joining us this week, for all the lovely comments and support. 

Crafty Hugs

You’re Going to Flip – Introducing Ink & Flip Geometric Butterfly Layering Stencil

Hello & Welcome to You’re Going to Flip Week! 

It’s been such a fun week on the blog, I hope you’ve enjoyed it as much as I have. Today though, I am super excited as we finally get to introduce you to the NEW Ink & Flip Geometric Butterfly Layering Stencil. 

This stencil is designed just like the previous Ink & Flip Geometric Heart Layering Stencil. With a base layer that creates a Butterfly window and a second detail layer that creates the geometric butterfly.

Let’s have a look at it in action…

I couldn’t resist using the geometric butterfly layer first and with two vibrant colours. I used Dragonfruit and Oceanside. My sentiment choice is from Floral Vines.

Next I had to use both layers together to show you how it looks as one.

Again I opted for some bright and cheerful colours. I used Honeysuckle and Poppy for the base background layer and Buttercup and Oceanside for the butterfly.

I kept things simple and finished with the Thinking Of You sentiment from Everyday Sentiments.

So, what do you think?

I know it’s easier to see these stencils in action, so I will be sharing a video on YouTube as soon as I can 😃

For now, why not enjoy more inspiration from the Brand Ambassadors over HERE.

This new stencil will be available on the website HERE tomorrow at 9am BST and I hope you will join us here on the blog for our usual Brand Ambassador Release Day Blog Hop & Giveaway.

Crafty Hugs

Introducing… Birthday Sentiments, Background Blocks Party Confetti & Balloon Bash Stencil

Hey!

Welcome to the first day of the product introductions. This is the exciting bit, where you get to see the sneak peeks in action!

Today myself and the Design Teams are introducing 3 of the February / 6th Birthday Release products, Birthday Sentiments, Background Blocks Party Confetti & Balloon Bash Stencil. As you can see by the titles, they all have a birthday / celebratory theme to them.
To start the hop and find all the Design Team links (in case you get lost along the way, as the DT has grown) click HERE.
Now how about a look at these stamps in action…
First up I thought I would share a card using the Balloon Bash Stencil and just one of the mix and match sentiments from Birthday Sentiments. If you like the previously released Festive Sentiments, then I think you might just LOVE this sentiment set too 😉
IntroBalloonStencil1
I started out with some smooth watercolour card, I use The Langton Hot Pressed (Smooth) Grain Satiné. I selected 5 colours of Distress Oxide in to form a rainbow effect. I then simply applied the colour through one of the balloon images in the stencil starting from Picked Raspberry, Spiced Marmalade, Twisted Citron, Peacock Feathers & Wilted Violet. I then spritzed the card with some water and dabbed the excess to achieve the mottled oxide effect on the balloons.
IntroBalloonStencil1a
The balloon strings are stamped from the previously released Balloon Bash clear stamp set and then I used my MISTI tool to stamp the sentiment in VersaFine Onyx Black ink a couple of times to get a nice smooth, solid impression.
Next I decided to ink up Background Blocks Party Confetti as I wanted to give my new go to technique a whirl on it! I simply love the direct to stamp colouring with water based markers. And this stamp simply calls for a rainbow of colours, don’t you think?!
IntroBBPartyConfetti1
For this card I placed the Background Block inside my small MISTI stamping tool and chose to colour the block with my Stampin’ Up! Brights marker collection. I simply started with a colour and just randomly coloured the elements in the design and simply repeated this for each colour until the block was all coloured.
IntroBBPartyConfetti1a
I then ‘huff’ over the stamp to moisten the ink. As The process is quite time consuming, the ink can dry onto the stamp, so you need to do this before you stamp or you will get a dull stamped image. But I think the results are worth the effort! After I had stamped the image I trimmed it down and adhered it to a Tempting Turquoise card base. I added sentiments from Birthday Sentiments and embellished with a yummy cupcake from Celebrate With Cake.
Before I removed the Background Blocks Party Confetti from the MISTI tool, I decided to spritz the image with some water and stamped the design onto some watercolour card, this formed the base for my next card design…
IntroBBPartyConfetti2
Again, such a cool effect and the colours are a little more muted this time, with being watered down. This time I embellished the card with a duo of stamped balloons from the Balloon Bash clear stamp set and another mix and match sentiment from Birthday Sentiments.
That’s all I have created to share with you today! Be sure to hop on over to sweet Carol to see the creativity there. If you get lost along the way here is the list of Design Team Blog Links…

25 Days Of Christmas Tags – Day 21!

Hey!

I’m super happy you’ve popped by today as here at Uniko we are super excited to be part of a wonderful festive event…

25Days2015

This is the 7th year the lovely and creative Tracey McNeely  from In My Creative Opinion has organised this fun and festive event to spread Christmas Cheer.

Uniko are honoured to be one of the 25 sponsors of the event and to be taking part 🙂

Sponsors 2017

Myself and the Uniko Design Team have got our festive on and created some Christmas Tags to share with you, so let’s get to the inspiration!

23755199_10210420267200918_8743181802428637073_n


First up I decided to go a little ‘Traditional’ with a classic red, white and gold combo. I don’t think Festive Sentiments has left my desk since it was released last month!

I dusted off one of my all time favourite Papertrey Ink Tag Sale dies, this is No.5 I love the curved top and the notched bottom of this tag shape and it as a good size, not too big, but not too small!

25DaysChristmasTags1a


So for this tag I simply die cut the tag from Stampin’ Up! Real Red card, stamped my sentiment from Festive Sentiments in VersaMark and heat embossed in Gold EP. I added a Soft Stone satin ribbon tail, secured with some Stampin’ Up! bakers twine.

Next, I couldn’t resist a snowflake tag!

25DaysChristmasTags2

I am loving having the Uniko Designer Die Snowflake Trio back in the inventory, I sure have missed using these beauties!

I fairly recently purchased some Stampin’ Up! Mini Pizza Boxes to use as gift packaging this Christmas and I thought it was the perfect size to dress up using a not so recent Stampin’ Up! purchase of the Cheerful Tags dies! I think these are now retired.

There are 2 tags in the set of Cheerful Tags dies and the one I have used has handy ribbon threading holes at the top and bottom of the tag. The tag does come with a back, but I didn’t need it and wanted my tag to be completely flat against the lid of the box.

25DaysChristmasTags2a


I didn’t want a design that would take too much focus off the sparkly medium snowflake, but I really wanted to pair it with the recently released Uniko Wonky Stripes Stencil! So, I opted for a soft Altenew grey ink (Silver Stone) to ink the stencil design onto the tag shape. I then simply adhered the tag over the top using foam adhesive. The ribbon is another favourite of mine, Hawaiian Shores from Papertrey Ink.

I had planned to make SO many different tags using Uniko’s festive clear stamps, but time was not on my side! Hopefully I will get to make and share these before the end of the event!

Anyway, the Uniko Design Team have some festive inspiration to share with you too, be sure to stop by their blogs (links below) and leave some love!

CLICK HERE to see more from Carol

CLICK HERE to see more from Deborah

CLICK HERE to see more from Izzy

CLICK HERE to see more from Jane

CLICK HERE to see more from Lindsey

CLICK HERE to see more from Rahmat

All the details about the event and link up can be found HERE. Today’s Uniko post on Tracey’s blog can be found HERE.

Enjoy!