Posts tagged “Uniko Ltd” (Page 2)

Uniko Challenge Reminder #66 – Flowers + Optional Twist Slimline

 Hey!

Myself and the Uniko Brand Ambassadors are here today to remind you about the July/ August 2021 Uniko challenge.


Challenge Guidelines:
* You can use any products/stamps to enter the challenge, but we do LOVE to see you use your Uniko products. Plus, there is an extra chance to win a prize if you do 😉
* Email entries welcome, just email a photo of your card to bev@uniko.co.uk and I will add it to the Uniko Flickr gallery and link up!
* Share the challenge graphic in your post and link back to the challenge if possible 😉


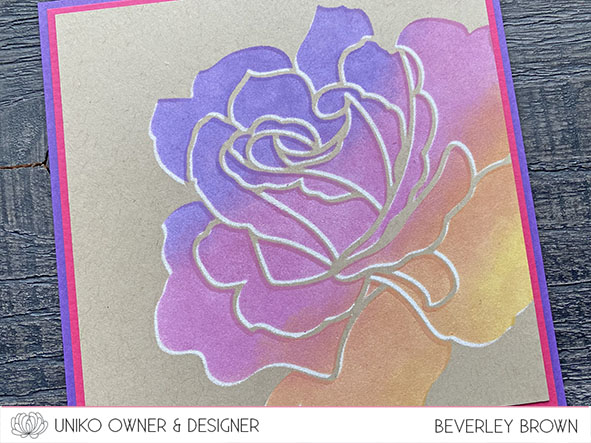
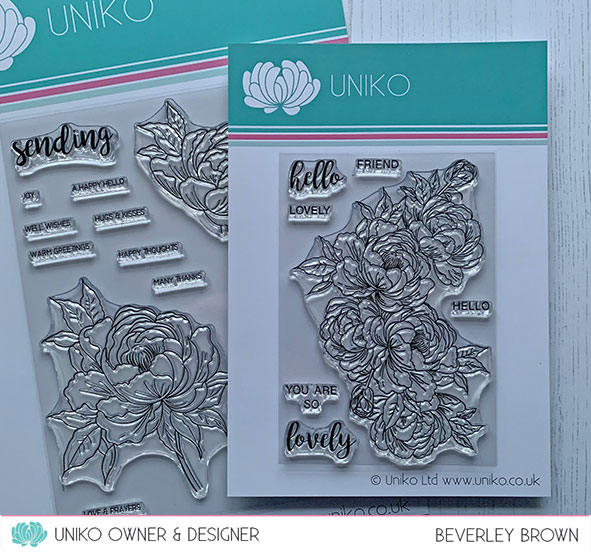
We’re delighted to welcome back Dhruvika as our Guest Designer for this reminder post.

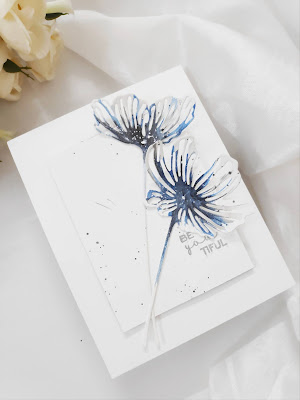
How stunning is Dhruvika’s card! If you pop over to her Instagram feed you can see all her other awesome cards too – HERE.

Hopefully you have hopped on over from HERE, where the Uniko Brand Ambassadors have shared inspiration and you will also find the link up and prize information.

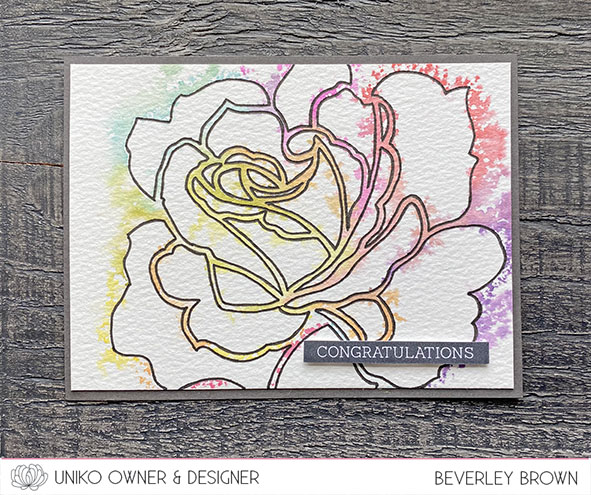
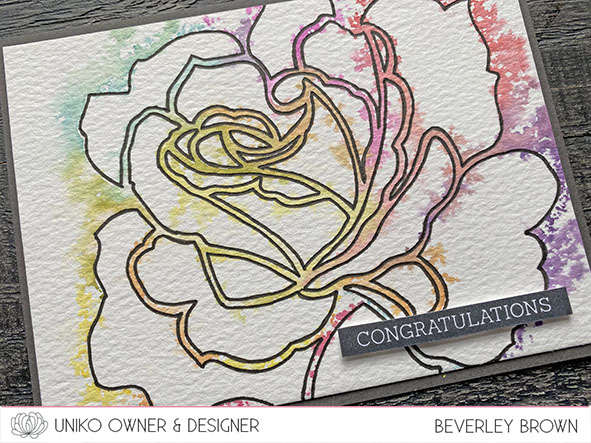
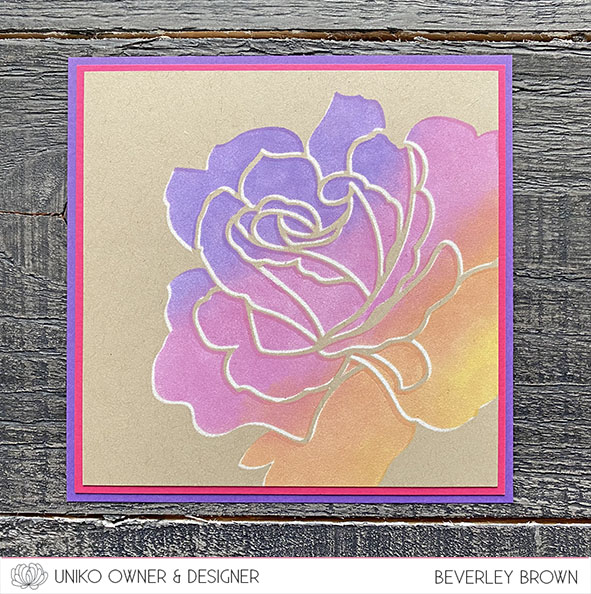
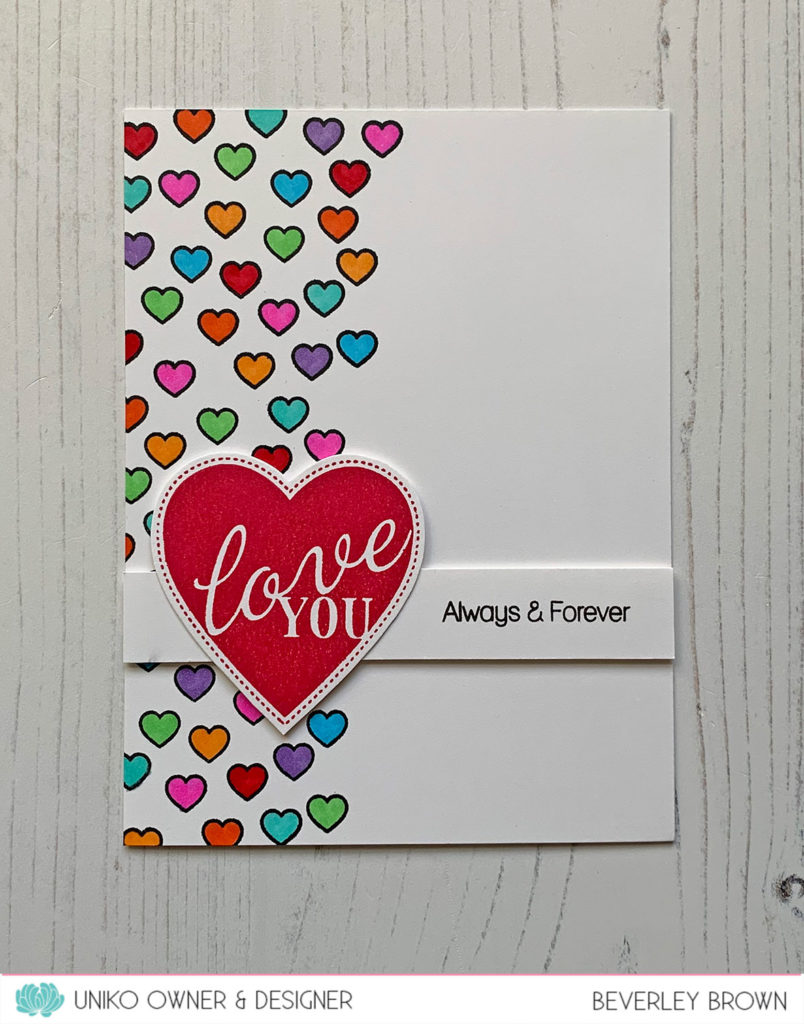
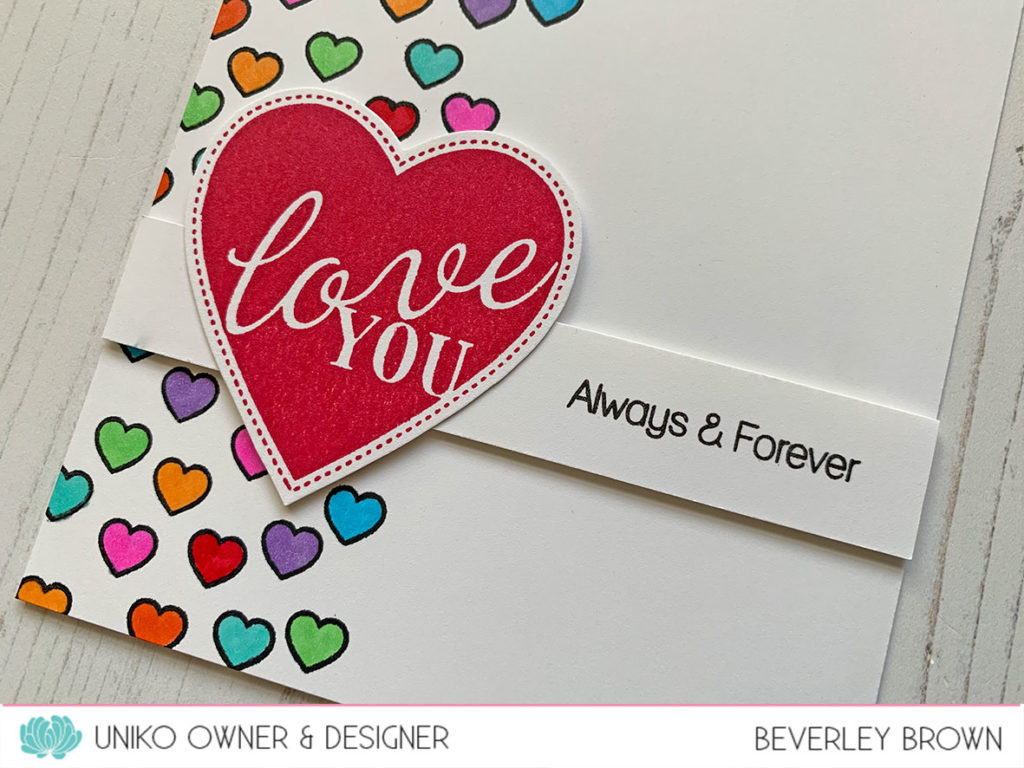
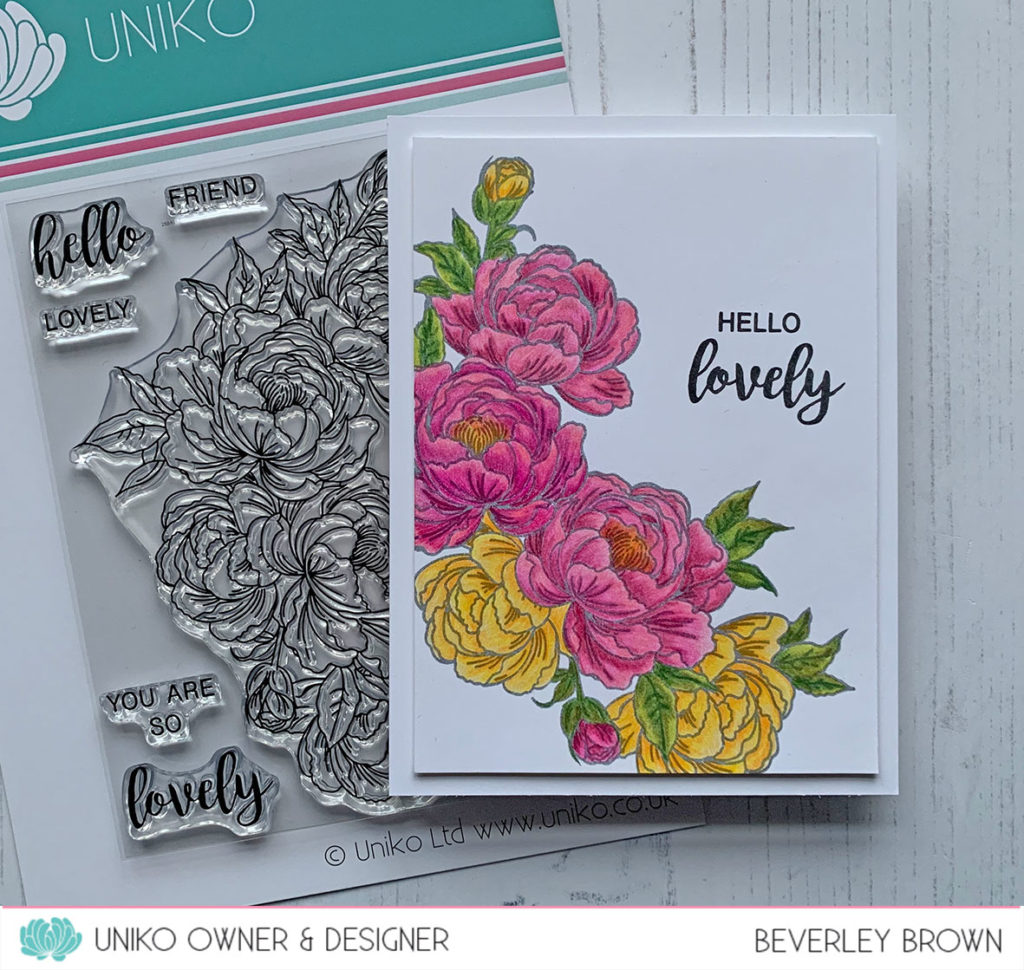
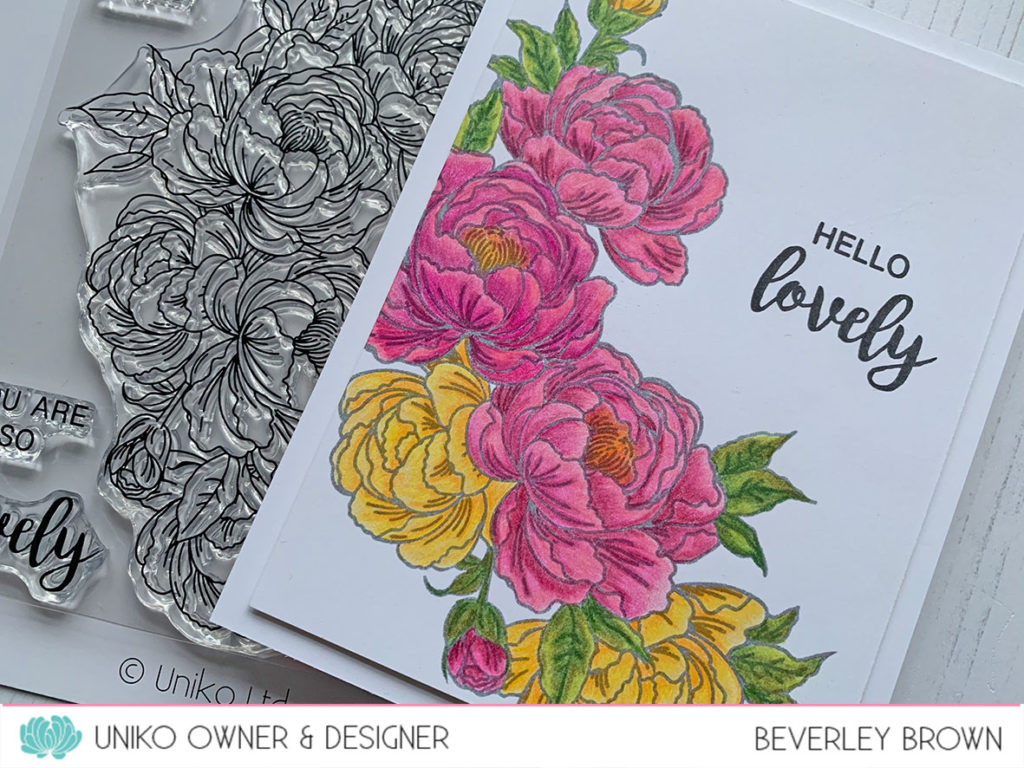
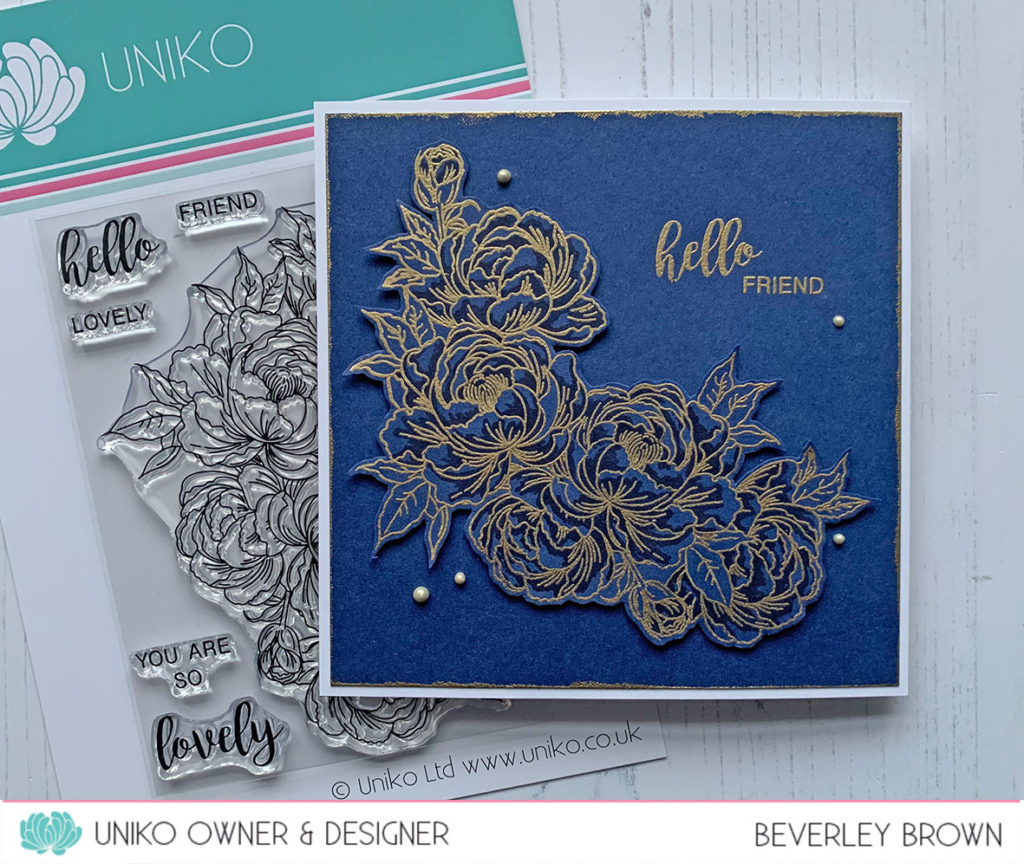
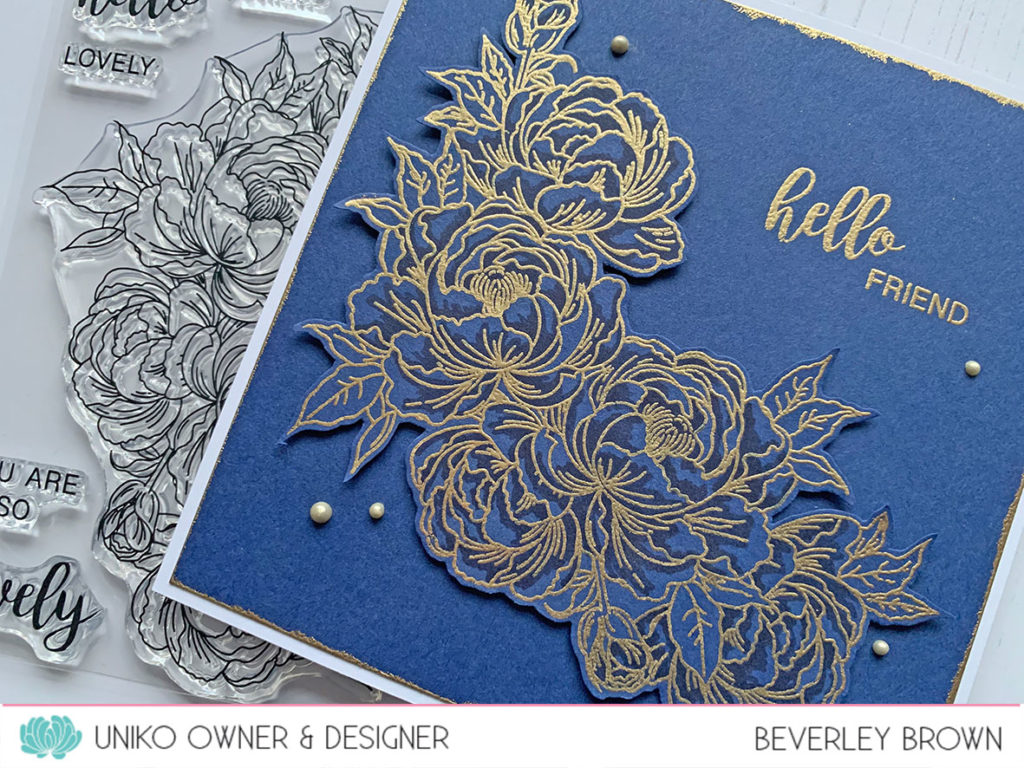
Here’s what I was inspired to create…

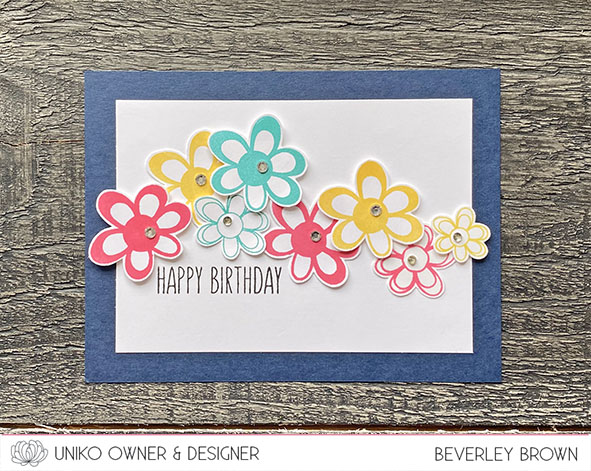
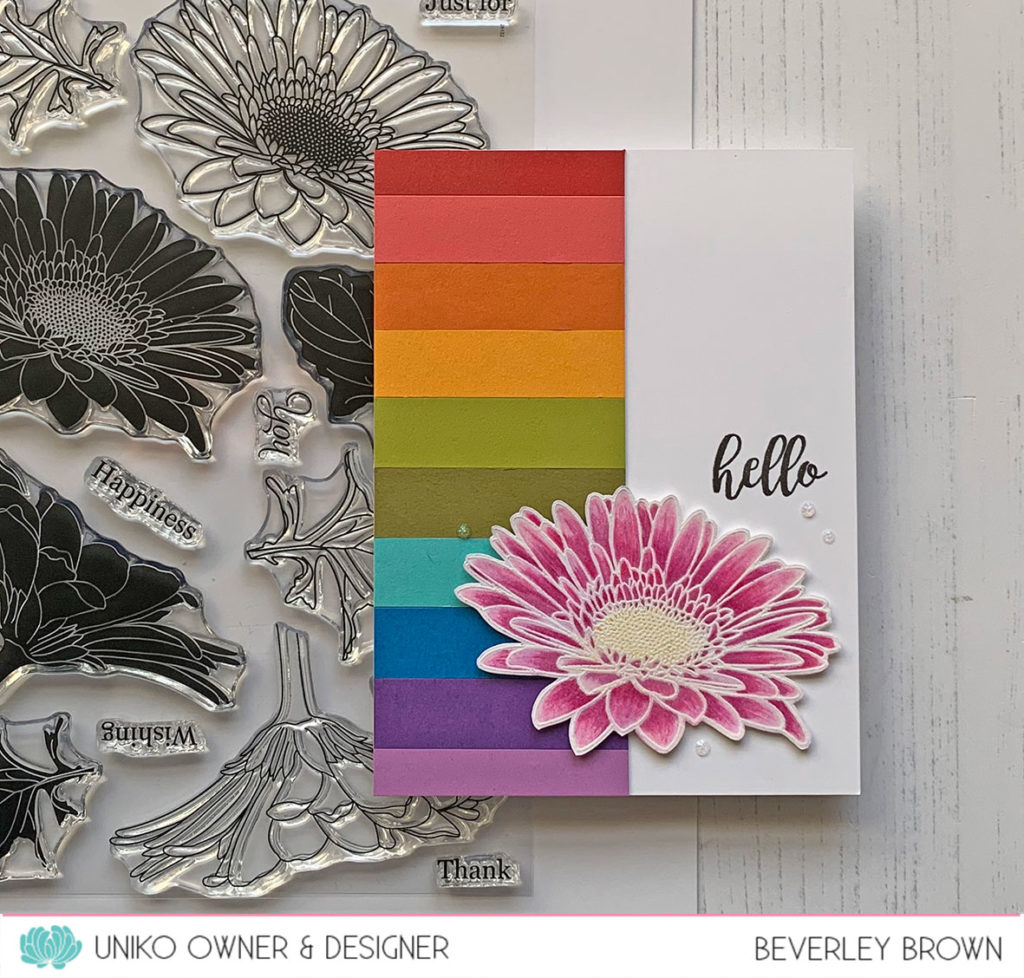
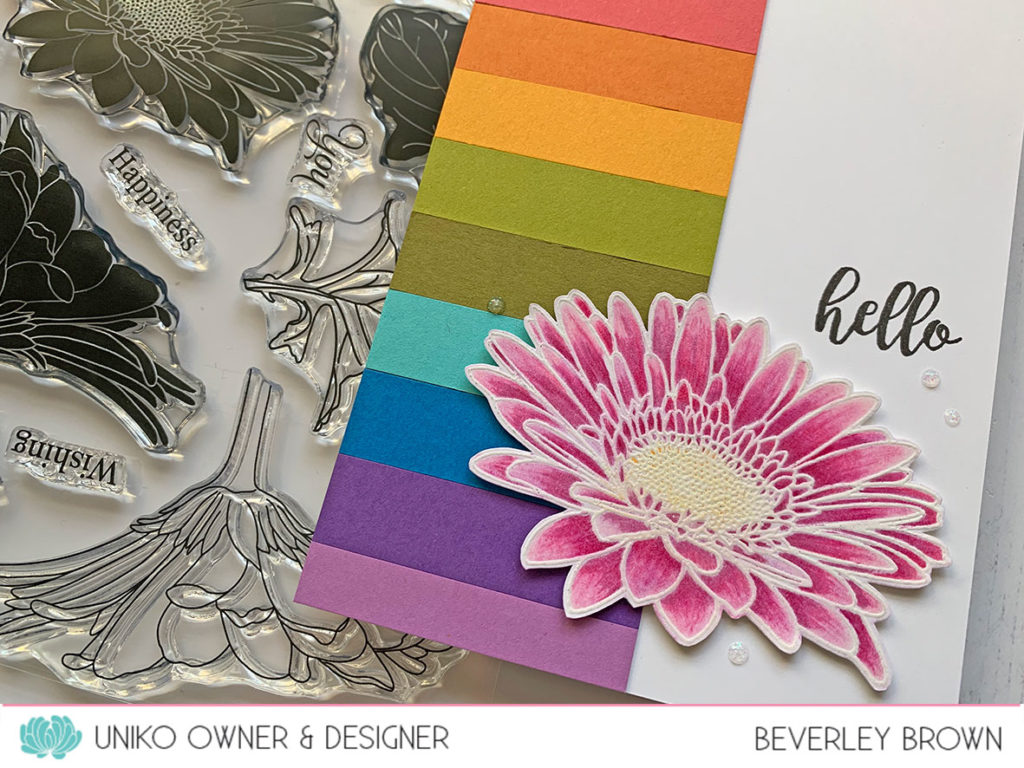
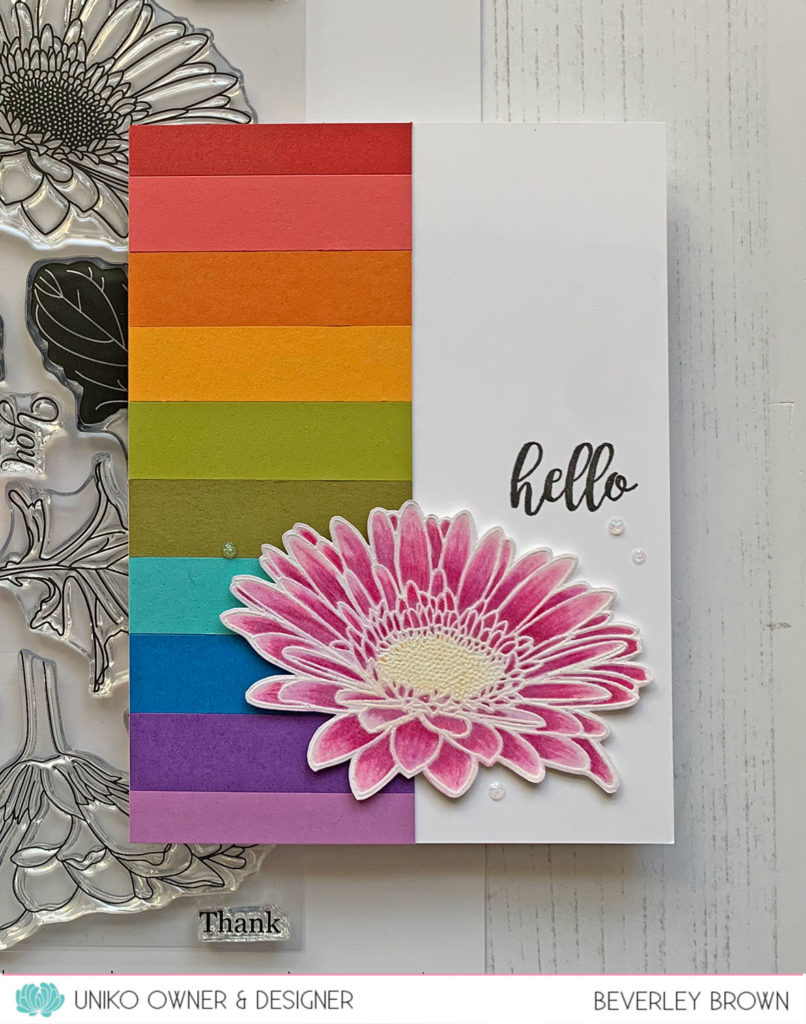
Not a slimline card this time, but a modern floral one using the newly released Doodle Flowers. I’ve also put in a trio of smaller flowers from the Background Blocks Doodle Flower for a little bit of variety and interest.

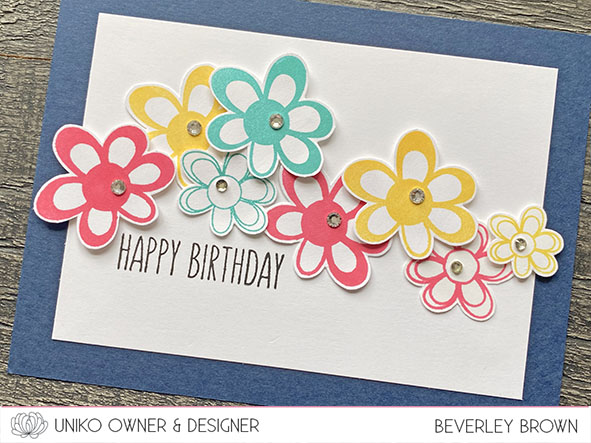
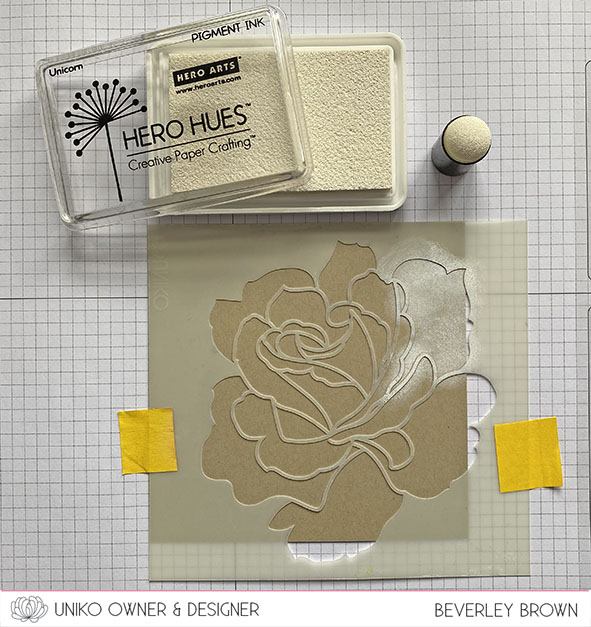
I started by stamping the flowers in a trio of Concord & 9th ink colours, Honeysuckle, Buttercup and Oceanside. I then indulged in some relaxing fussy cutting.

To assemble the card I first stamped the sentiment from Floral Vines and then arranged the flowers. I adhered some flat using DST and some with foam adhesive. I then finished off with a few clear rhinestones.

That’s all from me today, but I will be back soon with more to share using the July Release. Until then, thank you for stopping by & I look forward to seeing you in the gallery.

Crafty Hugs

Introducing… Stencil English Country Garden Butterflies Bundle

Hello & Happy Saturday!

Welcome back to day 3 and the final introduction of the June 2021 Mini Uniko Stencil Release. Hopefully you have hopped on over from HERE, the start of the hop.

Let me introduce you to the next stencils, English Country Garden Butterflies Bundle…

The bundle consists of two 6 x 6 inch stencils and a mask. Although I have bundled these together, there are lots of creative ways of using them on their own. Just as there is by using them together and combined with the English Country Garden Butterflies clear stamp AND the English Country Garden Butterflies Designer Dies!

Here is how I used them today…

I started off simple for my first card & combined both of the stencils. I started by inking the solid butterfly first with Distress Oxide inks in Mustard Seed, Spiced Pumpkin & Lipstick.

I then placed the detail stencil over the top and used Spiced Pumpkin, Lipstick and Festive Berries. I finished the card with a sentiment from Birthday Sentiments.

So many ideas for these stencils, but lastly for today I wanted to use just the butterfly mask…

I often forget to reach for other colour card, but I am currently going through a phase of using Kraft! I love how Distress Oxide inks still remain bright and vibrant on Kraft.

For this I temporarily adhered the mask and inked around using Salvaged Patina, Wilted Violet & Picked Raspberry. The sentiment is from Simply Said Blocks II and I added a little trio of black Nuvo Drops.

That’s all from me today, but be sure to hop around all of the Brand Ambassador blogs…

This stencil bundle along with the others introduced over the last couple of days will be available for purchase HERE on the website tomorrow Sunday 20th June at 9am BST. 


Be sure to pop back tomorrow for the June 2021 Stencil Release, Brand Ambassador Blog Hop & GIVEAWAY!

Crafty Hugs 

Introducing… Stencil Pure Florals Rose

Hello & Happy Thursday!

I am delighted you have stopped by today. Hopefully you have hopped on over from HERE, the start of the fun!

I am so excited to be bringing a Mini Uniko Stencil Release this month and today myself and the Uniko Brand Ambassadors get to show you the new stencils in action.

I’m over the moon to be adding these NEW Uniko Stencils to the growing collection. If you missed the peeks and news about the release/s I shared yesterday, be sure to catch up HERE.

Let me introduce you to the next in the Pure Florals collection, Stencil Pure Florals Rose…

This is a 6 x 6 inch stencil, so the bloom is beautifully large like the Chrysanthemum and the Gerbera. And like the others this stencil coordinates with the previously released and popular Pure Florals Rose clear stamp set.

I’ve had SO much fun ‘playing’ with stencils, trying out some mixed media techniques and still keeping a CAS feel with some of them. Like this first card…

For this I used a piece of water colour card. I found some postcard sized pieces, perfect for cards. The make is Langton and the weight is 140g, so nice and sturdy.

For this I started out with my stencil on my work space with the design on the opposite side to the direction I wanted the rose to face on my card.

I then used water based markers (I used Stampin’ Up! as I have a good mix of colours) to colour the lines of the stencil and around the outside. No need to be super perfect at this as once you’ve coloured it, you spritz lightly with water.

Before you place your water colour card over the top, you want to give that a light brushing of water to wet the card. This helps transfer the ink a little more.

The result is a beautiful watercolour outline rose, which was lovely, but I felt it needed a little more definition. I placed the clean and dry stencil over the top and used a fine liner to carefully draw inside the stencil. To finish I mounted the piece onto a dark smokey grey card base and added the congratulations sentiment from Simply Said Blocks II.

Lastly for today I had a play with another fun technique and this time I remembered to take some photos of the process 😉

Hello Distress Oxide inks, it’s been a while 😂 This is a shadow stencilling technique and depending on the stencil you use, it can be quite subtle like it has turned out with this design.

Step 1 – Kraft card base. I used a 13 x 13 cm square. Temporarily adhere your card to your work space and place the stencil where you want the design to be. Ink the design with white pigment ink until you are happy with the coverage.

Step 2 – Remove & clean the stencil. Once clean & dry reposition the stencil leaving a small border. I moved mine up by about 1mm and across to the right by 1mm.

Step 3 – Start applying your chosen colours.

I am using Distress Oxide inks in Wilted Violet, Picked Raspberry, Spiced Marmalade & Mustard Seed. I chose DOI because I find them smoother to blend. Though for this stencil I use sponge daubers instead of a brush as the stencil has large areas with delicate stencil details that can move quite easily.

Apply the colours of ink until you are happy, and then remove the stencil.

Hopefully you can see the subtle white shadow border it leaves on the design.

I kept this card sentiment free and simply mounted the stencilled piece onto a pink and purple card base.

That’s all from me today! Be sure to hop along with the Brand Ambassadors for more inspiration and I do hope you will pop by tomorrow for the next introduction.

Hannelie

Izzy 

Jane 

Julie

Rahmat

Steph


Crafty Hugs 

See Ya 2020!

 Happy New Years Eve!

My apologies for my disappearance just before & over Christmas. I simply took on too much and got totally overwhelmed before Christmas with how much I needed to get done and then Christmas Day came & went! I have since been enjoying some much needed downtime with The Beans & my husband.

This is a little snapshot of our Christmas Day!

I hope you all had a lovely day even though it may have looked different this year under the circumstances. 


As 2020 draws to a close, one of the strangest and another of the hardest years in my 41 years of life, I am looking not to what was bad or hard, but to all that I am grateful for. 


I am grateful for…


 good health

my family

 to have a roof over my head

for my business 


FOR YOU ALL HERE 

Thank you for your continued support & custom at Uniko and sticking with me during one of the toughest years. This card is for YOU ALL.

Today after clearing a walk way and an area on my desk, I made time for me in the studio to create this simple one layer thank you card. Apart from the smaller thank you stamps and one which is on the retired shelf, I think I *need* to design some larger thank you sentiment stamps 😉

Though having Alphabet Outlined is proving to be very useful to spell out larger words, which is what I did for todays card. I paired it with the flower from You Are, Yes You and simply coloured with Copic Markers.
That’s all my creativity I have to share with you today, but before I go and maybe pour myself a large glass of gin, I have a little discount code for you to use on the Uniko website.

THANK YOU once again for all your support & custom. Cheers to a New Year with LOTS more exciting Uniko products to come your way. Nothing, not even Covid 19 is going to stop me from bringing you more FUN and inspiration.


Crafty Hugs Bev x

Love You, Always & Forever

Happy Weekend!

I thought I’d pop by and share a quick Valentine’s card I made the other night using Always & Forever and Background Blocks Scattered Hearts.

Yep, I’m still on that rainbow kick! But don’t these scattered hearts down the edge of the card look so pretty in a rainbow colours?

Currently I am using Catherine Pooler Midnight ink to stamp images that I know I am going to colour with Copic Markers, so this is what I did with the hearts. The Always & Forever sentiment is stamped in VersaFine Onyx Black ink as this is my go to for sentiments, especially fine lined ones like this.

No major plans here this weekend, just downtime with The Beans and hopefully a little time in the studio to create 😉

Have a wonderful day.

Crafty Hugs

Feature Friday – Pure Florals Gerbera

Happy Friday!

I thought I would pop by today and share a card I was inspired to make after the restock of Pure Florals Gerbera arrived in the studio earlier this week. It’s taken me a couple of days to finish it in-between work as I am very slow at colouring!

I’ve said it before, but I really do get inspired to use older stash when a restock of them arrives, it’s like getting new stamps all over again.

This clear stamp set was launched way back in July 2012 and even though styles, trends and fonts have changed over the years since, this set is timeless with the realistic style it is drawn in.

With a goal this year to use more colour in my creations, I seem to be stuck on the rainbow colour train right now!

I have so many boxes of coloured card scraps, that I am trying to use as much as I can from them and not break out any more new sheets. So I created a rainbow of coloured strips down the edge of my card. I have to say, it seems like I used a lot here, but it has hardly made a dent!

The Gerber flower is the outline full face flower stamped and embossed with WOW! Opaque Bright White and I have coloured it using Prismacolor Pencils.

I decided to add a sentiment from the newly released Hello Lovely clear stamp set and my usual Nuvo Drops, this time in White Blizzard.

It was a refreshing change to use this older stamp set again & I hope to share more new creations with much loved and previously released Uniko clear stamp sets with you this year.

Thanks for stopping by today.

Crafty Hugs

Rainbow Hearts

Happy Hump Day!

How’s your week going? Mine didn’t start well with no hot water Monday morning and the house alarm going off at 5am for no reason. To then having the plumbers round and taking off all the radiators in the house. It was chaos!

I am so glad I did essential work like packing orders (thank you 🙂 )before they arrived as I had to move one side of my studio to the other (it’s not a big room either) so they could get to the radiator. It took me all evening when they had gone to get the house straight and sort The Beans out too!

Things have improved slightly but I’ve been hitting minor problems each day and it’s frustrating. So today after I had finished my essential jobs, I set to making a card to cheer myself up.

This week at school The Beans are reading a book called ‘Rainbow Fish’, so it inspired me to make a rainbow card. All these colourful hearts make me happy 🙂

I’ve used some of my favourite Altenew colours to stamp the striped heart from BIG & BOLD Love from the NEW Uniko release. Instead of making a Valentine’s card I decided to add a congratulations sentiment from Simply Said Blocks II. This way the card can be used for a Wedding, Anniversary or engagement card to name a few occasions.

In the photo above you can see how I have used my favourite 1mm thick foam adhesive to adhere all the hearts and sentiment.

I hope this card has added some cheer to your day like it has mine 🙂 Thanks so much for popping by today & I hope to be back tomorrow with another card to share.

Crafty Hugs

Introducing… Hello Lovely

Happy Friday & welcome to the last of the January 2020 Release product introductions. Today I have saved the new floral addition to the Uniko clear stamp set line up till last.

So I introduce to you, Hello Lovely.

This on trend floral stamp set features a large spray of peony blooms that takes centre stage on your paper craft projects. You probably recognise the peony bloom from the previously released Pure Florals Peony. I have a little comparison to show you of the two stamp sets together side by side…

As you can see from the photo above there is quite a difference in the size of the blooms.

How about a look at Hello Lovely in action…

On this first card I have stamped them in Lawn Fawn River Rock ink and coloured the blooms with my Prismacolour pencils.

The sentiment is one of the mix and match options contained in the set and I am just loving these fonts.

Next I wanted to create a card to show how you don’t need to be a fan of colouring to use this stamp set.

I’ve not used or touched on the Pantone colour of 2020 much yet, so I was inspired to use Stampin’ Up! Night of Navy. I stamped the peony spray with VersaMark ink and embossed with WOW Metallic Gold Rich Regular embossing powder.

Before fussy cutting the stamped image out, I did add a few lowlights to the blooms using my B99 Agate Copic marker and using the colourless blender to remove any colour that went onto the embossed lines.

Before

That is all the cards I have to share with you today, I hope you have enjoyed all the product introductions this week?

I will be back tomorrow with the Uniko Brand Ambassadors at 9am GMT for the January 2020 Reveal, Release, Brand Ambassador Blog Hop & GIVEAWAY! I hope you will join us and comment along the hop for your chance to win the ENTIRE release! All the products will be available to purchase in the store HERE too 😉

Thank you so much for stopping by today.

Crafty Hugs

Introducing… Background Blocks Scattered Hearts & Re-introducing Always & Forever

Hey!

I’m back today with one new product introduction and one re-introduction of a previously retired clear stamp set. It’s always nice when older stamp sets can make a return as trends change & they fit in nicely with new products.

I have a trio of cards to share with you today using these stamp sets and I’ve also combined another popular stamp set which coordinates beautifully with Always & Forever.

First up I have used Background Blocks Scattered Hearts combined with the ‘Happy Heart Day’ sentiment from You Are… Sentiments Outlined, which I introduced yesterday HERE.

For this card I have stamped the block as a focal image and overlaid the sentiment stamped on a simple panel raised with foam adhesive. I use 1mm thick foam adhesive as it still gives dimension, but is still mail friendly!

The layout of my card is from this weeks CAS Colours & Sketches challenge seen HERE and below, such a fun sketch to join in on 🙂

I used Catherine Pooler Midnight ink to stamp both the heart background and the sentiment, as this ink is alcohol marker friendly & I knew I wanted to try out some of my new Altenew Artist Markers.

I used all four markers from the Rose Petal collection to randomly colour the hearts and then I used the darkest shade Cosmic Berry to colour the ‘heart’ in the sentiment. The ‘happy’ and ‘day’ are coloured with a black fine liner. I also added some clear Wink of Stella to some of the uncoloured for some subtle sparkle.

Next I decided to combine both Background Blocks Scattered Hearts with Always & Forever.

This card layout was inspired by the new sketch over at Freshly Made Sketches this week seen HERE and below.

When stamping the Background Blocks Scattered Hearts, it is possible to stamp it so that you can fill a larger area, like I have on this card.

I’ve used a stitched border die (MFT, I think) to die cut the curved panel and I have stamped the ‘Always & Forever’ sentiment in black ink. The ‘Love You’ heart is stamped, fussy cut and adhered using 1mm thick foam adhesive.

Lastly for today I wanted to create a card using Always & Forever and a stamp set it coordinates with, Beautiful Blooms I.

As you can see the floral heart from Always & Forever features the Beautiful Blooms I flower.

From the very beginning of Uniko, I have always tried to design Uniko stamps so that they can be used together for more creative options.

On this card I have stamped the largest Beautiful Bloom onto my base card with VersaMark ink and heat embossed with detail white embossing powder. I’ve then ink blended a pink over the top. The red Beautiful Bloom heart is stamped, fussy cut & adhered with foam adhesive. I’ve added a small line of glitter around the edge of the heart using a quickie glue pen and fine glitter.

That is all the cards I have to share with you today, I will be back tomorrow with one more product introduction. All of the new stamps will be available on Saturday 18th January at 9am GMT.

Thank you so much for stopping by today & I do hope you will come back tomorrow.

Crafty Hugs

Uniko Challenge #57 Anything Goes & Optional Twist Cool Winter Colours

Hey!

Welcome to the January/February 2020 Uniko Challenge.

We’re kicking off 2020 with an Anything Goes theme and have added in the optional twist of Cool Winter Colours for those of you that like to challenge yourselves even more.


We’ve the amazingly awesome Trina P joining us as our Guest Designer and I know you’ll adore her awesome card.

How fabulous is that! Do pop over to her blog and let her know how clever she is – HERE

In January & February I have a few male birthdays & so I thought with the cool winter colours twist of the challenge I would make a masculine birthday card.

For my blues I chose the Altenew Sweet Dreams colour collection of inks and blended them onto my card base using my Taylored Expressions blender brushes. I do love how handy the blender brushes are and seem to be able to control them a little better than the standard foam pad tool!

I kept my design simple by using the Background Block Graffiti Texture and stamping it in Teal Cave ink and the sentiment from Simply Said Blocks stamped in the darkest shade Galactic Stream. The sentiment is adhered to the card using foam adhesive.

Be sure to check out all the inspiration from the Brand Ambassadors HERE on the challenge post & you will also find the link up to the challenge there too.

Need a little more incentive to join in? How about some prizes!

THE PRIZES

  • Main Winner Chosen By the DT – £25 eGift Certificate
  • Random Twist Winner – £5 In Stock Clear Stamp Set of Winners Choosing
  • Random Uniko Stamps Winner – £5 In Stock Clear Stamp Set of Winners Choosing
  • Top 3 Chosen By DT – 150 Loyalty Reward Points

You’ve got plenty of time to play along with this challenge. The deadline for submission is midnight (GMT) on Friday 21st February 2020.

Crafty Hugs,