Posts tagged “Stencils”

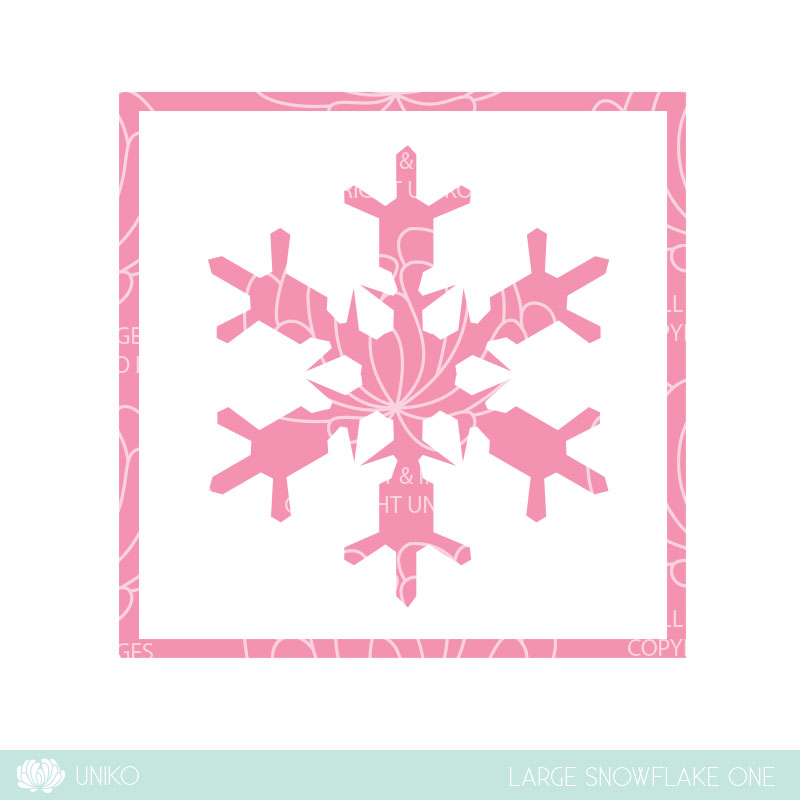
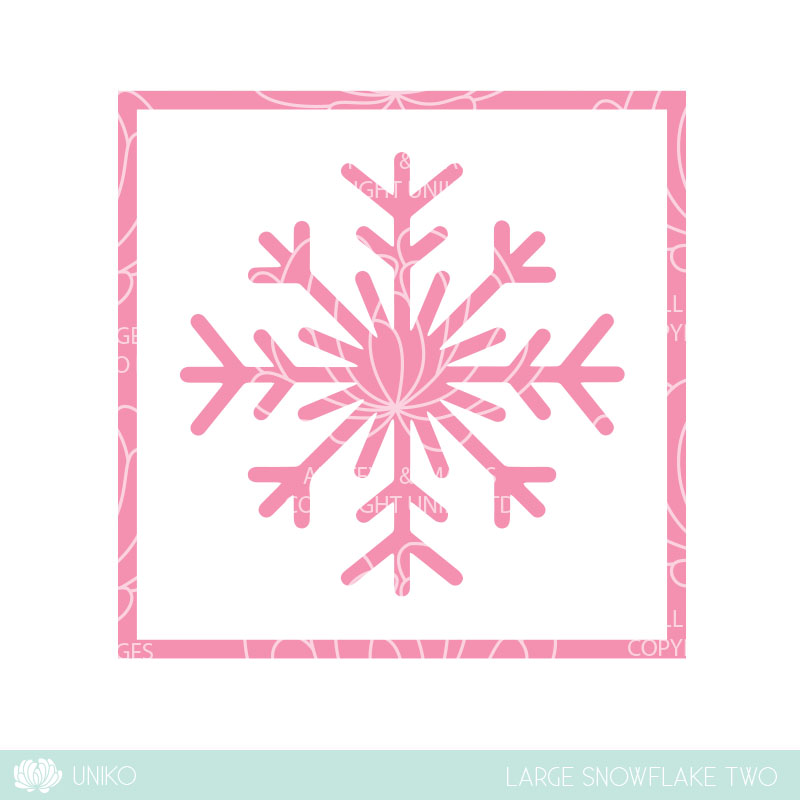
Introducing… Stencil Large Snowflake 1 and Large Snowflake 2

Happy Hump Day! 

We are back today to hopefully get you over the hump with some awesome inspiration as we introduce two fun and festive Stencils – Large Snowflake 1 and Large Snowflake 2.

As you might know, I love snowflakes, so I couldn’t choose just one, so I decided to release both!

Now let’s have a look at them in action. I’ve used the same layout & used the snowflake stencils the same way, but I’ve switched up the colours and used different stencils and sentiments to pair with them.

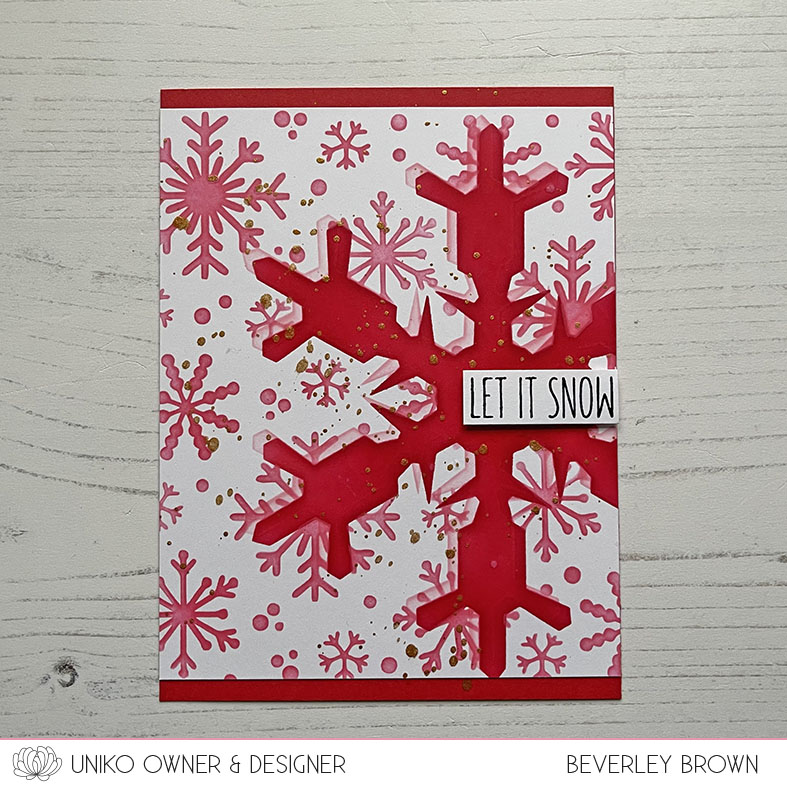
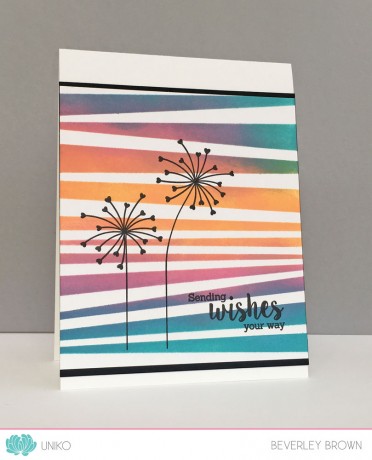
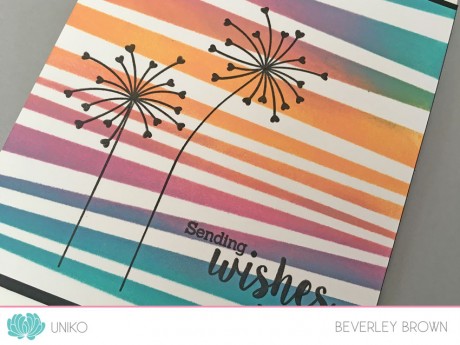
First up for Large Snowflake One I went for an unconventional colour scheme of pinks & reds. I started by placing the snowflake stencil and inking through with Altenew Frosty Pink ink. I then moved the stencil slightly to create a shadow effect and then inked through with Ruby Red.

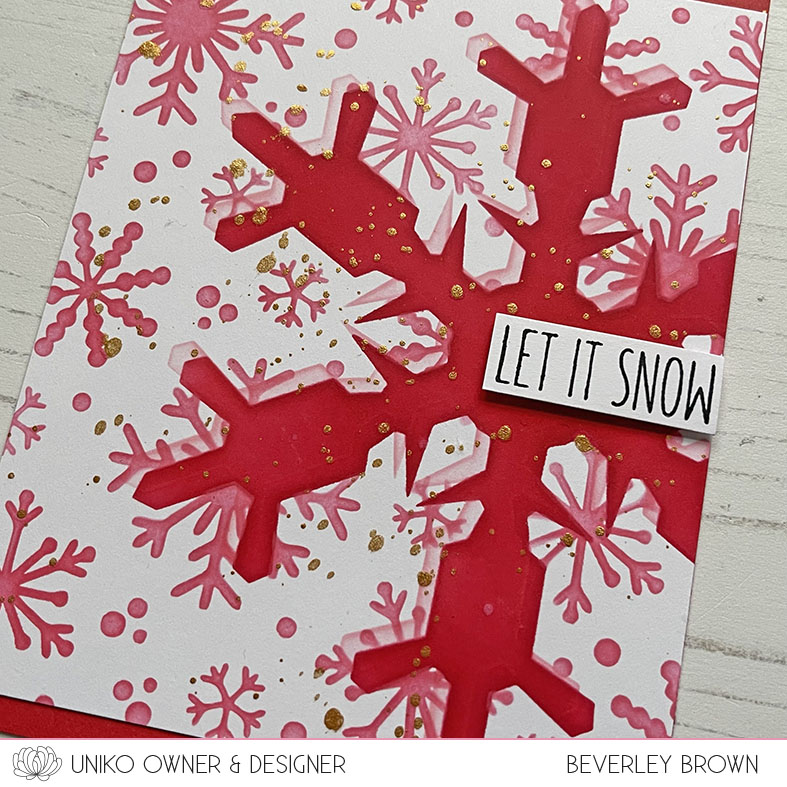
I then removed the stencil and placed the mask over the main red snowflake before placing & inking through the Stencil – Let it Snow with Coral Berry ink. I then splattered with some Gansi Tambi gold watercolour and added the Let it Snow sentiment from Christmas Sentiments.

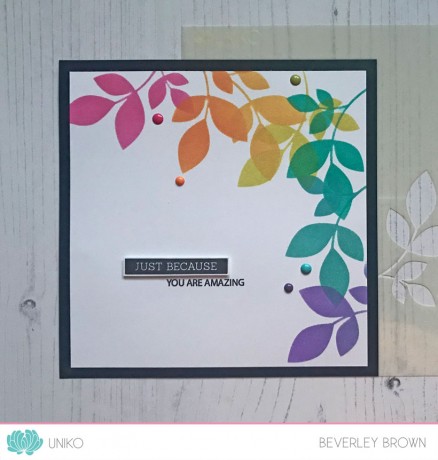
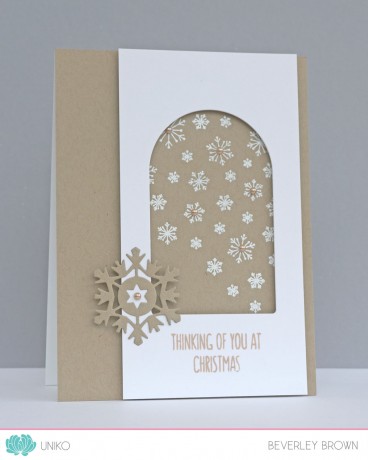
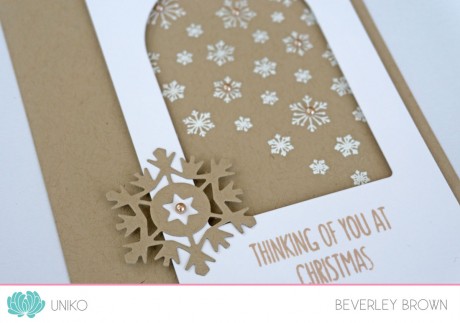
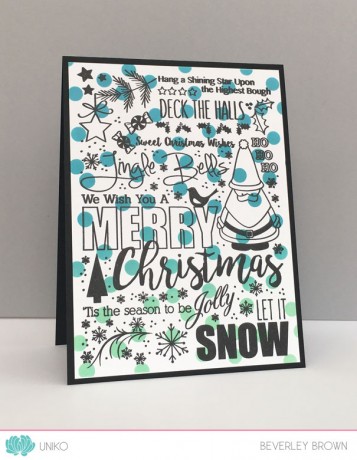
For my second card I used Large Snowflake Two. I followed the same steps as before. This time I used Concord & 9th Inks.

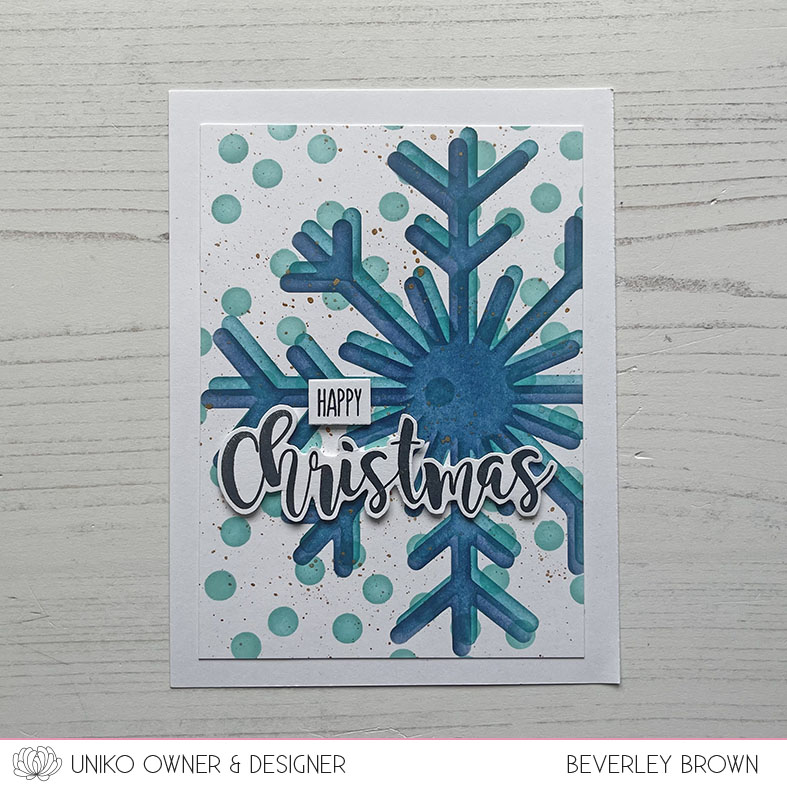
Oceanside & Midnight for the snowflakes and Aqua Sky for the Stencil Scattered Polka Dots. Again I added some gold splatters and the sentiment is from Festive Sentiments, adhered using foam adhesive.

So that’s the formal introductions done! Which means tomorrow is release day – yay!

So which is your favourite? I can’t decide TBH as I just love snowflakes. So that’s it just 4 stencils added to the Uniko line up. They will be available to purchase tomorrow HERE on the website at 9am GMT. 


If you need some more inspiration to help make up your mind, be sure to come back tomorrow for our usual blog hop & giveaway.
See you tomorrow.

Crafty Hugs 

Introducing… Stencil Pure Florals Rose

Hello & Happy Thursday!

I am delighted you have stopped by today. Hopefully you have hopped on over from HERE, the start of the fun!

I am so excited to be bringing a Mini Uniko Stencil Release this month and today myself and the Uniko Brand Ambassadors get to show you the new stencils in action.

I’m over the moon to be adding these NEW Uniko Stencils to the growing collection. If you missed the peeks and news about the release/s I shared yesterday, be sure to catch up HERE.

Let me introduce you to the next in the Pure Florals collection, Stencil Pure Florals Rose…

This is a 6 x 6 inch stencil, so the bloom is beautifully large like the Chrysanthemum and the Gerbera. And like the others this stencil coordinates with the previously released and popular Pure Florals Rose clear stamp set.

I’ve had SO much fun ‘playing’ with stencils, trying out some mixed media techniques and still keeping a CAS feel with some of them. Like this first card…

For this I used a piece of water colour card. I found some postcard sized pieces, perfect for cards. The make is Langton and the weight is 140g, so nice and sturdy.

For this I started out with my stencil on my work space with the design on the opposite side to the direction I wanted the rose to face on my card.

I then used water based markers (I used Stampin’ Up! as I have a good mix of colours) to colour the lines of the stencil and around the outside. No need to be super perfect at this as once you’ve coloured it, you spritz lightly with water.

Before you place your water colour card over the top, you want to give that a light brushing of water to wet the card. This helps transfer the ink a little more.

The result is a beautiful watercolour outline rose, which was lovely, but I felt it needed a little more definition. I placed the clean and dry stencil over the top and used a fine liner to carefully draw inside the stencil. To finish I mounted the piece onto a dark smokey grey card base and added the congratulations sentiment from Simply Said Blocks II.

Lastly for today I had a play with another fun technique and this time I remembered to take some photos of the process 😉

Hello Distress Oxide inks, it’s been a while 😂 This is a shadow stencilling technique and depending on the stencil you use, it can be quite subtle like it has turned out with this design.

Step 1 – Kraft card base. I used a 13 x 13 cm square. Temporarily adhere your card to your work space and place the stencil where you want the design to be. Ink the design with white pigment ink until you are happy with the coverage.

Step 2 – Remove & clean the stencil. Once clean & dry reposition the stencil leaving a small border. I moved mine up by about 1mm and across to the right by 1mm.

Step 3 – Start applying your chosen colours.

I am using Distress Oxide inks in Wilted Violet, Picked Raspberry, Spiced Marmalade & Mustard Seed. I chose DOI because I find them smoother to blend. Though for this stencil I use sponge daubers instead of a brush as the stencil has large areas with delicate stencil details that can move quite easily.

Apply the colours of ink until you are happy, and then remove the stencil.

Hopefully you can see the subtle white shadow border it leaves on the design.

I kept this card sentiment free and simply mounted the stencilled piece onto a pink and purple card base.

That’s all from me today! Be sure to hop along with the Brand Ambassadors for more inspiration and I do hope you will pop by tomorrow for the next introduction.

Hannelie

Izzy 

Jane 

Julie

Rahmat

Steph


Crafty Hugs 

Uniko’s 7th Birthday Linky Party!

Woohoo!

It’s time for some celebrating! This month at Uniko we are celebrating our 7th Birthday and I am kicking the celebrations off today with a party!

It wouldn’t be a birthday celebration without a PARTY, right?

Now, the party starts over HERE and you can find LOTS of inspiration from my awesome team, the link up to add your entry AND of course all the prize info. There are SEVEN ways to win 😉

All you have to do is create a birthday card and add it to the linky! You don’t have to have a blog to enter, you can link your card from your Instagram, Facebook, Pinterest or like with ALL Uniko Challenges you can email me your entry to add.

You don’t have to use Uniko products, but I’d LOVE to see you using your Uniko stash (including Uniko Digital Freebies) AND there is an extra opportunity to win a prize if you do 😉

Okay, enough chit chat, how about some inspiration…

UnikoBirthdayLinky1

I dusted off a couple of sets for this card, Background Builders: Seeing Stars and Balloon Bash. I used my MISTI tool to stamp both the diagonal ombre star stripes and the ombre balloon. I drew the ballon string with a fine liner as I wanted a nice crisp string! The sentiment is from Simply Said.

UnikoBirthdayLinky1a

The layout of my card was is from this weeks Freshly Made Sketches challenge seen HERE and below. This is one of my favourite challenges to join in on when I can 🙂

Next I wanted to try out a new glimmer paste that arrived in the post, Nuvo Glimmer Paste – Moonstone. My goodness, this stuff is lush! Just look at the shine…

UnikoBirthdayLinky2

This time as I wanted to use the paste through a Uniko Stencil I used the Balloon Bash stencil. I started out with the round pink balloon and used Altenew Cherry Blossom collection inks to achieve the ombre effect.

UnikoBirthdayLinky2b

I then masked off the pink balloon to layer the larger balloon behind inked up in Altenew Sweet Dreams collection. I then went back and placed the stencil over the smaller round balloon to

FMS Final 373-001apply the glimmer paste. Now, usually I struggle with applying pastes on a large surface, but this stuff… this stuff glides on beautifully!

UnikoBirthdayLinky2a

This time I was inspired to join in on another favourite challenge, AAA Cards HERE and seen below. For this challenge they want you to use a third of your card (so leaving a third of your card with white space) & an optional twist of masking.#132

That’s all I have to share with you today, thanks for stopping by and joining in on the fun!

Hugs

Introducing… Simply Said Blocks II and Natures Treasures II Stencil & Mask

Hey!

Welcome to the first day of the May 2018 Release product introductions. This is the fun part, you now get to see all the sneak peeks in action. The Design Team and our Guest Designer for May Anna have worked their socks off and created an abundance of inspiration to share with you over the coming days 🙂

Today we are introducing 2 products. Simply Said Blocks II a mini clear stamp set with additional popular sentiments in the same style as Simply Said Blocks. And we are ‘officially’ introducing Natures Treasures II Stencil. This stencil was part of the Uniko Stamping Retreat goody bag in Dec 2017. It has proven popular with those that attended, myself and some of the DT, that it was time it was made available to everyone 🙂

Hopefully you have hopped on by from our lovely Guest Designer, Anna’s blog HERE.

How about a bit more inspiration?! I’ve a couple of cards to share using a combination of the Natures Treasures II Stencil and sentiments from Simply Said Blocks II and a sneak peek of some others from another clear stamp set we will be introducing next week 😉

IntroNT2stencil2

I thought I’d start off with a super CAS card and a bit of partial fussy cutting! For this card I began with a 10.5 x 12 cm piece of white card. I stamped the sentiment from a clear stamp set we are introducing in a couple of days called Just Because first, so that I could then position and ink the leaf.

IntroNTstencil2a

I used a trio of Distress Oxides to do this, Fossilized Amber, Spiced Marmalade and Picked Raspberry. I then drew a soft pencil line where I wanted to cut straight and then went ahead and fussy cut it out. This panel is then adhered to my base card using 1mm thick foam adhesive.

For my next card I channeled my inner Laura Bassen, to create this rainbow card.

IntroNT2stencil3

Again I used Distress Oxides and simply worked across from Picked Raspberry down to Wilted Violet. The sentiment is a combination from Simply Said Blocks II and Just Because.

IntroNT2stencil3a

That’s all I have to share with you for today, but there is LOADS more inspiration from my awesome Design Team. Be sure to hop along and leave some love along the way 🙂

Hugs

Release Schedule…

Sneak Peeks 1st – 4th May 2018, these little teasers give you hints at what is in store!

Introducing… 5th – 11th May 2018, here you will see a closer look at the products being released with a daily blog hop with the Uniko DT.

Release Day! Saturday 12th May 2018 9am BST you will get to see the products in their entirety and purchase them HERE on the website! As usual there will be a Design Team Blog Hop & GIVEAWAY!


Extra PRIZE Info! Alternative prizes will be offered to those that may already own the prize offered. Winners will be announced on Saturday 11th on the Winners Page HERE

October 2017 Reveal, Release, Blog Hop & GIVEAWAY!

WhooHoo!

It might be Monday, but it is a HAPPY Monday here at Uniko HQ, as it is FINALLY release day! All the products and sneak peeks at brand spanking NEW products are now available HERE to purchase.

Hopefully you have hopped over from the Uniko Blogspot blog HERE, where I have formally introduced all NINE new products lining the shelves! We have 5 new clear stamp sets, 2 new Designer Dies AND 2 NEW Uniko Stencil Designs!!

How about a little bit of inspiration using the new products…

Oct17ReleaseBBfs1

{Click Photo for a Closer Look}

First up is this wintery snowflake window card. I’ve used Background Blocks Falling Snowflakes, stamped in VersaMark and heat embossed in white behind a window die cut using a tag shaped die. I’ve then added a sentiment from Festive Sentiments and embellished the design with the small Designer Die Snowflake.

Oct17ReleaseBBfs1a

{Click Photo for a Closer Look}

My next are samples I created whilst demoing at Stamp Magic yesterday. I couldn’t resist giving the NEW Uniko Stencils a whirl with my recently purchased and growing collection of Distress Oxide Inks and then doing some simple stamping using Block Party Christmas and Organic Wishes.

WonkyWishes1

{Click Photo for a Closer Look}

Here I have used Spiced Marmalade, Peacock Feathers and Picked Raspberry to blend together using a ‘pouncing’ motion with my ink blending tool over the Wonky Stripes Stencil. I have then stamped the heart ended seed heads, double stem and sentiment from Organic Wishes.

WonkyWishes1a

{Click Photo for a Closer Look}

While I was using the Wonky Stripes Stencil I sent ahead and created another panel using the same colours. This time I decided to over stamp Block Party Christmas.

WonkyBPxmas

{Click Photo for a Closer Look}

It is a really fun and unique way of adding colour and interest to these subway art style stamps! Plus each time you blend the colours you can achieve a different colour way, blend mix and look of the stencil design.

Lastly I decided to give some more love to the Scattered Polka Dots Stencil and again paired it with Block Party Christmas.

PolkaPBxmas1

{Click Photo for a Closer Look}

Hopefully I have inspired you a little more using the new products available today, but I know that the Design Team have some fabulous inspiration too, so be sure to hop along the links below and to comment along the hop for your chance to win the ENTIRE October 2017 Release!! You have until Midnight (BST) Monday 23rd October to comment and the winner will be announced Tuesday 24th October.

Happy Hopping!

CLICK HERE to see more from Carol

CLICK HERE to see more from Deborah

CLICK HERE to see more from Izzy

CLICK HERE to see more from Jane

CLICK HERE to see more from Lindsey

CLICK HERE to see more from Rahmat

CLICK HERE to see more from Sarah P

 Hugs