Posts tagged “Handmade Cards”

Simply Cards & Papercraft Feature Plus FREE Digital Downloads.

Hello & Happy FriYAY 🎉

Earlier this week I was delighted to receive my copy of Simply Cards & Papercraft issue #244 in the mail. I am always excited to see Uniko in print and again I have designed a fabulous collection of FREE digital images for you all to use.

If you love Uniko’s Paradise Collection as much as me, then I think you will enjoy this Tropical Bouquets digital collection too.

Here is a peek at the feature in the magazine and a full look at one of the cards I have made for the feature using the images. 

The FREE Digital Collection can be downloaded by visiting CraftWorld HERE.

I hope you enjoy using them and if you are on social media, please tag @unikoltd so I can see them or why not join Uniko’s Facebook Group Uniko Ltd and share your makes in there. 

And how about a little Giveaway. 


I’ve an extra copy of the magazine to give to one lucky comment left on any of Uniko’s posts across all social media, sharing the news about this collection. So if you follow Uniko on Instagram and Facebook as well as the blogs, you have even more chances to win! 


Simply leave a comment before midnight Friday 19th May 2023 and I will randomly select a winner and announce Monday 22nd May 2023.


Crafty Hugs 

Introducing… Designer Dies Natures Treasures II Day One

Happy Wednesday!

Hopefully you have hopped on over from HERE, where myself and Vinita are getting you over the mid week hump with the first of three days creativity introducing you to the NEW Designer Dies Natures Treasures II.

These dies didn’t quite arrive in time for the last release, hence why I have a mini surprise release this week! It seems weird releasing just one product, but I couldn’t have them sit on the studio shelf any longer.

So, as its a little different than normal I have changed up the introductions a little.

But enough talk, lets see them in action…

When I design I am constantly thinking of versatility. How can I provide more creative options with this design. So when it came to the dies that coordinate with the previously released Natures Treasures II clear stamp set, I also wanted them to work as stand alone dies. Where you don’t have to use the stamps, if you didn’t want to. I am pleased how I have achieved this.

For this first card I combined the stamps and the dies, but not in the usual stamping on the die cut way. I used the more solid stamped leaf to create a frame and then the open leaf dies to create a focal point inside the frame, that is adhered using foam adhesive.

I added a bakers twine bow and some Bottle Green Crystal Nuvo Drops and the sentiment is from Floral Vines.

For my second card, I went for the traditional shaker card…

New dies ALWAYS call for a shaker card in my opinion! Here I went for the easy shaker option using the solid leaf die cut.

The shaker element is Sprinkles: Cupcake Dreams from Little Things from Lucy’s Cards that I bought ages ago.

Again the sentiment is from Floral Vines and I finished off the CAS design with Dandelion Gloss Nuvo Drops.

Lastly for today I used the dies and stamps the traditional way, stamping and die cutting.

I always start by stamping the leaves and to get (an almost, as it isn’t 100% guaranteed) perfect die cut, I use a die cut mask.

And before I get to the other supplies I used, can we just appreciate the die cut Oceanside leaf at the bottom. Finally beautiful detail of the inside of the leaf being cut out. *insert all the heart eyes*.

The stamped lines are from Background Builders Classics and the sentiment is from Everyday Spring Sentiments.

That’s all from me today.

Thank you for stopping by & Crafty Hugs 

Introducing… Spring Botanicals Crocus

Welcome to Day 1 of the product introductions for our 11th Birthday Release. 

Hopefully you have hopped on over from HERE, the start of the Brand Ambassador inspirational blog hop. Today myself and the Brand Ambassadors are showcasing the newest addition to the Spring Botanicals Collection, Spring Botanicals Crocus. 

Let’s have a look at this flower in action…

I started with my usual clean & simple style. I stamped and coloured the crocus with Prismacolor Pencils and then fussy cut the image out. I started cutting the two wispy leaves first and then followed the flower round.

I’ve then adhered the flower to a white card base using foam adhesive. My sentiment choice is from another clear stamp set we are introducing later this week! I finished off with a few enamel dots from my stash.

For my second card today I went with a ‘quicker’ colouring option. I highlight ‘quicker’ as in reality it took me a while to mask & ink each of the horizontal stripes!

I’d used these colours on another card I am sharing later this week and I really liked them, hence why I chose to use them with the Background Blocks Horizontal Stripes. I used my MISTI stamping tool and plenty of masking paper to achieve the look.

I then stamped the crocus over the top in black ink. This time I opted for one of the sentiments from the set.

Lastly for today I put my ink blending to the test. I was going for a rainy spring morning sky with the sun just rising. I used Concord & 9th Dove, Midnight, Grapefruit, Buttercup and Sprout.

I then heat embossed the crocus in white before colouring with Copic Markers and again opting for a sentiment from the same set as my first card.

That’s all for my inspiration today using this clear stamp set. But be sure to hop along the Brand Ambassadors to see what they have come up with.

We will be back tomorrow with more to share. This clear stamp set, along with all we are introducing this week will be available on Saturday 4th March 9am GMT. 

Crafty Hugs 

Introducing… Stencil English Country Garden Butterflies Bundle

Hello & Happy Saturday!

Welcome back to day 3 and the final introduction of the June 2021 Mini Uniko Stencil Release. Hopefully you have hopped on over from HERE, the start of the hop.

Let me introduce you to the next stencils, English Country Garden Butterflies Bundle…

The bundle consists of two 6 x 6 inch stencils and a mask. Although I have bundled these together, there are lots of creative ways of using them on their own. Just as there is by using them together and combined with the English Country Garden Butterflies clear stamp AND the English Country Garden Butterflies Designer Dies!

Here is how I used them today…

I started off simple for my first card & combined both of the stencils. I started by inking the solid butterfly first with Distress Oxide inks in Mustard Seed, Spiced Pumpkin & Lipstick.

I then placed the detail stencil over the top and used Spiced Pumpkin, Lipstick and Festive Berries. I finished the card with a sentiment from Birthday Sentiments.

So many ideas for these stencils, but lastly for today I wanted to use just the butterfly mask…

I often forget to reach for other colour card, but I am currently going through a phase of using Kraft! I love how Distress Oxide inks still remain bright and vibrant on Kraft.

For this I temporarily adhered the mask and inked around using Salvaged Patina, Wilted Violet & Picked Raspberry. The sentiment is from Simply Said Blocks II and I added a little trio of black Nuvo Drops.

That’s all from me today, but be sure to hop around all of the Brand Ambassador blogs…

This stencil bundle along with the others introduced over the last couple of days will be available for purchase HERE on the website tomorrow Sunday 20th June at 9am BST. 


Be sure to pop back tomorrow for the June 2021 Stencil Release, Brand Ambassador Blog Hop & GIVEAWAY!

Crafty Hugs 

Introducing… Stencil Pure Florals Rose

Hello & Happy Thursday!

I am delighted you have stopped by today. Hopefully you have hopped on over from HERE, the start of the fun!

I am so excited to be bringing a Mini Uniko Stencil Release this month and today myself and the Uniko Brand Ambassadors get to show you the new stencils in action.

I’m over the moon to be adding these NEW Uniko Stencils to the growing collection. If you missed the peeks and news about the release/s I shared yesterday, be sure to catch up HERE.

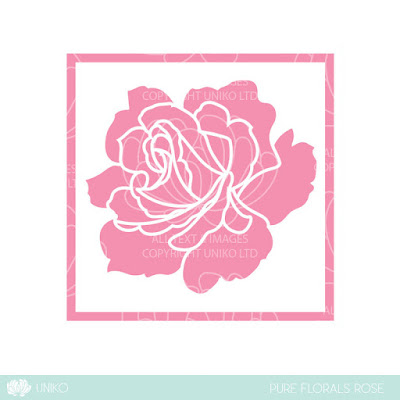
Let me introduce you to the next in the Pure Florals collection, Stencil Pure Florals Rose…

This is a 6 x 6 inch stencil, so the bloom is beautifully large like the Chrysanthemum and the Gerbera. And like the others this stencil coordinates with the previously released and popular Pure Florals Rose clear stamp set.

I’ve had SO much fun ‘playing’ with stencils, trying out some mixed media techniques and still keeping a CAS feel with some of them. Like this first card…

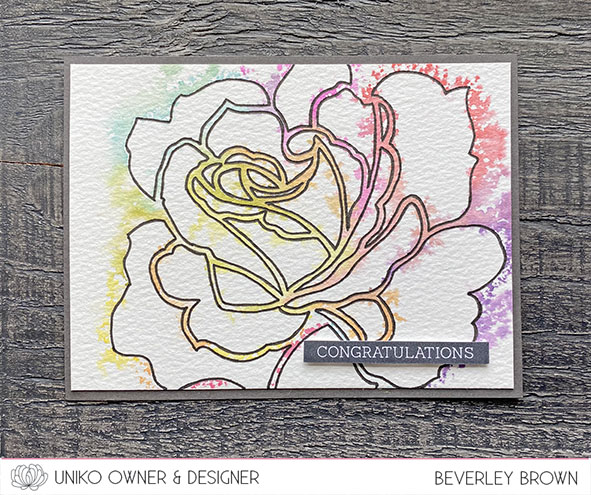
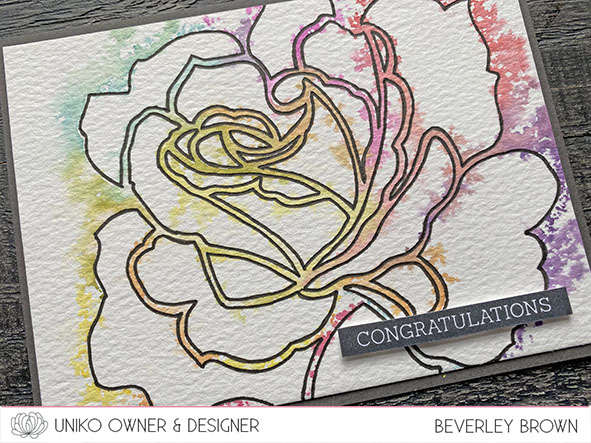
For this I used a piece of water colour card. I found some postcard sized pieces, perfect for cards. The make is Langton and the weight is 140g, so nice and sturdy.

For this I started out with my stencil on my work space with the design on the opposite side to the direction I wanted the rose to face on my card.

I then used water based markers (I used Stampin’ Up! as I have a good mix of colours) to colour the lines of the stencil and around the outside. No need to be super perfect at this as once you’ve coloured it, you spritz lightly with water.

Before you place your water colour card over the top, you want to give that a light brushing of water to wet the card. This helps transfer the ink a little more.

The result is a beautiful watercolour outline rose, which was lovely, but I felt it needed a little more definition. I placed the clean and dry stencil over the top and used a fine liner to carefully draw inside the stencil. To finish I mounted the piece onto a dark smokey grey card base and added the congratulations sentiment from Simply Said Blocks II.

Lastly for today I had a play with another fun technique and this time I remembered to take some photos of the process 😉

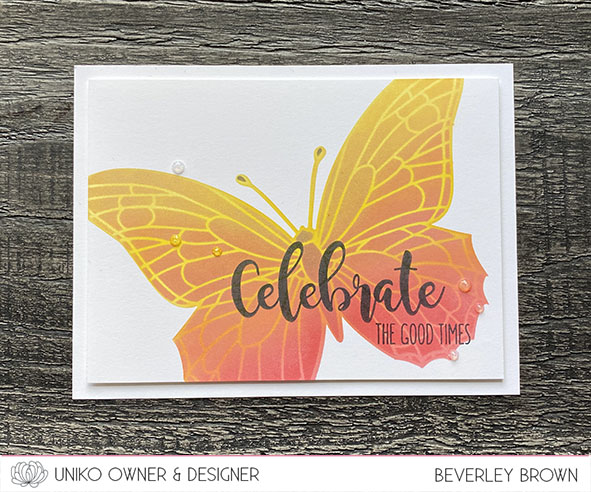
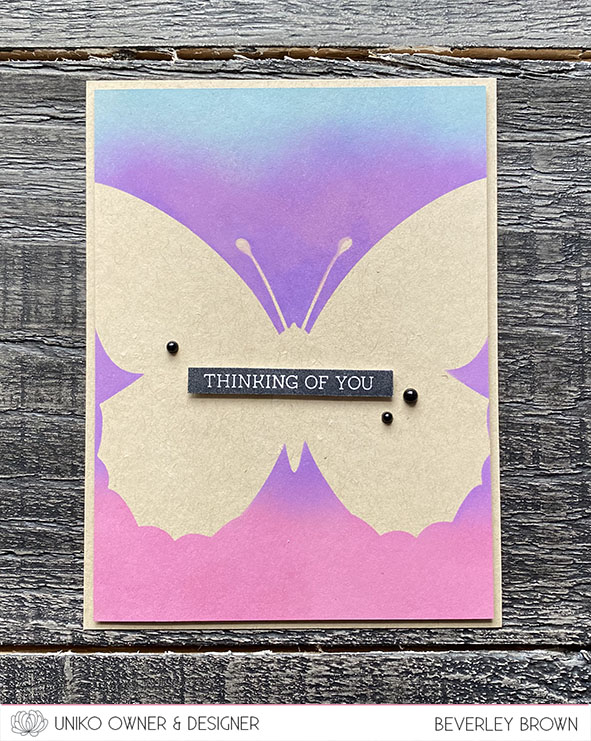
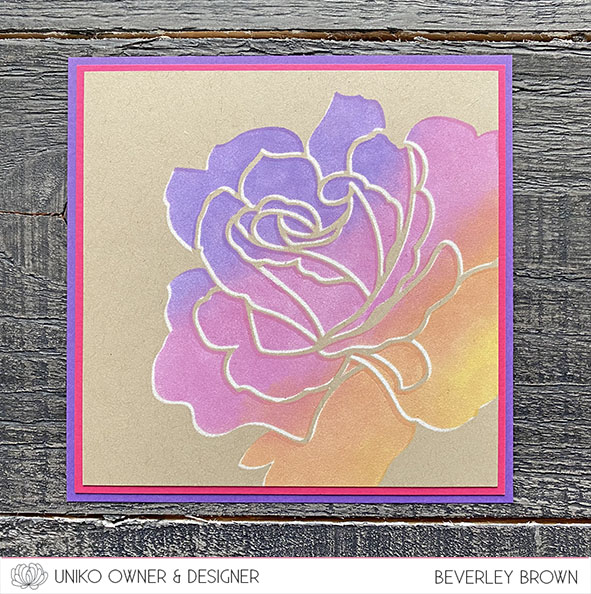
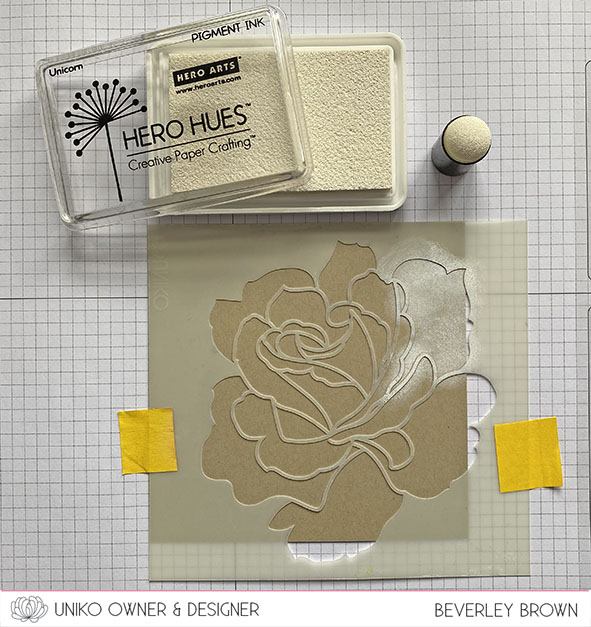
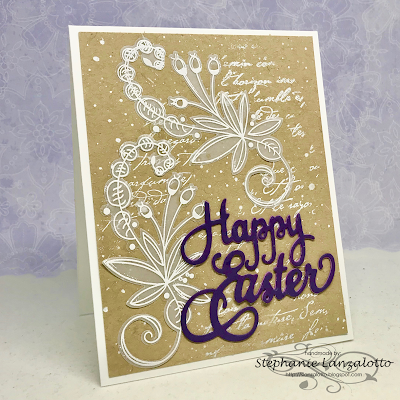
Hello Distress Oxide inks, it’s been a while 😂 This is a shadow stencilling technique and depending on the stencil you use, it can be quite subtle like it has turned out with this design.

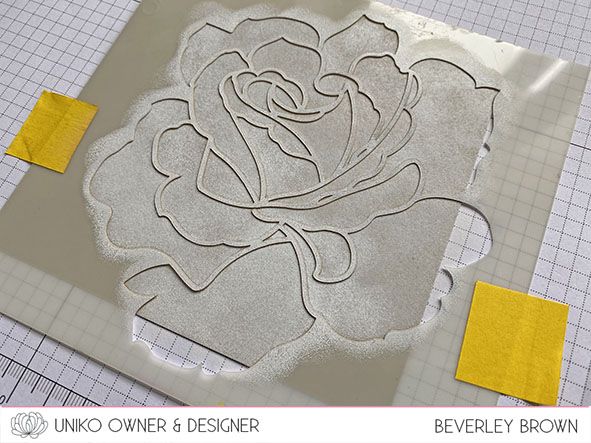
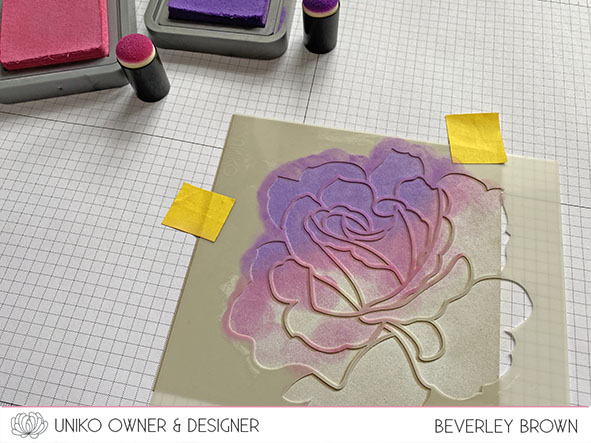
Step 1 – Kraft card base. I used a 13 x 13 cm square. Temporarily adhere your card to your work space and place the stencil where you want the design to be. Ink the design with white pigment ink until you are happy with the coverage.

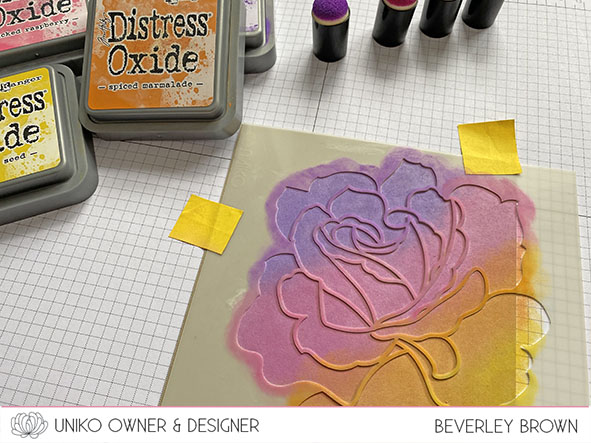
Step 2 – Remove & clean the stencil. Once clean & dry reposition the stencil leaving a small border. I moved mine up by about 1mm and across to the right by 1mm.

Step 3 – Start applying your chosen colours.

I am using Distress Oxide inks in Wilted Violet, Picked Raspberry, Spiced Marmalade & Mustard Seed. I chose DOI because I find them smoother to blend. Though for this stencil I use sponge daubers instead of a brush as the stencil has large areas with delicate stencil details that can move quite easily.

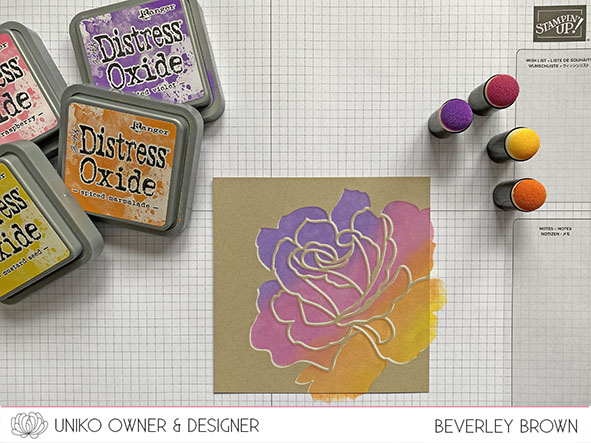
Apply the colours of ink until you are happy, and then remove the stencil.

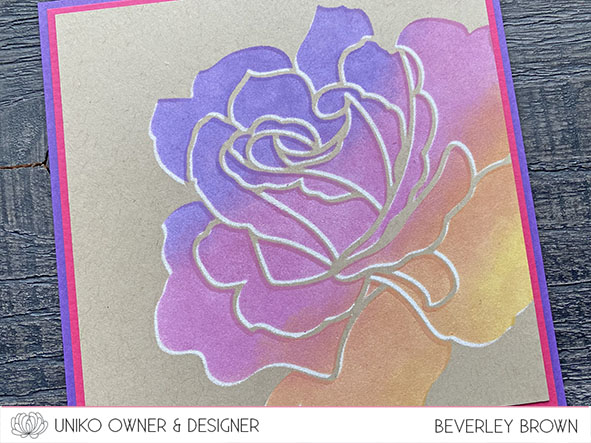
Hopefully you can see the subtle white shadow border it leaves on the design.

I kept this card sentiment free and simply mounted the stencilled piece onto a pink and purple card base.

That’s all from me today! Be sure to hop along with the Brand Ambassadors for more inspiration and I do hope you will pop by tomorrow for the next introduction.

Hannelie

Izzy 

Jane 

Julie

Rahmat

Steph


Crafty Hugs 

Uniko Challenge #64 Signs of Spring with Optional Twist Easter

 Hey!

Welcome to the March/April 2021 Uniko Challenge.


Here in the UK the days are getting lighter and even if the weather is not catching up that well we are seeing signs of Spring. So that’s the theme for our new challenge.

We’re delighted to welcome Stephanie as our guest Designer for this challenge. I’m sure many of you will know her well and been inspired by her wonderful cards. A visit to her blog is always a pleasure, find it HERE.

WOW! what a stunning card using those Uniko Originally Organic stamps on vellum and subtle French Script background.

I’ve been loving the signs of Spring on my daily walks to and from the school and The Beans have been learning about the seasons, so it is a hot topic of conversation.

I decided to give some fresh inky love to one of the Flower Power stamp sets, Flower Power #6 in particular with a sentiment from Flower Power #4.

I love using stamps I haven’t used for a while and it was a delight to use these roses and create this climbing frame.

That’s all I have to share, but be sure to hop on over HERE and see what the Brand Ambassadors have created. You will also find the link up to the challenge and all the prize details 🙂

Crafty Hugs 

Uniko Stamping Retreat!

Hey & Happy Monday!

If you follow Uniko on social media or subscribe to the newsletter, you might have seen my advert for the Uniko Stamping Retreat?!

I thought I’d pop by and share a little about the day here too 😉

{Click Photo For A Closer Look}

It has taken me a while, but I have finally found the perfection location to hold Uniko events like this Stamping Retreat!

I wanted somewhere which was close to where I live in the North East of the UK, not too big and not too small. I wanted somewhere with character and the ability to adapt to the requirements of my ideals for Uniko events. Then one day my close friend who I have got to know though having the beans and hosting play dates told me about one of her new adventures with her husband and a couple of friends and a venue their are hiring out, literally 20 minutes away from where I live. I knew of it straight away and had no doubt that it was perfect!

The Station House at Wynyard Woodlands Park…

Set in a beautiful woodland park is this old station house, which most recently was a visitor centre. As you walk in you are greeted with a space filled with character and warmth. With a spaces perfect for a hive of creativity.

I am so excited to be holding the first Uniko Stamping Retreat on Saturday 9th December 2017 10am – 4pm at this venue!

Why is it called a Stamping Retreat? I hear you ask! 

Simply because the focus of the day is on stamping with Uniko clear stamps and retreating to this wonderful location!

I didn’t want to call it a class, as that sounds to formal. The day is about being relaxed and enjoying the creative process. Whether you are an expert stamper/crafter, beginner or somewhere in between, this is the day for you.

What is involved/included?

If you ever attended one of my previous ‘classes’ at The Paperlane in Northallerton, the overall structure is similar, but I have added in some NEW things too 😉

I will be designing a collection of cards using the NEW Uniko December Release, which is based around Spring & Florals. You will receive a ‘kit’ that will contain all the instructions and materials to make 5 – 6 cards throughout the day at your own pace. I will be there to help and guide individuals as needed and I will demonstrate any techniques to the whole group at the beginning of the day.

Along with the kit there will be two individual project / technique stations for each of you to take turns, have a go and make during the day. For December these will be…

* A stencilling technique station. You will get to have a ‘play’ with some new Uniko Stencil Designs and make a card using them!

* A small MDF stamped hanging decoration.

Along with all this you will receive a Uniko Goodie Tote Bag! This will contain a FREE clear stamp set from the December Release and a few other goodies. The total worth of this goodie bag will be £10 😉

There will be optional kit purchases available, clean and simple Christmas cards using the recent Uniko October Release and a kit based on the Uniko September Release. These will be priced at £5 each.

There will also be a Uniko pop up shop of all the items available on the Uniko website! You will receive 10% off any purchases made during the day!

Does this sound FUN or what?! I can hardly wait 😉 I do hope that some of you will be able to come and enjoy this day with myself and Uniko!

For more details and to book your place pop on over HERE to the website.

Hugs