(Page 3)

Introducing… Mid Century Modern Baubles

Welcome to the fifth and final day of the product introductions for our July/August Release. 

Hopefully you didn’t miss day 1, 2 or 3 product introductions, but if you did you can catch up HEREHEREHERE and HERE.

Today myself and the Brand Ambassadors are showcasing another fun addition to the Mid Century Modern inspired products with another fun Christmas themed set, baubles! If you love the Mid Century Modern (MCM) series as much as I do, I think you will love this new addition and I am sure you will have fun pairing it with lots of the current products in this series. 

Mid Century Modern Baubles features 3 fun bauble designs and a selection of Mid Century inspired decorations. Plus, like all the MCM we’ve introduced this week you can mix and match to your hearts content with new & previously released!

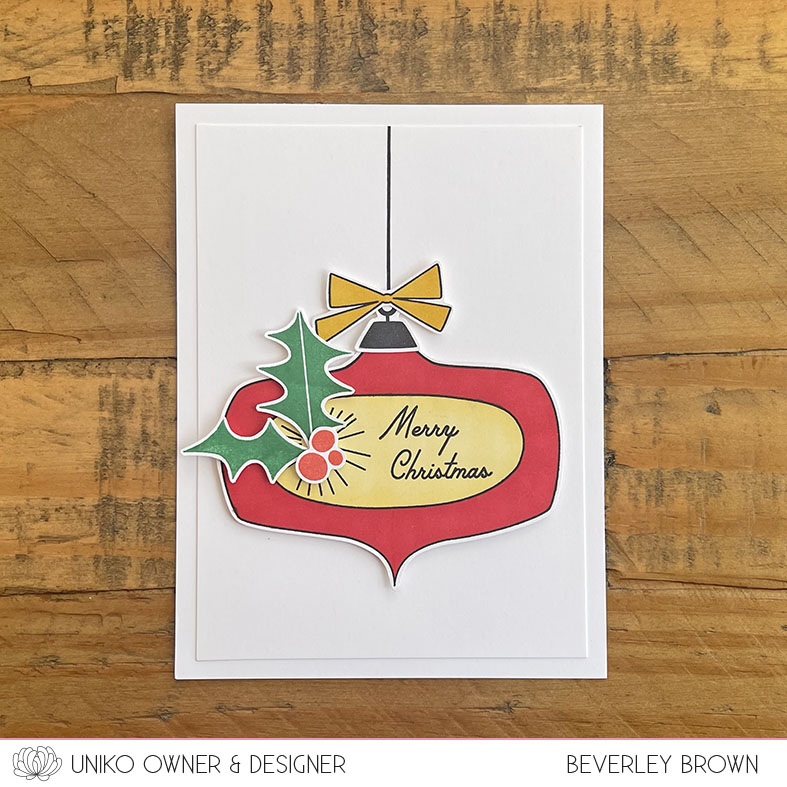
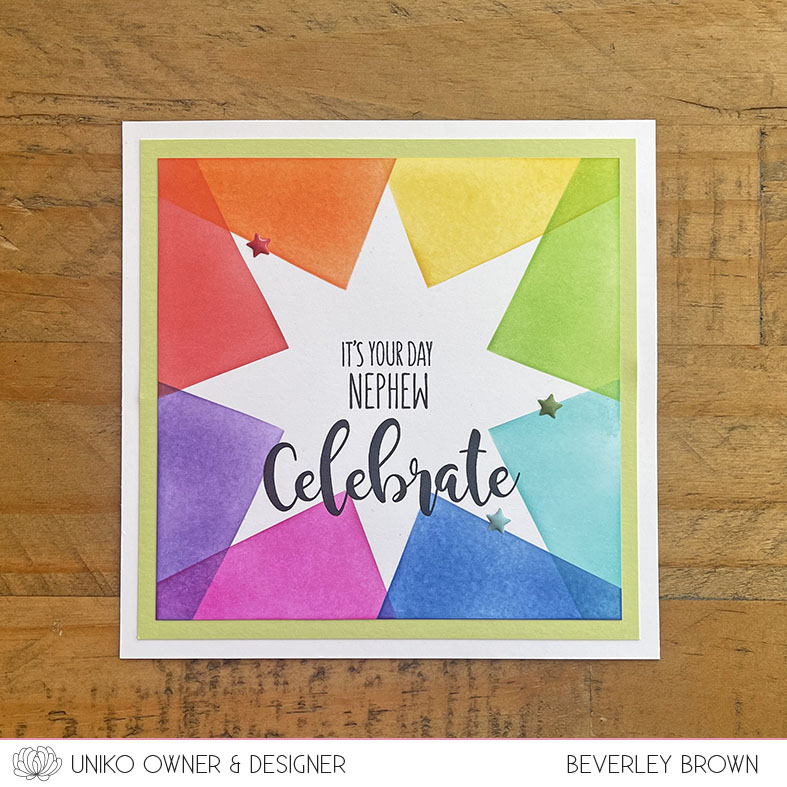
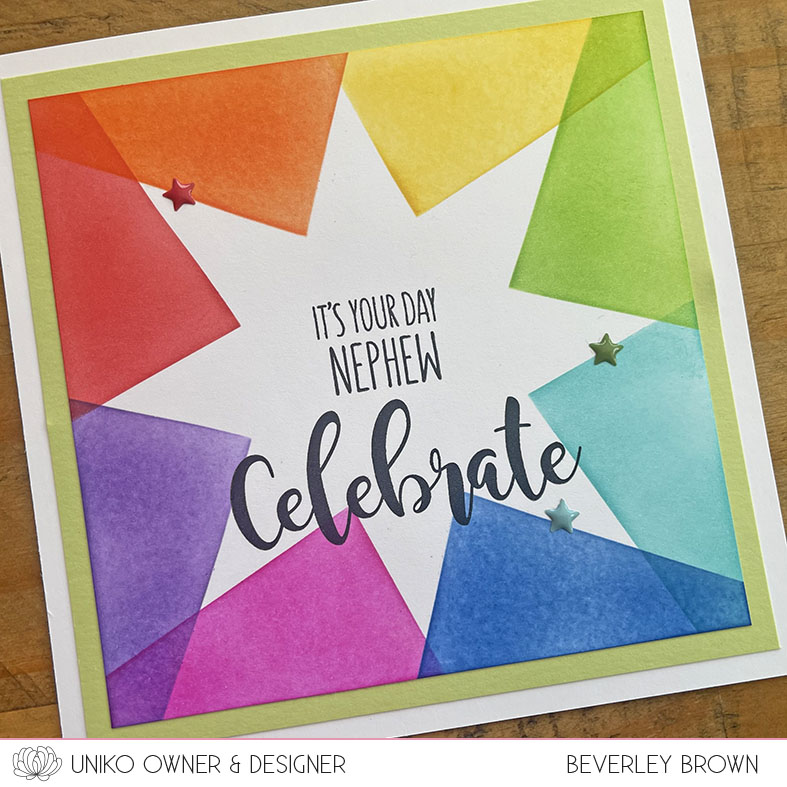
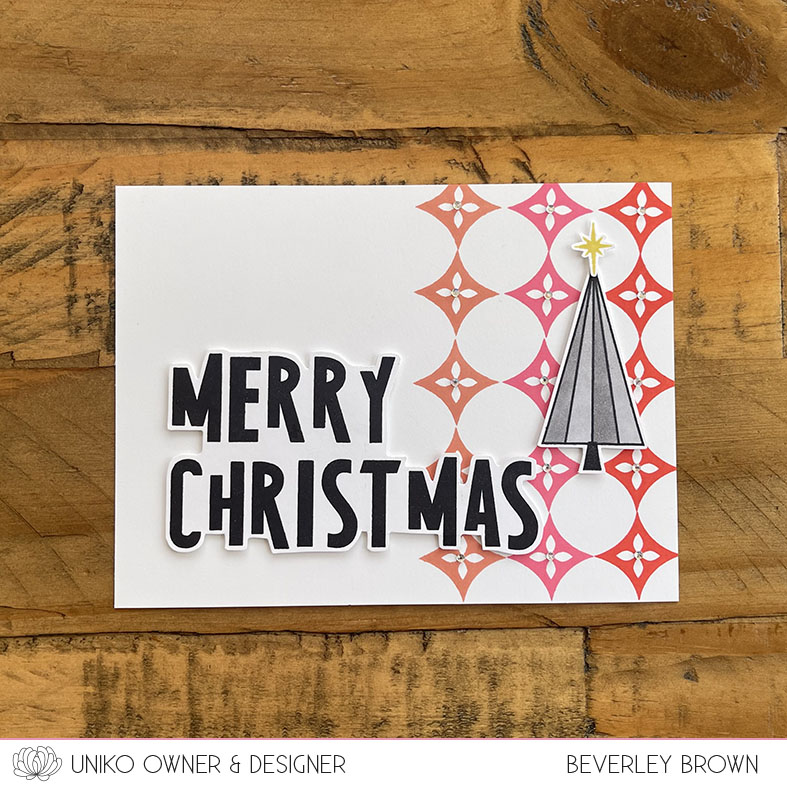
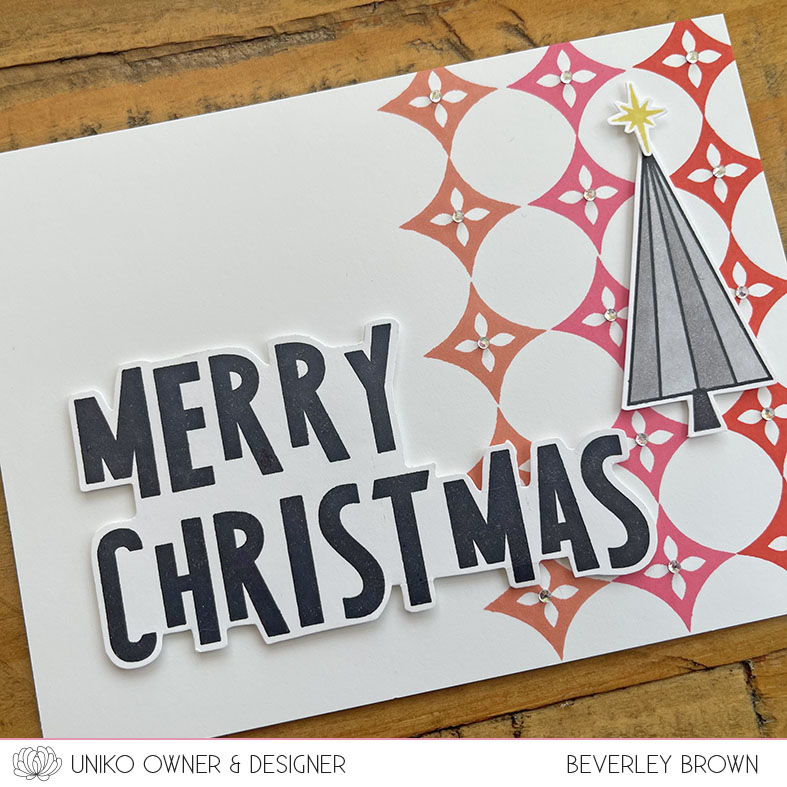
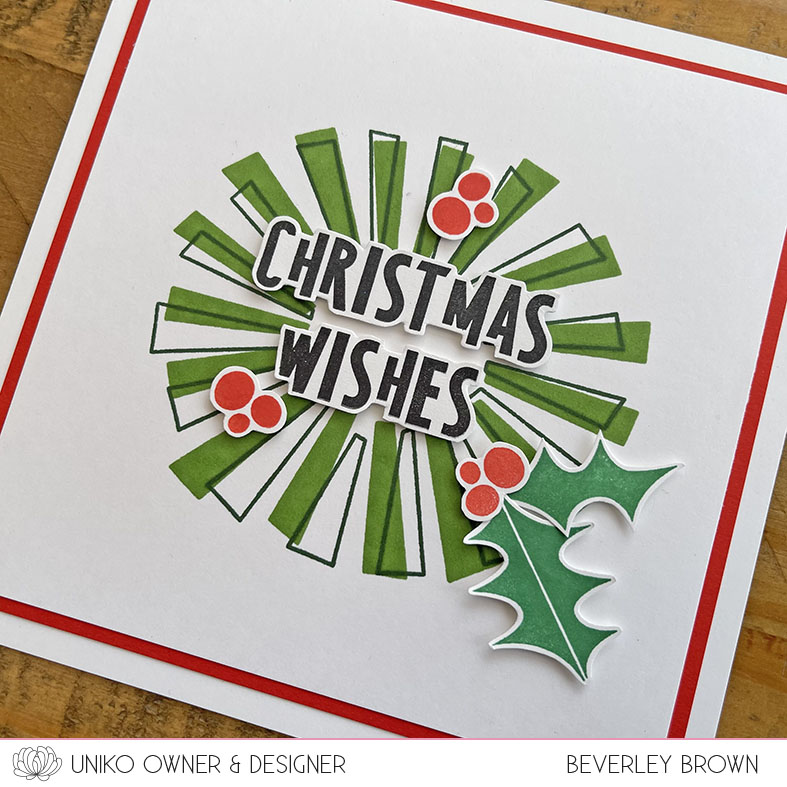
For my first card I used the larger of the baubles which I decorated with one of the oval shapes, sentiment and burst image from the set. This set contains a different bow shape to MCM Wreath Builder, but I did use the holly leaves and berries from the set.

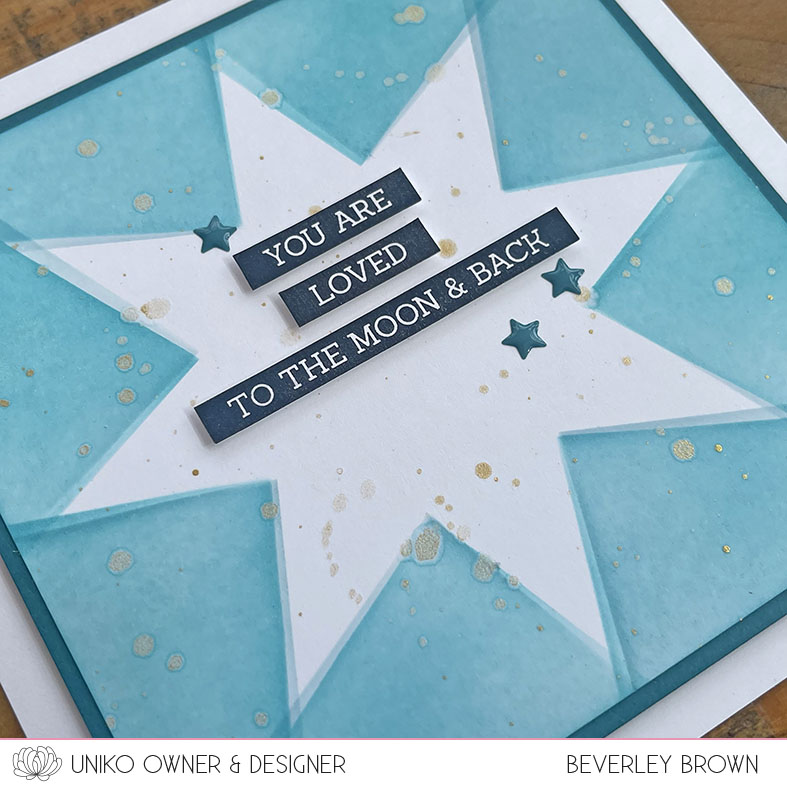
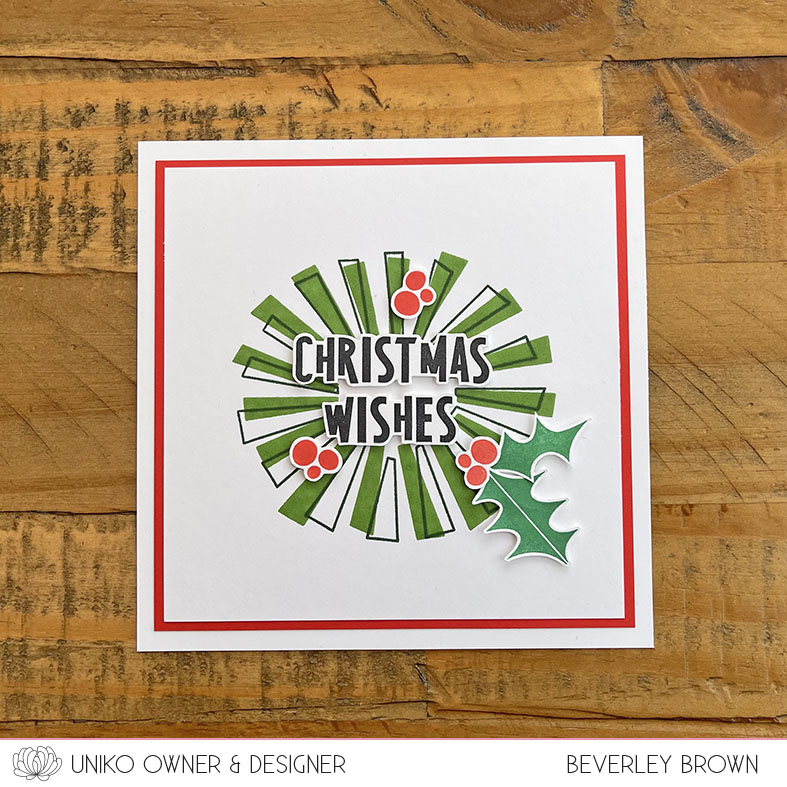
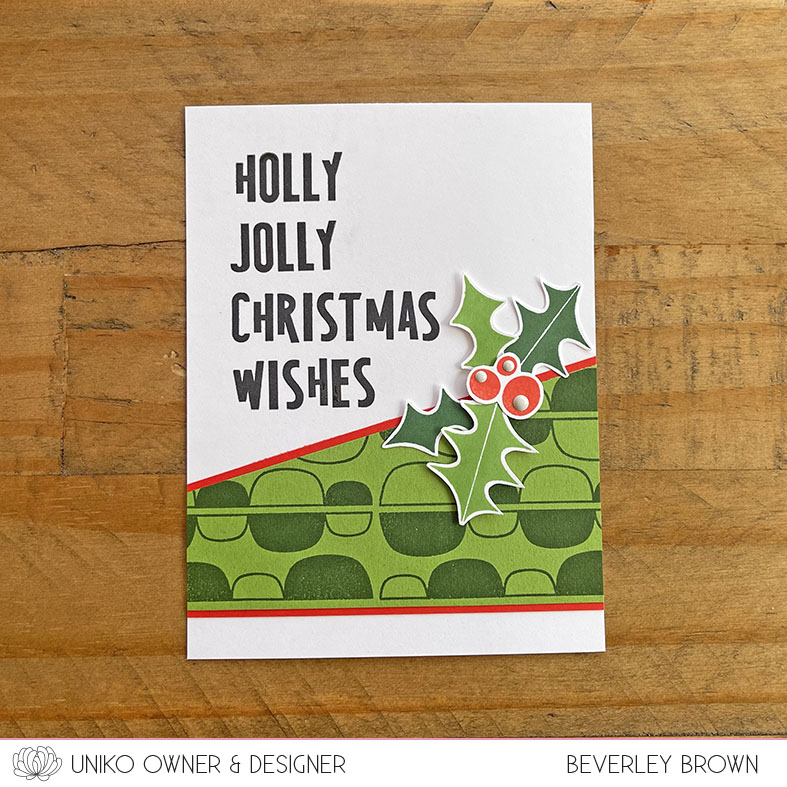
Next I decided for a cluster of baubles and used all three of the shapes on one card. This is 14 x 14cm square card base, so hopefully you can visualise the size of the baubles.

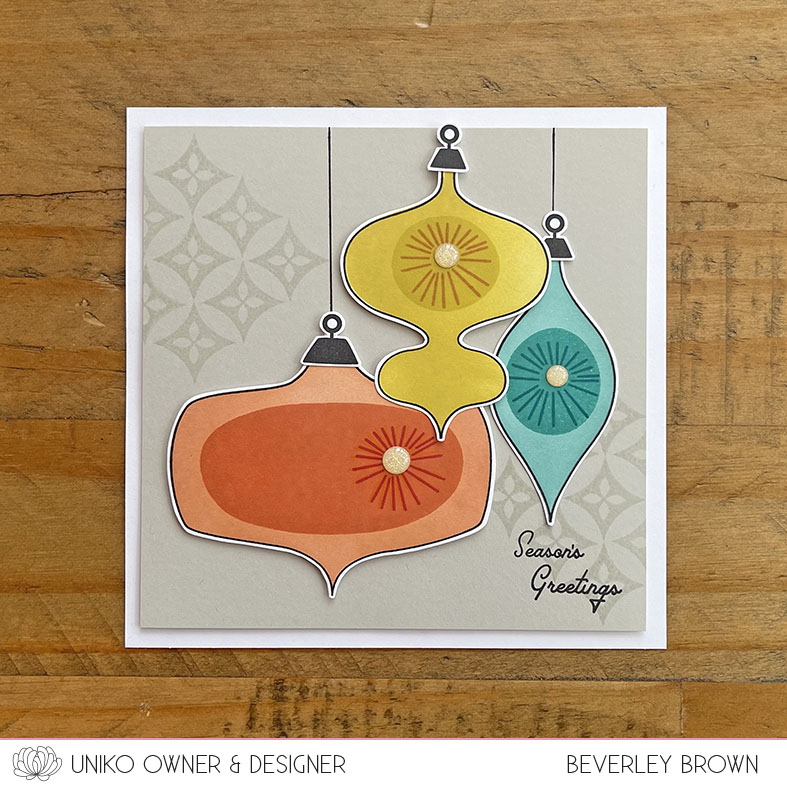
To colour this trio of baubles I created a reverse mask, so using the outline you would usually discard. I then used my blending brush to quickly colour each of them.

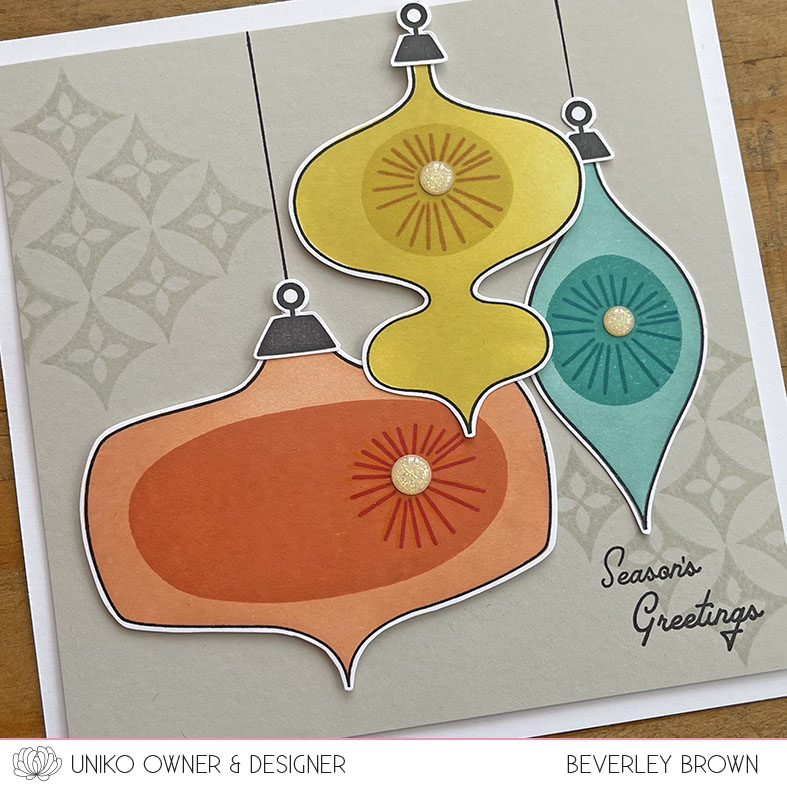
I then used the shapes and burst image to decorate. The diamond shape behind is also from the stamp set. I’ve used Pebble ink onto Pebble card stock for a tone on tone effect. The sentiment is another mix and match from the set.

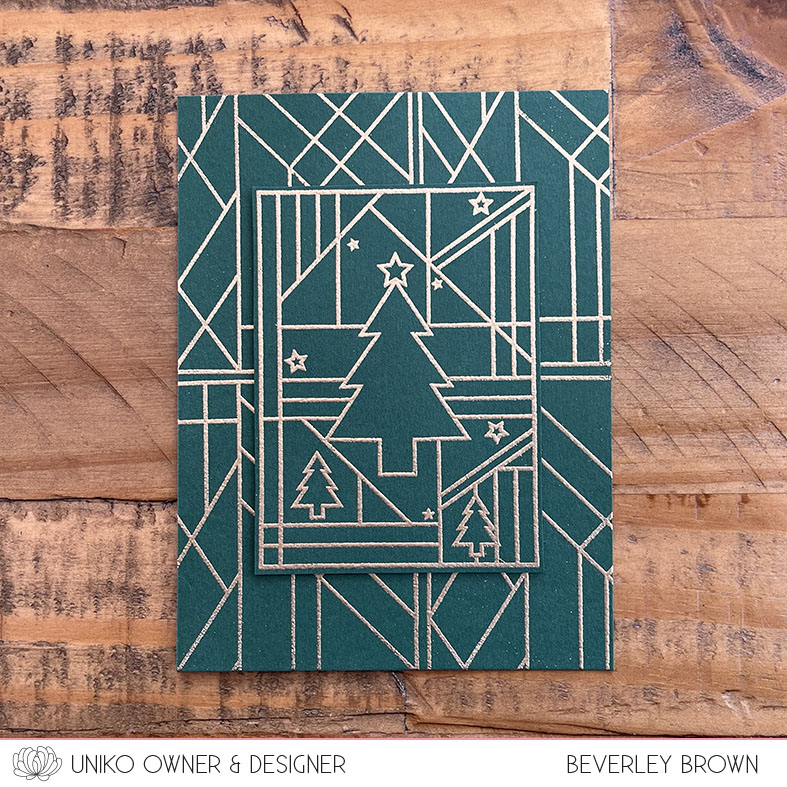
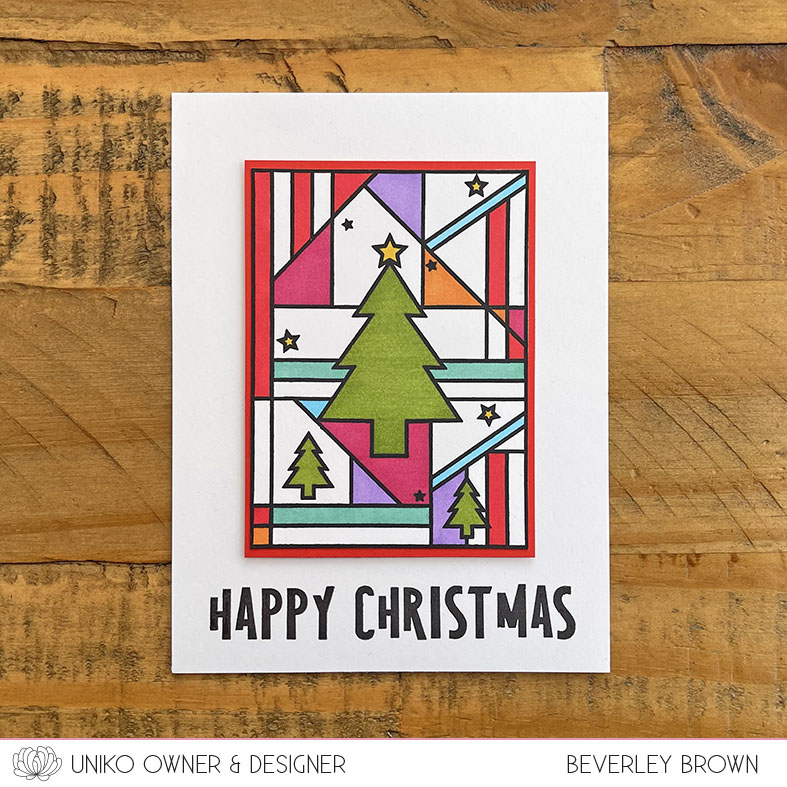
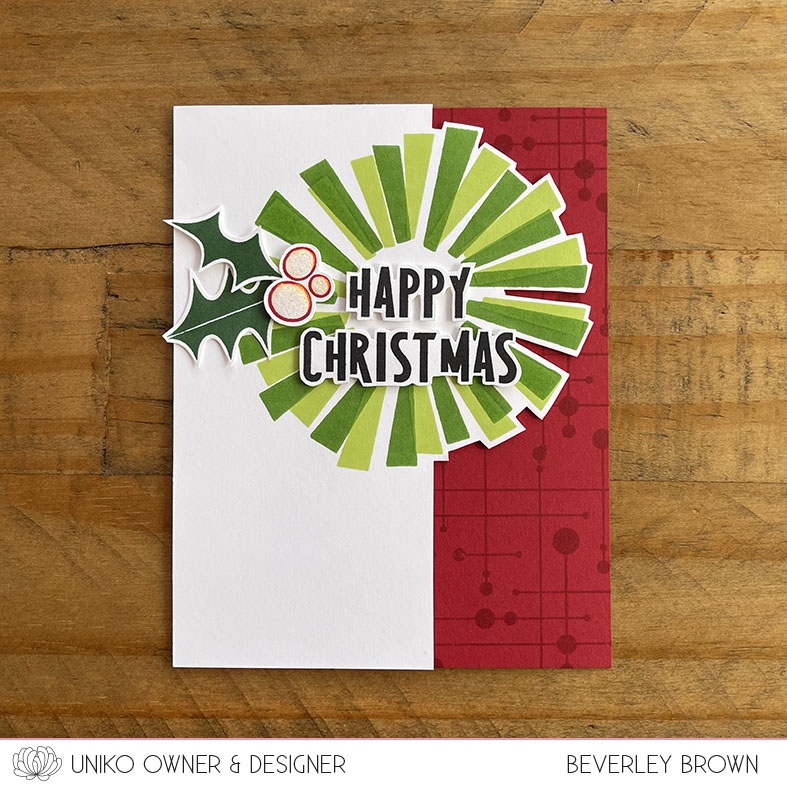
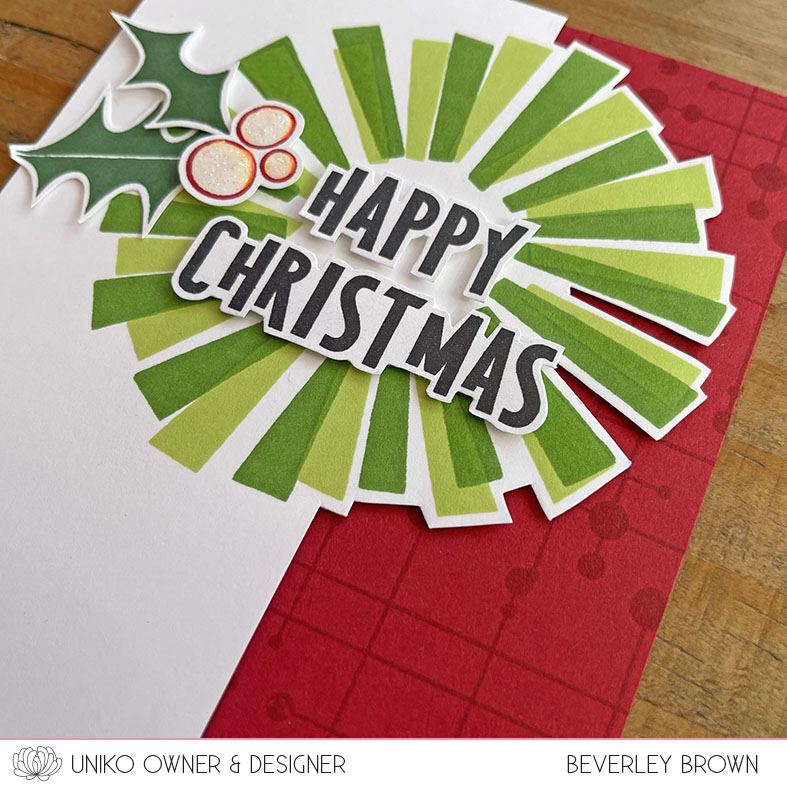
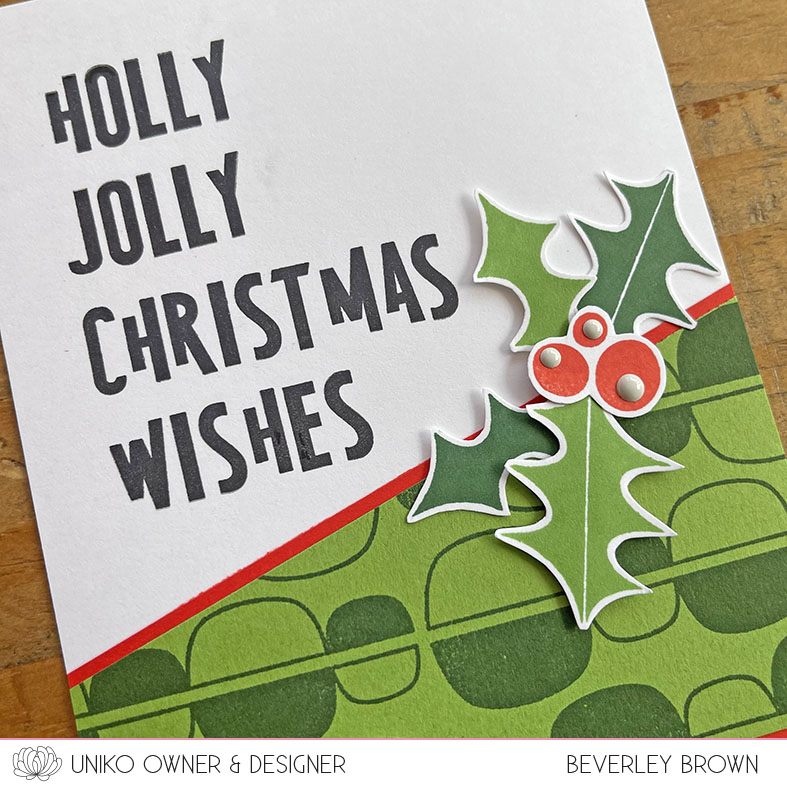
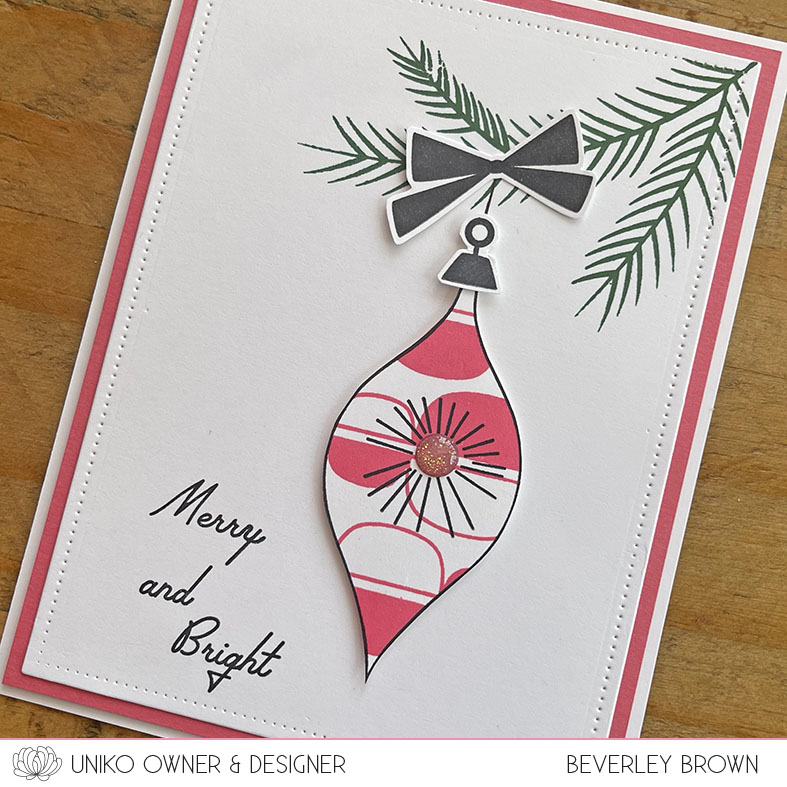
Lastly for today I wanted to pair a bauble, firstly with the pine branch from Winter Foliage and add some pattern using Background Blocks Mid Century Modern II.

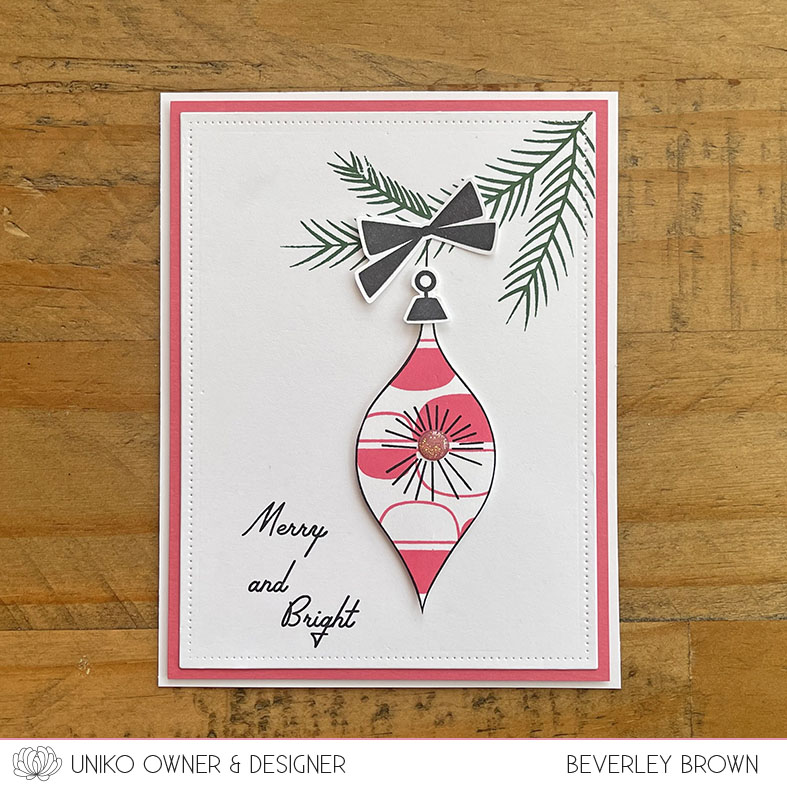
I opted for a bright Honeysuckle pink colour and appropriately added the Merry and Bright sentiment. Even though I’ve used quite a lot on this one card, it has a bit of a clean & simple look to it.

So that’s it. All of the products have been introduced, which means tomorrow is Release Day!

I’d love to know what’s on your shopping list. 

All the products will be available at 9am BST on the website HERE. I hope you will join us on the blog for our usual Reveal, Release, Brand Ambassador Blog Hop & GIVEAWAY!

Plus, I will be going Live on Facebook around 7pm BST to talk through the products and a few of the cards. As always I will save the video and share to our YouTube channel.

Crafty Hugs 

Introducing… Background Blocks Arts Decoratifs Christmas & Everyday Family

Welcome to Day 4 of the product introductions for our July/August Release. 

Hopefully you didn’t miss day 1, 2 or 3 product introductions, but if you did you can catch up HEREHERE and HERE.

Today myself and the Brand Ambassadors are showcasing a fun addition to the Art Deco inspired products with a new background block AND a new addition to the Everyday Sentiment series.

First let’s have a look at the new Background Block…

As you can hopefully see, I designed this new block to coordinate with the previously released Background Block Arts Décoratifs.

On this first card I have used the Background Block Arts Décoratifs on my Evergreen base card, heat embossing n gold ink.

I then stamped and heat embossed in gold the new Background Block Arts Décoratifs Christmas. I fussy cut the block out leaving a small border and adhered to my card using foam adhesive.

For my second card using the new block, I went colourful…

I stamped the block in black and coloured with alcohol markers. I then fussy cut the block out and adhered to a piece of Poppy card stock before adhering to my card base with foam tape. My sentiment choice is from Mid Century Modern Wreath Builder.

Lastly for today I finished the rainbow card I started during my Facebook Live demo of the Ink & Flip Stencil – Christmas Star.

The second product we are introducing today is a new addition to the Everyday Sentiments, with Everyday Family.

This clear stamp set doesn’t need a huge explanation. It contains a HUGE variety of family sentiments with some clever mix and match options to cover a variety of spelling options! Here I used the Nephew paired with a sentiment from Birthday Sentiments.

That’s all from me today.

Crafty Hugs

Introducing… Ink & Flip Stencil – Christmas Star

Welcome to Day 3 of the product introductions for our July/August Release. 

Hopefully you didn’t miss day 1 and day 2 product introductions, but if you did you can catch up HERE and HERE

Today myself and the Brand Ambassadors are showcasing a fun and in my opinion another innovative Uniko stencil. This stencil has a fun ink & flip feature and this design creates a Christmas Star.  

Enough talk, let’s have a look at the creativity and join me around Midday (BST) Live on Facebook as I demo this new stencil.

First, here is a look at the stencil…

As you can see from the product picture, it doesn’t look like much. Just 4 angled rectangles. Which, I am sure you could get creative with.

However, the concept of this stencil is to ink through, clean and then flip the stencil vertically, so what was once on the left, is now on the right. This will then reveal a star.

For my first card, I wanted to go rainbow. The sentiment I had in mind from Reach For The stars being my inspiration.

This took a little brain work to work the ink colours out. So Ideally line up your 8 colours and then start with colour 1, missing out 1 colour until you get to the point to clean your stencil & flip.

Then start with the first colour you skipped and repeat, missing the colours you’ve used. Ta dah! You then have a rainbow background and beautiful star.

My second card for today was an experiment. I wanted to see what the result would be if I inked through the stencil with my card rotated 45 degrees. And then inked again with it straight.

This is the result. It created an almost kaleidoscope effect. I only used two shades of aqua ink and I think if I were to do it again I would use 4 shades.

I also think you would get a fun result if you used a standard size card, like 10.5 x 14 cm.

I finished off may card with some Gansi Tambi gold ink splats and sentiments from Simply Said Blocks III.

If you are a visual learner, like me. I think this stencil needs to be seen in action to understand how it works. So I will be going live on Facebook around Midday (BST) today to demo the stencil.

Like before I will share the live recording on You Tube and share a link from all social platforms. I will edit and add a link to this post too!

YouTube Link HERE

Crafty Hugs 

Introducing… Mid Century Modern Christmas

Welcome to Day 2 of the product introductions for our July/August Release. 

Hopefully you didn’t miss yesterdays product introduction, but if you did you can catch up HERE. Today myself and the Brand Ambassadors are showcasing another of the new additions to the Mid Century Modern series with Mid Century Modern Christmas.

If you love the Mid Century Modern series as much as I do, I think you will love this new addition and I am sure you will have fun pairing it with lots of the current and new products in this series. 

Thos who know me well, know I get smitten with fonts and this is one that I have uniquely adapted to have a Mid Century Modern look to it is one I have added to my list.

Here, on this first card I have used the smaller version from yesterdays introduction. But you will see further along today the larger version of two sentiments contained in this small A7 clear stamp set. Along with this fun Christmas tree design.

I love a geometric too! So although this has a Christmas tree intention to it, there are lots of other uses for this stamp!

My second card shows the size difference of the sentiments. The Merry is from todays set and the Christmas is from yesterdays set.

I created a colourful cascade of the Merry and added a fussy cut Christmas in black. Then added a trio of Christmas stars.

Lastly for today I used the full large sentiment. Apologies from the get go, it appears I had my wonky eyes on when adhering the sentiment with foam tape!

The diamond square accent I have used on the background is from another clear stamp set we are introducing later this week. But I couldn’t resist pairing it with the sentiment and Christmas tree.

Another fun set to add to the Mid Century Modern collection and I am excited to see the combinations the Brand Ambassadors have come up with and even more so what YOU come up with!

Don’t forget to hop along with the Brand Ambassadors HERE.

Crafty Hugs

Introducing… Mid Century Modern Wreath Builder

Welcome to Day 1 of the product introductions for our July/August Release. 

Today myself and the Brand Ambassadors are showcasing one of the new additions to the Mid Century Modern series with this fun wreath builder clear stamp set. 

If you love the Mid Century Modern series as much as I do, I think you will love this new addition and I am sure you will have fun pairing it with lots of the current products in this series. Plus, on Release Day I will be showing more uses for this set, than just festive cards!

But first, let’s have a look at this stamp set in action…

For my first card I’ve gone for a 14 x 14 cm card base. The wreath is approximately 8.5 x 9 cm, so it doesn’t get ‘lost’ on a big card, but also fits nicely on a standard size card, as you will see.

The wreath comes in separate solid and outline stamps, but they are not the same. This is so they can be stamped layered like I have easily. Plus I think it creates interest and options with them being different.

I’ve added one of the sentiment options from the set, which I have fussy cut. Then I have embellished with some berries and the holly leaves also from the set.

For my next card I wanted to pair the wreath with some older, but much loved and ever popular Mid Century Modern products.

As you know I am a clean and simple card maker, but I love pattern too. Often it can be tricky getting balance of incorporating lots of white space and adding pattern. So to keep the balance the trick is to think about the card layout and techniques you can use to achieve the clean & simple style.

‘Some’ would say that this isn’t clean & simple. But we all have our own interpretations of the word and style and to me this fits on the upper end!

As you can see I used just the solid wheat for this card and overlapped them in Concord & 9th Sprout & Parsley inks. I then used a pencil to lightly draw a line where I wanted to cut straight and then around the wreath to reveal my base card.

I used Concord & 9th Cranberry card for the base and stamped the Background Block Mid Century Modern in Cranberry ink for a tone on tone effect. Again I have embellished with a fussy cut sentiment, holly leaves and berries.

Lastly for today I have another card pairing previously released Mid Century Modern products…

This card is sentiment heavy! I’ve used 5 of the 6 sentiments from the set on this one card! I wanted the sentiment to be the focus and the holly leaves to be the accent.

But I also wanted some Mid Century Modern pattern so opted for this layout and used Background Blocks Mid Century Modern II.

Fun, right?

These 3 cards only scratch the surface of the potential this clear stamp set holds. I know the Brand Ambassadors have worked their creative magic with this stamp set too, so be sure to head HERE and hop along.

I can’t wait to show you more of this set later in the week and coming weeks! Until then, thank you for stopping by today.

Crafty Hugs

2023 May/June Reveal, Release, Brand Ambassador Blog Hop & GIVEAWAY!

Hello, Happy Friday AND Happy New Release Day!

I’m super excited to share these new products with you and they are now officially available to purchase over HERE on the website. Hopefully you have hopped on over from HERE where I have formally introduced the new products.

So let’s have a look at what I created using them today…

I’ve been wanting to use the Bauhaus Blocks since I designed them in the Mondrian style and that was my starting point for this first card.

I tried to break out of my often uniformed lines for this card and stamped the blocks down the side on an angle.

I coloured the blocks with Copic Markers and the centre block is adhered using foam adhesive.

For my second card I couldn’t resist pairing the new Bauhaus Blocks with the Background Blocks Linear.

Again I used Copic Markers to colour sections of both the background block and the Bauhaus Block which I have adhered using foam adhesive.

Lastly for today I chose to use the Stencil – Layering Bauhaus Blocks Builder.

I fancied inking with shades of grey and I am pleased how this came out. My lighter grey layer must of had a bit of aqua left on it, so it added a slight green tint to it. But I rather like the contrast against the darker shades.

As you can see I decided to accent my card with the cat from Mid Century Modern Purrfect Day. Totally mixing up design styles here again, but they compliment each other perfectly.

That’s all I have to share here today using these new products. Be sure to leave some comment love either on their blogs or social media. I will be randomly selecting a winner to win the entire release and will announce the winner Saturday 10th June 2023.

I’ll be on the Uniko Facebook page this evening at 7pm BST demonstrating the Stencil – Layering Bauhaus Blocks Builder. I hope to see you, but if you can’t make it, I will post the recording to catch up later.

Crafty Hugs

Introducing… Stencil – Layering Bauhaus Blocks Builder

Welcome to the FINAL day of the product introductions for our mini May/June Release. 

Hopefully you have hopped on over from HERE where myself and the Uniko Brand Ambassadors have formally introduced the newest layering stencil, Layering Bauhaus Blocks Builder.

You might notice the common newest feature that I have incorporated into Uniko Stencil more recently. The option of a focal point or building to fill a larger space. Having the layers makes it a little more complex, but it it still super easy to achieve an all over pattern. 

I will be going LIVE over on the Uniko Facebook Page on Friday to demo this stencil. But until then, let’s see this beauty in action…

For my first card today I opted for the focal point option using all 3 layers of the stencil. I am loving this Aqua Sky, Grapefruit & Buttercup colour combination.

I then decided to embellish the card with a Mid Century Modern Florals flower stamped in Oceanside and Marmalade ink. The sentiment is another from yesterday’s introduction, Bauhaus Blocks.

Lastly for today I felt I needed to show the stencil filling a whole panel.

This time I opted for my usual bright colour scheme of Honeysuckle, Oceanside and Buttercup.

This time with the bright colours I felt the card required a bold statement sentiment. I used the Smile die from the Exclusive Uniko CraftStash Collection, only available HERE over on CraftStash. I then accented it with the ‘Just Wanted To Say’ sentiment block from Simply Said Blocks III.

A wonderful addition to the Uniko Stencil collection, don’t you think?

So there you have it. We have formally introduced all of the products in this mini release. I do hope you will join us tomorrow for the Reveal, Release, Brand Ambassador Blog Hop & GIVEAWAY! Plus, all the products will be available on the website at 9am BST. 

Crafty Hugs

Introducing… Bauhaus Blocks Clear Stamps

Happy Wednesday & Welcome to Day 2 of the product introductions for our May/June Release. 

Today myself and the Brand Ambassadors are showcasing a new clear stamp set called Bauhaus Blocks. If you’ve been here at Uniko for some time, you will know that I am inspired by a lot of design period styles.

One of my most recent obsessions is Bauhaus! Hence the clear stamp set being introduced today…

The name of this clear stamp set literally says it all, Bauhaus Blocks. It features 5 block designs and 4 sentiment options in this fun font.

I’ve used 4 of the blocks on this first card choosing a colour combo I came across during my research. A little unusual from my usual ‘go to’ colours, but I rather like it.

Next up I kept with the same colour scheme, but opted for a single focal point card.

I die cut a square window to expose my dark grey card base. I’ve then stamped, coloured and fussy cut one of the squares to put inside.

The white frame panel is adhered using foam adhesive & I’ve popped a sentiment from Simply Said Blocks on with foam adhesive too.

That’s all from me today. I can’t wait to share more using this stamp set and I know the Brand Ambassadors have worked their magic with it, so be sure to hop along with them all HERE.

We will be back tomorrow with more to share. This clear stamp set, along with all we are introducing this week will be available on Friday 2nd June 9am GMT. 

Crafty Hugs 

Introducing… Stencil Flower Power #4

Welcome to Day 1 of the product introductions for our May/June Release. 

Today myself and the Brand Ambassadors are showcasing the newest addition to the Flower Power Collection with the Stencil – Flower Power #4.

Hopefully you have hopped on over from HERE, the start of the hop and all the links to the Brand Ambassador blogs. Definitely not to be missed with all their creative inspiration.

Now, here’s how I have used the new stencil..

So this stencil is a blown up version of the Flower Power #4 clear stamp outline flower and so I decided to use the April Showers Bring May Flowers sentiment from the set. I think to complements the bold floral beautifully.

I finished off the card with some subtle sparkly splatters and some enamel drops.

For my second card today I opted for another partial inking design and a little bit of rainbow.

I love an angle, so that’s what I decided to do here. I then adhered it to this lovely Concord & 9th Pebble card stock base to really make those rainbow colours pop.

The smile die cut is from the Exclusive Uniko Collection with CraftStash HERE. I’ve used my usual trick of layering up a couple of die cuts to add a slight bit of dimension.

That’s all from me today.

We will be back tomorrow with more to share. This stencil, along with all we are introducing this week will be available on Friday 2nd June 9am GMT. 

Crafty Hugs 

Simply Cards & Papercraft Feature Plus FREE Digital Downloads.

Hello & Happy FriYAY 🎉

Earlier this week I was delighted to receive my copy of Simply Cards & Papercraft issue #244 in the mail. I am always excited to see Uniko in print and again I have designed a fabulous collection of FREE digital images for you all to use.

If you love Uniko’s Paradise Collection as much as me, then I think you will enjoy this Tropical Bouquets digital collection too.

Here is a peek at the feature in the magazine and a full look at one of the cards I have made for the feature using the images. 

The FREE Digital Collection can be downloaded by visiting CraftWorld HERE.

I hope you enjoy using them and if you are on social media, please tag @unikoltd so I can see them or why not join Uniko’s Facebook Group Uniko Ltd and share your makes in there. 

And how about a little Giveaway. 


I’ve an extra copy of the magazine to give to one lucky comment left on any of Uniko’s posts across all social media, sharing the news about this collection. So if you follow Uniko on Instagram and Facebook as well as the blogs, you have even more chances to win! 


Simply leave a comment before midnight Friday 19th May 2023 and I will randomly select a winner and announce Monday 22nd May 2023.


Crafty Hugs